|
|
|
#26
 06/12/2006, 05:23 PM
|
|||
|
|||
|
I GOT MY SHIPMENT!
Finally! And just in time. The people at the post office must have been pretty sick of seeing me walk in to check my box and walk back out with my tail between my legs when I didnt find my package notice. Anyway, on with the pics! Get ready for the craziest display of plumbing youve ever seen. My brother said my close loop looks like the international space station. I have a Sequence Dart being fed by a 2 pipe. The dart flows through an oceans motions super squirt. I put a bypass below the squirt so I get as much flow as I can out of the Dart. Here are some pics of my plumbing skills (or lack there of.) 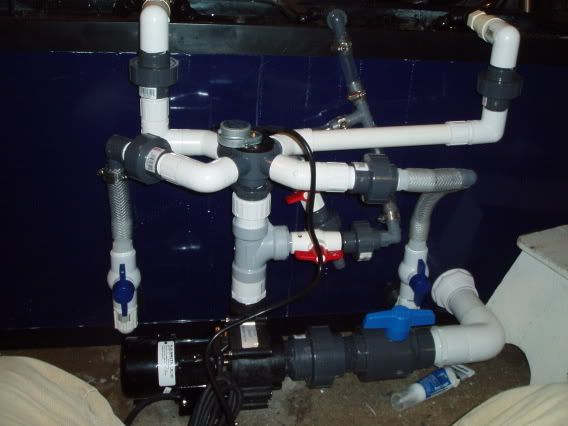 and from the top 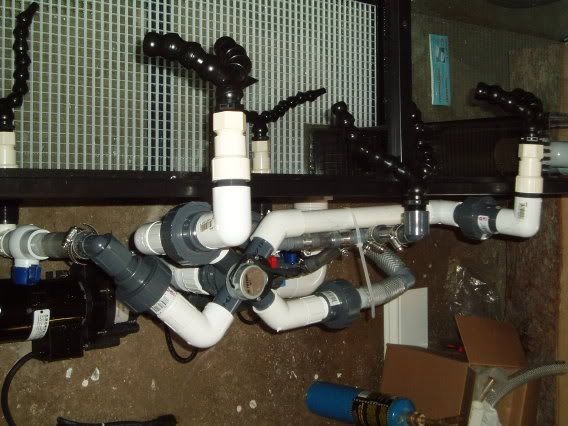 and the front 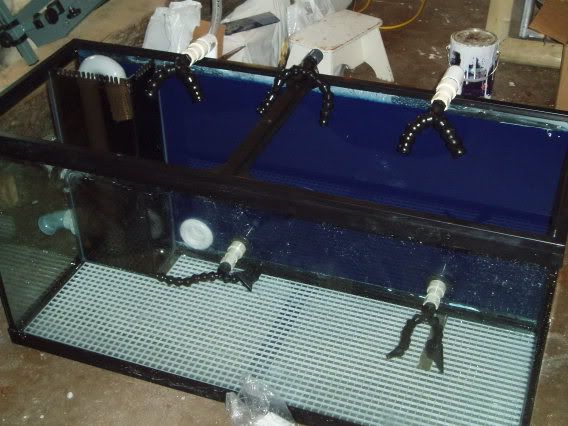 whoever invented loc line must be rich. Its perfect for a close loop.
__________________
I'm not as think as you stupid i am |
|
#27
06/12/2006, 05:24 PM
|
|||
|
|||
|
Heres an invention that probably wont make me rich, but I think its a good idea anyway. I was worried about sand being sucked into the close loop and ruining my dart and squirt, so I made this little guard out of acrylic and topped it off with plastic mesh. It will cover up the close loop intake.
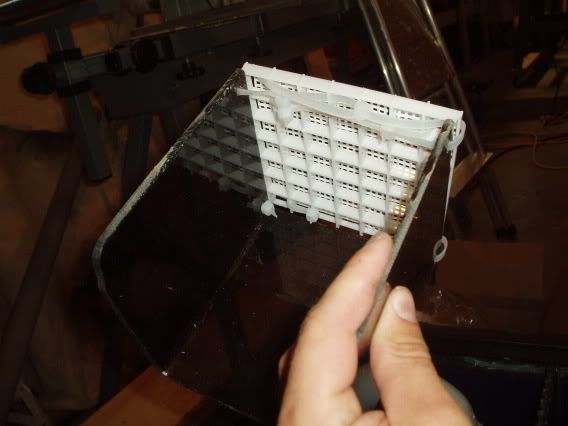 I made a little strainer out of plastic mesh and zippy ties to protect the 2 bulkhead used as the close loop intake. 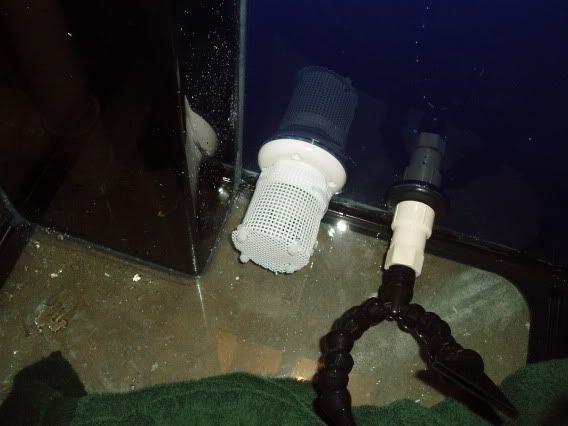 and fitted like so. After I test the plumbing, I will silicone this thing in. I think my fishies will be safe from a ride though the plumbing. Should keep the sand out of there as well. 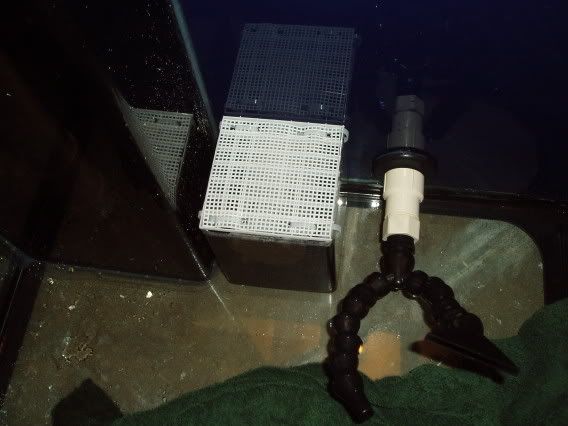
__________________
I'm not as think as you stupid i am |
|
#28
06/12/2006, 05:30 PM
|
|||
|
|||
|
Heres some shots of the canopy sitting on top.
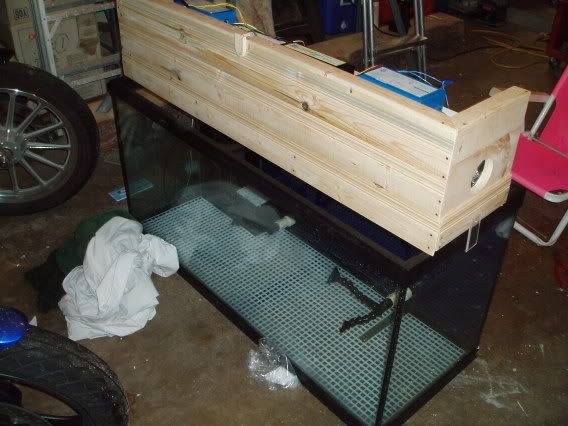 my fans wouldnt fit because the close loop returnes running over the top of the tank were in the way, so I had to take them off. Ill fine another place for them , maybe closer to the middle. 
__________________
I'm not as think as you stupid i am |
|
#30
06/12/2006, 07:44 PM
|
|||
|
|||
|
in a later post i will explain why i am putting eggcrate on the bottom in a little more detail, but basicallly i am using it to help support the rock and protect the bottom of the tank. i will be using a sand bed
__________________
I'm not as think as you stupid i am |
|
#31
06/20/2006, 09:32 AM
|
|||
|
|||
|
I water tested the tank the other day with the close loop running
 It worked great! The dart defiantly provides more than enough flow for the 90. the Squirt four way keeps the currents flowing randomly as well. I was watching some little pieces of saw dust in the tank wiz around, and I think my fish are going to enjoy it. I had allot of fun tinkering with the mod pipe. 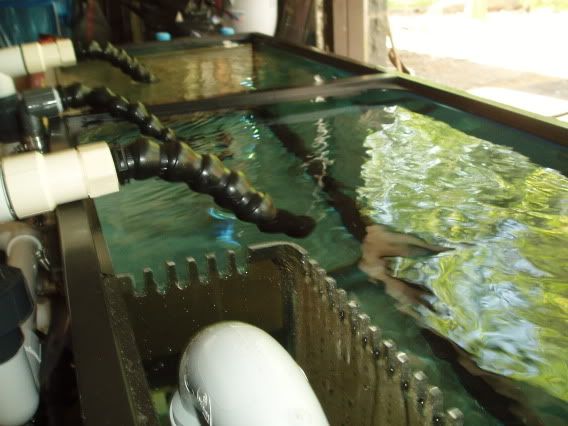 Plenty of surface agitation. Heres a cool shot showing some of the different flow patterns generated by the different nozzles. 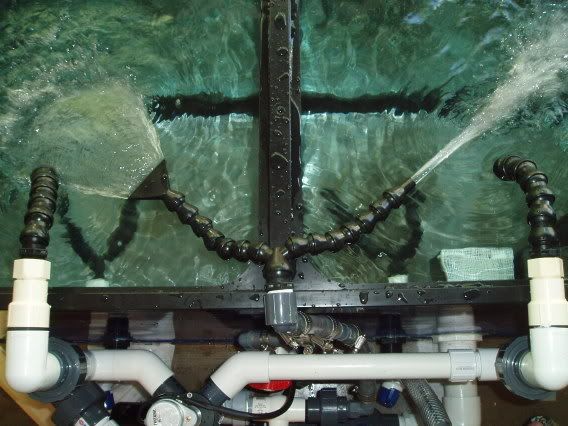 Listening to the water all afternoon kind of made me have to go to the bathroom.  
__________________
I'm not as think as you stupid i am |
|
#32
06/20/2006, 09:35 AM
|
|||
|
|||
|
the squirt takes almost exaclty a minute to do one full rotation. I tried to take these videos of one of the lines shooting into the water during its rotations. hope they work
 
__________________
I'm not as think as you stupid i am |
|
#33
06/20/2006, 11:07 AM
|
|||
|
|||
|
wow thats alot of flow.
The screen over the intake and the box of the closed loop may get clogged up. Just something to keep an eye on as you might have to clean it once and a while. Nice work. keep it up!
__________________
-- Bob |
|
#35
06/23/2006, 03:18 PM
|
|||
|
|||
|
Now. We left off with the tank sitting in the garage full of hose water. Ive got allot done since then, but I will take things in a step by step fashion so you dont miss a beat
 . .So Ive had a bunch of questions about the egg crate in the bottom of the tank. I had mentioned I would talk a little more about why I am putting it in there, and heres my explanation. What I am attempting to do is create an anaerobic water layer underneath the sand bed that will (hopefully) reduce or eliminate nitrate. Nitrate is reduced to nitrogen gas only under anaerobic (without oxygen) conditions because the bacteria responsible for this cannot tolerate oxygen. I cut several ¼ pieces of pvc pipe that I put underneath the egg crate to hold it off the bottom of the tank. 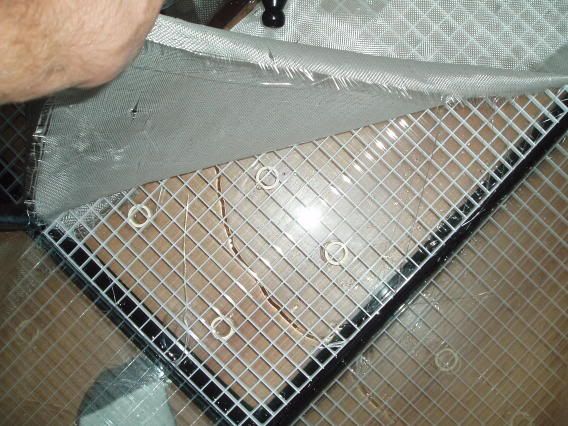 I then put a sheet of fiberglass over the egg crate. This will keep the sand from sifting through the egg crate.  finally I covered the whole thing with sand. I used a mix of caribsea fine grain sand, and some of the crushed choral substrate I had left over from the 33 gal tank. there is about 65-70 lbs of sand in there now.  Im no sure if the sand bed is deep enough to actually keep the water with high oxygen content from filtering down into the sub sand bed area that is supposed to be low in oxygen, but I can always add more sand if I detect nitrate.
__________________
I'm not as think as you stupid i am |
|
#36
06/23/2006, 03:18 PM
|
|||
|
|||
|
Aside from the sand bed, I also moved the old tank and got the new one up on the stand! This was a bit of an ordeal, and the next time I upgrade (lets face it, its inevitable) Im going to build a new stand so I only have to move one tank at a time. Anyway, heres a photo journey of the tank moving process:
My last shot of the old 33 gal. looks a little rough doesnt it.  bit of a mess  The plan was to siphon the water and move all livestock into a Rubbermaid tub on the floor which acted as a temporary holding tank.  and here we are with the 90 gal up on the stand! 
__________________
I'm not as think as you stupid i am |
|
#37
06/23/2006, 03:28 PM
|
|||
|
|||
|
I filled the tank up with water and added the salt mix and let it run with the close loop and lights on for a few days. This shot is from the first night. I got a good deal on a Ushio 250W 10000k bulb (on the left), which has a kind of greenish glow to it. on the right , I have a used 10000k Coralife bulb that I am using temporarily until I get another Ushio. The color contrast is really obvious when the water is cloudy
.  heres a shot of the business end of the canopy. As I said, Im using 2x250W MH bulbs (icecap ballasts) and two 3 VHO actinic bulbs. 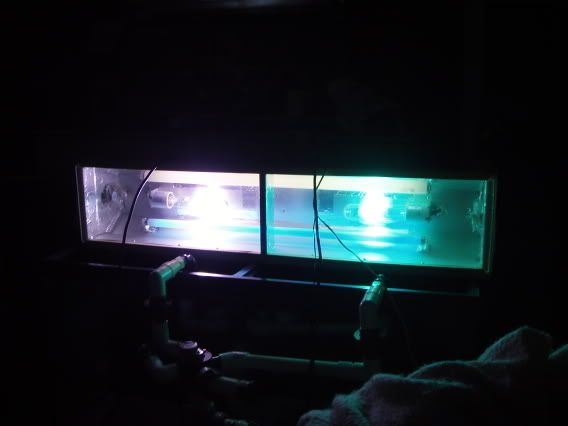 Heres a shot taken a few days later once the water cleared. Now that the salinity is a little higher, I hooked up the main circulation pump so the water flows through the sump/fuge. This, along with the mature sand from the old tank, should reduce the nitrogen cycle time to just a few weeks (or days hopefully).
__________________
I'm not as think as you stupid i am |
|
#38
06/23/2006, 03:40 PM
|
|||
|
|||
|
So, a few days have passed and Ive been checking my water regularly. Everything is in check! Salinity matches that of the holding tank the fish and chorals are in. Ammonia, nitrate and nitrite are undetectable, pH is 8.4 and salinity is normal. The time Ive been waiting for since I started the project has come, and Im ready to put my livestock into the new tank!
After acclimatizing the fish and chorals, I added them one at a time to the display, after I finished the rock work. The rock works didnt take much time, I pretty much just piled it up. I am really happy with how it looks. This is all the rock I had in the old tank. there is about 50 lbs or so. I was thinking Id like to add another 50, but after seeing what it looks like, I think I may only add another 20 or 30 lbs. I dont really want a heck of a lot of rock in this tank so the fish have plenty of swimming room. Anyway, on with the first full tank shot 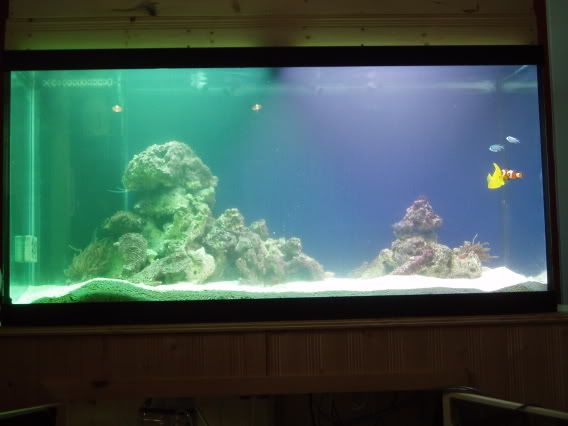 the water is still a touch cloudy, but I am still really happy with it.
__________________
I'm not as think as you stupid i am |
|
#39
06/23/2006, 03:41 PM
|
|||
|
|||
|
Looks awesome dude, I wish I had planned for a closed loop when I was putting up my 90 but I didn't think about until it was too late! This is my first salt tank, next time!
Anyway, keep up the awesome work man.
__________________
"Two things are infinite: the universe and human stupidity; and I'm not sure about the the universe." Albert Einstein |
|
#40
06/23/2006, 03:43 PM
|
|||
|
|||
|
A made a few videos so you can see the display the way I do. The fish seem quite happy in their new home. These videos were taken about an hour after I transferred them into the tank, they dont show any sings of stress at all. They also happily accepted a well deserved brine shrimp meal.

__________________
I'm not as think as you stupid i am |
|
#41
06/23/2006, 03:46 PM
|
|||
|
|||
|
and video # 2

__________________
I'm not as think as you stupid i am |
|
#43
07/25/2006, 12:04 PM
|
|||
|
|||
|
Here's an update, for those of you following allong,which i'm sure there are many. The new tank has been running for about 4 weeks now. I added some more rock which looks pretty cool i think, although i'd still say that i'm a novice when it comes to aquascaping. I didn't use any cementt or apoxy, everything is just stacked up o-natural. You can probably see from the pic that it is going through a bit of a diatom and hair algea phase, which is pretty grose, but normal for a new tank. I really hope it clears up quick cause i'm getting a little sick of cleaning it. I should be getting my new skimmer in later this week, allong with an RO/DI unite. I'm going with the ASM G3 that i will modify into a recirculating skimmer. I'm also going to tear down my sump and build a smaller one to free up some room under the stand, but I won't get into that now. I'll be sure to post plenty of pics when it happens. anyhoo, on with the pic

__________________
I'm not as think as you stupid i am |
|
#44
07/25/2006, 12:05 PM
|
|||
|
|||
|
sorry about the flash, my camera sucks
__________________
I'm not as think as you stupid i am |
|
#45
07/25/2006, 12:21 PM
|
|||
|
|||
|
it all looks great, but why the color difference in the 2 MH bulbs? are they different spectrums?
__________________
Nothing good happens fast in this realm of underwater landscaping, only time will allow your reefkeeping and livestock to flourish! |
|
#46
07/25/2006, 01:03 PM
|
|||
|
|||
|
You sure that Ushio is behaving properly? I used to run a 10k ushio and I dont remember it having a green appearance (even with a miscalculated white balance).
I now run 14k Ushios; very happy with them. More 10k than the 10k's ever were. |
|
#47
07/25/2006, 01:21 PM
|
|||
|
|||
|
Hey Kong, are Ushio's better than BlueLines?
__________________
Nothing good happens fast in this realm of underwater landscaping, only time will allow your reefkeeping and livestock to flourish! |
|
#48
07/25/2006, 07:26 PM
|
|||
|
|||
|
i'm not quite sure whats up with the ushio. i got it cheap from a guy that said it was shipped to him accidently. the bulb on the right is a used 10000k XM bulb. I kinda ran outa money when it came time to get the bulbs. eventially i'll get a set of new bulbs. i'm thinken 12000k reeflux
__________________
I'm not as think as you stupid i am |
|
#49
08/01/2006, 07:32 PM
|
|||
|
|||
|
So Ive been busy! I made lots of progress on the tank in the last week. First of all, I totally re-did my sump. The old one was a 40 gal tall tank and it was really tricky to get in and out of it, and it was a bit of a grimey mess, so with my new skimmer coming, I decided to re-do the whole thing.
Here she is:  I took a relatively economical approach. Instead of buying a large new tank and baffling it out, I put two old 10 gals side by side and joined them up with a bulkhead. Beside those, I bought a 7$ recycling bin. The bin probably holds about 10 gallons or so (full). It was made from pretty hard plastic, and didnt bow when I filled it up. Im going to use this as my skimmer box because it has a pretty bug footprint (14x13) which should be plenty for the ASM G-3 that I have coming.  The 10 gallon tanks gave me a bit of trouble when I drilled them. The drilling went fine I should say, but when I went to stick the bulkheads on I got a bunch of cracks. The cracks had me worried for a while, but after silicone them up and water testing them I decided they were good for a trial run, and they passed with flying colors. Not a single leak when I tested out all the plumbing.  One of the 10 gals Im using as a fuge which has a deep sand bed and cheato growing under a daylight bulb. Ill add another bulb and grow xenia on the other side (at least thats the plan) because it has such good phosphate absorbing capabilities. The other 10 gal is simply there for water changing purposes. As you may be able to make out from the pic the return line is split to a garden hose behind a ball valve that I throw out the window when it comes time to change the water. The return pump simply pumps the water out of the 10 g tank (more like 12 gallons because it sucks a few inches out of the fuge as well) so I know exactly how much salt water to make up for my water change.
__________________
I'm not as think as you stupid i am |
|
#50
08/01/2006, 07:40 PM
|
|||
|
|||
|
Heres a pic of the return pump Ive been using. Not quite sure what it is exactly, I bought it off of ebay for 35 bucks. It runs cool and quiet and when I opened it up after I took my old sump down it looked good as new. Probably puts out about 500 gph with 4 head pressure.
 And heres my float switches for the auto top off circuit. I bought an auto top off kit from floatswitches.net and I love them. Very reliable. I was using them with my old sump for about 4 months with no problems. For the new sump I made a nice new acrylic bracket. 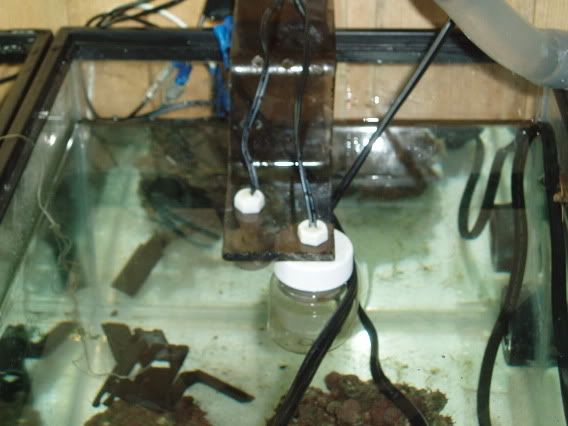
__________________
I'm not as think as you stupid i am |
|
|


 Linear Mode

