|
|
|
#1
 04/29/2006, 09:47 PM
|
|||
|
|||
|
It's official. My 2' cubish tank has FINALLY started. Scott from Aquatics System design is building my new tank. It is 24" x 24" x 16" acrylic tank. It will be run as an open top.
  The main focus of this tank was to have to equiptment visible anywhere. I believe I have sucessfuly done this. All the cl returns will be hidden under the rockwork and will be directed via loc line. The cl pump is a Little Giant 4 MDQX-SC - 1225 GPH @3'. My sump is 24" x 24" x 17" where my Coralife Super Skimmer 65 will he house. I know this skimmer is small for this tank, but it is going to have to work for now. I will have two heaters in the sump, but I have not decided which ones yet. My return pump will be a Mag 3. I am not wanting to have a high flow through my sump. I am trying to keep this tank very quiet as it will be in my bedroom.  The lighting for this tank with be a diy hood/pendant that will be suspended above the tank. My lighting is a 250w PFO ballast with a 10k Xm bulb. My supplementation is 2 24" URI superactinics powered by an IceCap 440 ballast. All of my equipment will be controlled by my new Aquacontroller Jr. It will be set up to use Aquanotes and will be fully controllable via the internet. I started construction of the stand today. The stand is 36" tall, 25" wide, and 30" deep. The stand was framed with 2"x4" studs with 1/2" plywood on the bottom and doubled up 1/2" plywood on the top. On the top the rear joist was notched to accommodate the drain and return in the overflow box. The entire frame will be painted wit several coats of white primer. The stand will be finished in oak and stained with cherry stain. I will apply quite a few coats of polyurethane. I have not decided if I am going to purchase premade doors or make my own, but I am leaning toward buying them at this time. It will just be one less thing I have to make.    I do not think I will get anymore work done on the stand till the end of next week. It is finals weeks at the University of Missouri - Kansas City and I need to study for my Differential Equations, Dynamics, Circuits, and Therodynamics finals. |
|
#2
05/04/2006, 11:19 AM
|
|||
|
|||
|
Looks good !
Are the closed loop returns drilled on the bottom of the tank ? That's a cl big pump for that tank  . .I like suspended lights, you will too when it's time to do tank maintenence.
__________________
Less technology , more biology . |
|
#3
05/04/2006, 12:12 PM
|
|||
|
|||
|
Looks like Calvins custom 40
 ... i'll tag along ... What are you going to keep? ... i'll tag along ... What are you going to keep?
|
|
#4
05/04/2006, 01:58 PM
|
|||
|
|||
|
Re: 2' cube build has officially started!
Quote:
 tagging along |
|
#5
05/04/2006, 07:12 PM
|
|||
|
|||
|
The holes in the bottom of the tank are for my cl. They are going to be hidden in the rock work and routed out the work via locline.
I ended up getting a practically new Gen-X PCX30 for my cl pump. It only does about 980 gph so that is about a 30x turnover rate. What I like about my design is there will only be about 1' of head on the pump. I will have ball valves on all of the returns so I can control the flow. Maybe I will get an oceansmotion for my birthday! My sump tank will have plenty of equiptment in it here in a few weeks. Just you wait and see. LOL Does anyone have a link to Calvin's custom 40g? I would love to look at it. |
|
#6
05/07/2006, 10:20 AM
|
|||
|
|||
|
Over the last few weekends I have finished framing the stand and put two coats of white paint on it. I also made a few modifications to make the stand sronger. After while I am going to go get the oak to skin the stand in. Hopefuly I will be able to get most of the oak cut today, but who knows.
Last night I was working on programing my Aquacontroller JR. I looked at CathyJ's to help me along the way. Here is what I have so far. I would like some feedback on it. Timer Names: MH1 - Metal Halide ACT - Actincs SMP - Sump Light CL1 - Closed Loop FAN - Fan to cool tank HTR - Heater SKM - Skimmer Timers: If time > 11:00 then ACT on If time > 13:00 then MH1 on If time > 19:00 then MH1 off If time > 21:00 then ACT off If time > 21:00 then SMP on If time > 11:00 then SMP off If temp < RT + .5 then HTR on If temp < RT + .0 then HTR off If temp > RT + .5 then FAN on If temp > RT + .0 then FAN off If temp > RT + 1 then MH1 off Max Change 20M then MH1 off If temp > RT +1.2 then ACT off Max Change 5M then ACT off If feeding cylce then CL1 off If feeding cycle then SKM off If Power Fail then MH of Max Change 20M then MH off If Power Fail then ACT off Max Change 5M then ACT off If Power Fail then SKM off Max Change 5 M then SKM off That is what I have right now. Let me know what you think. Also, a few questions on the programming. Do the timers have to be in order like a "ladder logic" program or does it just run though all the timers and see which is applicable? Basically what i am asking is does the order I enter the timers matter? Also, how is the best way to calibtrate the temp probe and do I need to buy calibration fluid to calibtrate the ph probe or is it store in calibration fluid now? |
|
#7
05/07/2006, 10:34 AM
|
|||
|
|||
|
not sure if I rea it right but you plan on turning off the MH's cuz of one degree change in temperature?
|
|
#9
05/08/2006, 10:35 PM
|
|||
|
|||
|
Here is how I have edited the parameters:
If time > 11:00 then ACT on If time > 13:00 then MH1 on If time > 19:00 then MH1 off If time > 21:00 then ACT off If time > 21:00 then SMP on If time > 11:00 then SMP off If temp < RT + 1 then HTR on If temp < RT + .5 then HTR off Max Change 5M then HTR off If temp > RT + 1 then FAN on If temp > RT + .5 then FAN off Max Change 5M then FAN off If temp > RT + 2 then MH1 off Max Change 20M then MH1 off If temp > RT + 2.5 then ACT off Max Change 5M then ACT off If feeding cylce then CL1 off If feeding cycle then SKM off If Power Fail then MH of Max Change 20M then MH off If Power Fail then ACT off Max Change 5M then ACT off If Power Fail then SKM off Max Change 5 M then SKM off I am trying to keep my temp swings to a minimum. I think this is doable with the controller. I may have to allow for more of a temp swing then 2 degrees. I will just have to wait until I get the tank up and running. Also, I think I am going to revised the lighting parameters to run on the lighting tables that come preprogrammed on the controller. On Wed. evening I am going to go out and take a few pics of the tank! I can not wait to see it. It is not quite done yet. The actual tank is built, but the holes need to be drilled and the overflow needs to be attached. Also, I decided not to continue on the stand until I have the tank in my posession. I do not want to have to back track later on if something is not correct. So right now I am concentrating on getting the Aquacontrollter figured out and curing my cyano in my 29g :evil: . I am sure the filters are dead in my rodi. My new filters should be here soon. I need to do water changes badly, but do not want to use bad water. |
|
#11
05/14/2006, 08:41 AM
|
|||
|
|||
|
I have been working on the stand off and on over the last few days. I have all of the wood cut for the exterior of the stand. I just need to go buy trim and attach it all. I am hoping to get some of this done this evening. I am hoping to get some new pictures too.
I need to get the tank before I can trim the top of the stand so I can be sure that the tank fits in the opening perfectly. |
|
#14
05/20/2006, 04:45 PM
|
|||
|
|||
|
I just got back from picking up my tank and working on the stand. I am sooooo excited. The tank looks better then I imagined. My favorite part is the addition af teeth on the overflow. I had not even thought about that, but Scott thought I would want them. However, in case I did not want them he just screwed the row of teeth on and when you take the teeth off you would never even know they were there. It is awesome!
The craftsmanship is INCREDIBLE. Tomorrow I am hoping to start triming the stand. I have quite a bit of work left to do. I also need to start thinking about how I am going to build the doors. I decided not to put a door on the front. I really was not needed. I can get to everything from both sides. Plus, since I used 1/4" oak plywood the extra brace in the front is going to help with potential warping. I think I am going to attach my closed loop pump to that new front brace so I do not have to build a shelf. There really is not much room for a shelf. Does anyone know where I can buy Spa Flex? Here are some pictures.     
|
|
#15
05/26/2006, 08:20 AM
|
|||
|
|||
|
Has anyone every used a Phosban Reactor? I was thinking about incorporating one in my cube. I would run Phosban and occasionally caron in it. What does everyone think of them?
Here is the one that I was looking at: http://www.marinedepot.com/md_viewIt...product=RW1111
__________________
James 40g Cube by ASD, ASD Calc Reactor, Maristar Hood with 250w 14k Phoenix and (2) UVL Super Actinic T5's SPS Dominated |
|
#17
05/29/2006, 10:07 PM
|
|||
|
|||
|
After a long Memorial Day weekend of moving my girlfriend I finally had a few hours this evening to work on the stand a little more. I was able to get the trim on the top and bottom of the stand and started filling the top back right and left corners of the stand on the sides of the overflow box. I need to go and get some corner for the corners of the tank. I also need to make doors for the stand, but I believe that is going to wait until after I have the tank up and running.
I am leaving on a fishing trip to Canada on Thursday night, so i am not sure how much more I am going to get done before then. As soon as I get back I am going to get the trim finished and start sanding and then sand some more. The final product is getting closer and closer. I am very anxious. Here are a few pictures of the progress.   
|
|
#18
06/13/2006, 10:15 PM
|
|||
|
|||
|
Now that I am back from my wonderful vacation I have had some time over the last few days to work on the stand. I finished getting the stand trimmed out, then got it sanded, cleaned off, applied the pre-stain and then stained it. I am pretty pleased with the stand at this point. There are a few things I would have done differently. I guess you live and learn.
What have yet to figure out is how I am going to do the lighting. I have the MH ballast and reflector and the VHO ballast, end caps and bulbs. I want to have a pendant style lighting setup. The only problem is that I do not want to spend all the money to buy a MH/VHO pendant. I was going to see if I could find a metal shop that would make me a pendant out of sheet metal and then I would paint it black. I just do no know of any where that would do this for me. Any suggestions? My only other options is to build one out of pine. If I can not find somewhere to make me a pendant out of sheet metal, this is what I am going to have to do. Trim finished -  Materials -  pre-stain treatment applied -  Stained -  
|
|
#20
06/14/2006, 12:47 AM
|
|||
|
|||
|
Very Nice!! It does look somewhat like Calvins415 24X24X20 Custom 40 gal project. In fact I think Scott made his also but with a corner overflow.
http://archive.reefcentral.com/forum...hreadid=652876 |
|
#21
06/14/2006, 11:36 AM
|
|||
|
|||
|
I have been watching that thread. I like his design, but I want to go topless
  Scott does some incredible work. While I was at his shop picking up my tank he was working on a 450 gallon that weighed in near 600lbs. It was amazing. Scott does some incredible work. While I was at his shop picking up my tank he was working on a 450 gallon that weighed in near 600lbs. It was amazing.Also, I think I have FINALLY found a calcium reactor for this tank. The same person who made my tank came up with this small reactor. I am in line to purchase one. I need to put that Aquacontroller Jr. to work! 
|
|
#23
06/14/2006, 01:50 PM
|
|||
|
|||
|
very professional looking stand, nice job
|
|
#24
06/14/2006, 01:55 PM
|
|||
|
|||
|
Quote:
http://archive.reefcentral.com/forum...hreadid=656861 Edit: Nevermind, looks like you already found it. 
__________________
"The problem with America is stupidity. Why don't we just take the safety labels off of everything and let the problem solve itself" Member of the 1000 watt bulb club |
|
#25
06/14/2006, 03:42 PM
|
|||
|
|||
|
Quote:
Quote:
"Almost done ! I am stoked about the design. It is all hard piped on the suction side with integrated bubble counter just like the big boys. On the output side I have had to use some flex tube because of the cost of the 1/8" bushing - BUT - I have found a way to include an IN LINE pH PROBE PORT that is integral to the reactor plumbing - not some add on gadget. That is a feature that doesn't exist on any reactor that is even remotely as small as this one ! This has been a tough one to design - I have had to make several of the fittings myself from stock pvc, but I think I have a reactor that is truly one of a kind for it's size. " He is still waiting on a few fittings to finish it up. Oh, I did find one more picture. It is setting next to one of his full size reactors. 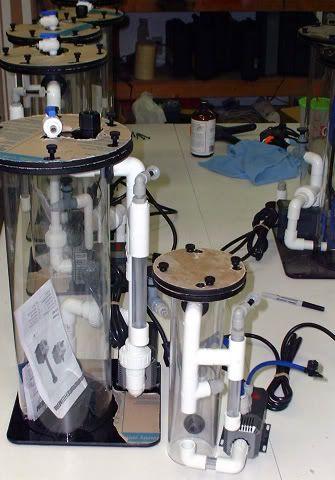
|
|
|


 Linear Mode

