|
|
|
#151
 08/26/2007, 09:28 PM
|
|||
|
|||
|
Funny Johnathan.. I actually printed out his design a few months back and was looking at it today. I just have autotopoff floats for the sump. I was already planning on asking you a bunch of things down the road. I just need to get some help to lift my tank so I can get moving. Thanks for the offer. I will definetly take you up on it..
__________________
Eric (Red House for my 425 system) |
|
#152
08/26/2007, 10:07 PM
|
|||
|
|||
|
Not to pour sand in your drink, but as I read this thread and saw the pic of the stockman pipes and your construction. I noticed that you placed the pipe reducer upside down on the pipe. I'm glad its working but its just not as designed. Nice build thread and good luck.
__________________
90 corner overflow w/sump/refug, skimmer, 2 vho & 2 250w 10k XM MH., fishbowl Innov lunar light system, 1500gph CL. Teco ca200 chiller. started with a 55 in 4/20/04 upgraded to 90 5/1/07 |
|
#153
08/26/2007, 10:28 PM
|
|||
|
|||
|
tgfrench: He didn't build a stockman aqua silencer. He built a Hofer Gurgle Buster. Different design.
Eric, I didn't follow Weatherson's design exactly either. I used some of his ideas and made some changes to suit my needs. What I built would be very good for your size system. I use the same pump to stir the new SW as I do to drain the sumps. Just flip the valves and turn on the pump. And I have the timer stir the new SW for 15 minutes 4x/day, and always have an air stone going in it. I run 200' of 1/4 supply line coiled in the heated SW tank, to help bring the incoming water temp. up a bit.
__________________
Jonathan--DIBS Breeder and Card carrying member of the Square Skimmer Brigade (Click on the Red House to see my pics garage) |
|
#154
08/27/2007, 05:56 AM
|
|||
|
|||
|
Thanks guys.
Jonathan-I though about the size. If it gets to a point where its not enough water I have the room on top to switch out to a larger tank. Eric- that pipe at the end of the return is just a "Y" fitting. one end in the water and the top open to let in air. Also my water change is with the 2 pumps because I had them from taking down my old system so I figured I might as well use them. They are a mag24 and mag 18. The RO/DI on the top is a plus. I just open a valve and let it fill the bottom tank. Then I can close one valve and open another to mix and reverse that to pump into the sump. tgfrench-jnarowe is right. Its not a Stockman. Take a look at the link in his post.
__________________
Paul I've spilled a drop or two of water in my day. (click red house for my build thread) |
|
#155
08/27/2007, 06:58 AM
|
|||
|
|||
|
i stand corrected. Still a good thread and a nice setup.
__________________
90 corner overflow w/sump/refug, skimmer, 2 vho & 2 250w 10k XM MH., fishbowl Innov lunar light system, 1500gph CL. Teco ca200 chiller. started with a 55 in 4/20/04 upgraded to 90 5/1/07 |
|
#156
08/27/2007, 10:58 AM
|
|||
|
|||
|
and I wonder if the Hofer stand pipe will clog, as I discussed earlier, but time will tell. It could always be fitted with a sponge or sock to keep debris out if it becomes a problem.
__________________
Jonathan--DIBS Breeder and Card carrying member of the Square Skimmer Brigade (Click on the Red House to see my pics garage) |
|
#158
08/27/2007, 04:15 PM
|
|||
|
|||
|
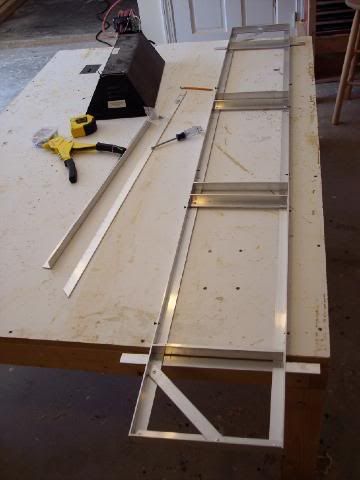
I made my light rack today. Simple aluminum that hold 3-400watt Hamilton pendants and 2 VHO actinics. All the ballasts are in the fish room to save heat in the hood. I have a Honeywell fan across the lights and a Nutone exhaust fan to vent the hood area.
 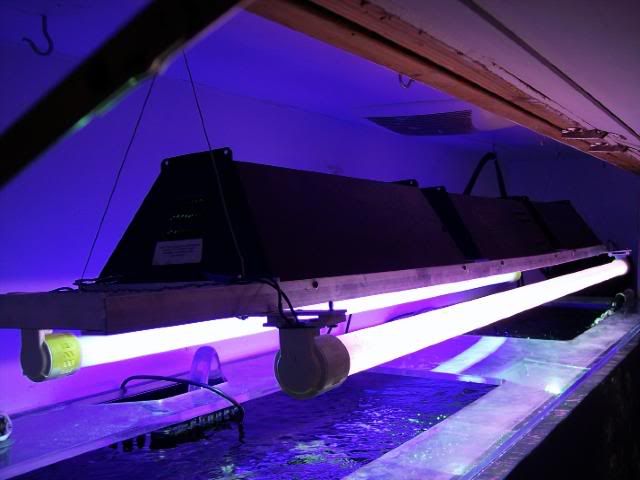 This was the 1st time the MH have been on in a month. Messing with the system, having the skimmer off line really did a number on my water clarity. I hooked up my old skimmer till I get a new one and ran some carbon. Hopefully it will clear a little.
__________________
Paul I've spilled a drop or two of water in my day. (click red house for my build thread) |
|
#159
08/27/2007, 04:39 PM
|
|||
|
|||
|
Do you think enough light from the tubes is going into the tank? Can you pull it aside to get into the tank?
__________________
Jonathan--DIBS Breeder and Card carrying member of the Square Skimmer Brigade (Click on the Red House to see my pics garage) |
|
#160
08/27/2007, 06:41 PM
|
|||
|
|||
|
Its a weird angle but its actually centered over the tank. I can move them back about 6-8" when I need to.
__________________
Paul I've spilled a drop or two of water in my day. (click red house for my build thread) |
|
#161
08/27/2007, 08:19 PM
|
|||
|
|||
|
Yeah I figured it was the picture. Looks like you have nice surface agitation too.
__________________
Jonathan--DIBS Breeder and Card carrying member of the Square Skimmer Brigade (Click on the Red House to see my pics garage) |
|
#162
08/29/2007, 07:15 PM
|
|||
|
|||
|
Only thing I did today was keep figuring out my skimmer options.
Jonathan, I PM you my specs. Thanks for the input on "going square"
__________________
Paul I've spilled a drop or two of water in my day. (click red house for my build thread) |
|
#163
08/29/2007, 10:47 PM
|
|||
|
|||
|
so many ways to do it...I have seen square, wooden, Rubbermaid, becket, NW, airstone, etc. and all have their advantages. Perhaps using any skills you already have would be a good place to start. being a cabinet maker puts you in a different class than the average DIYer!
__________________
Jonathan--DIBS Breeder and Card carrying member of the Square Skimmer Brigade (Click on the Red House to see my pics garage) |
|
#164
08/30/2007, 07:31 AM
|
|||
|
|||
|
The good thing about working with acrylic is using the same tools in my shop. I can just switch blades and cut acylic, joint the edges, route, bore holes etc...
__________________
Paul I've spilled a drop or two of water in my day. (click red house for my build thread) |
|
#165
08/30/2007, 08:24 AM
|
|||
|
|||
|
I tell you what, if you have a jointer you wil be set. I did mine without one and it shows. You can also make acrylic scrapers on the jointer that work much better than the ones sold in the hobby.

__________________
Jonathan--DIBS Breeder and Card carrying member of the Square Skimmer Brigade (Click on the Red House to see my pics garage) |
|
#166
09/05/2007, 02:29 PM
|
|||
|
|||
|
Those of you with acrylic tanks, do you have luck with removing scratches on the inside? Even when I get down to the 12000 grit I still see the fine scratches. Is that normal or am I missing something?
__________________
Paul I've spilled a drop or two of water in my day. (click red house for my build thread) |
|
#167
09/05/2007, 03:00 PM
|
|||
|
|||
|
Paul,
I hand polished my tank and it was tough...you should be using a polisher with a very fine liquid abrasive for your final run. I used stuff from Micro Surface. They have an extensive selection of aircraft grade kits for acrylic as well as individual items. I used Micro Gloss and the Anti-Static for my last two runs, applied with an angle grinder and first a buffer pad, and then a sponge pad. I also slowed the grinder down with a reostat. Once the water is in the tank, you can still remove scratches with a magnet and various sandpapers like the Mighty Magnet Scratch Removal Kit. This simply consists of a magnet cleaner with extremely fine grade sandpaper glued to algae pads. It's a little over-priced, but I bought one and it works well. You may be able to DIY them once you see how they are made.
__________________
Jonathan--DIBS Breeder and Card carrying member of the Square Skimmer Brigade (Click on the Red House to see my pics garage) |
|
#168
09/06/2007, 09:38 AM
|
|||
|
|||
|
Yes, I have a similar kit. After I finish with the finest grit, I still see very fine scratches. You can tell the difference between an area that has been repaired and one that hasn't. Do those very fine scratches ever get worked out or is that just the way it looks?
__________________
Paul I've spilled a drop or two of water in my day. (click red house for my build thread) |
|
#169
09/07/2007, 10:43 AM
|
|||
|
|||
|
pcostanzo, you have to follow up with a buffing compound. it's tough to do in a tank filled with water, but it removes small amounts of the surface material until you get down past the scratches. Looks better than new. Just use a hand buffer and Novus 3 followed by Novus 2.
|
|
#170
09/07/2007, 11:05 AM
|
|||
|
|||
|
The Novus worked good for me on the outside. I'll keep plugging away at the inside with the finer grits. I hope this isn't a sign to upgrade to a 600 gal starphire.

__________________
Paul I've spilled a drop or two of water in my day. (click red house for my build thread) |
|
#171
09/07/2007, 11:26 AM
|
|||
|
|||
|
I think it is
__________________
-Tom Proud Registered ORCA Member |
|
#172
09/07/2007, 05:08 PM
|
|||
|
|||
|
I've seen a 3 sided box used in the past that is similar in use to a koffer dam. You put in inside the tank over the scratch, then pump the water out of the space. the water pressure from outside the box created a pretty good seal and gives you room to work on the scratch without emptying the whole tank. The limitation there is the hight of the tank. If it's really tall or the scratch is towards the very bottom of the pane, your workspace would be very long and skinny.
|
|
#173
09/07/2007, 06:23 PM
|
|||
|
|||
|
My new skimmer. Assembly required.
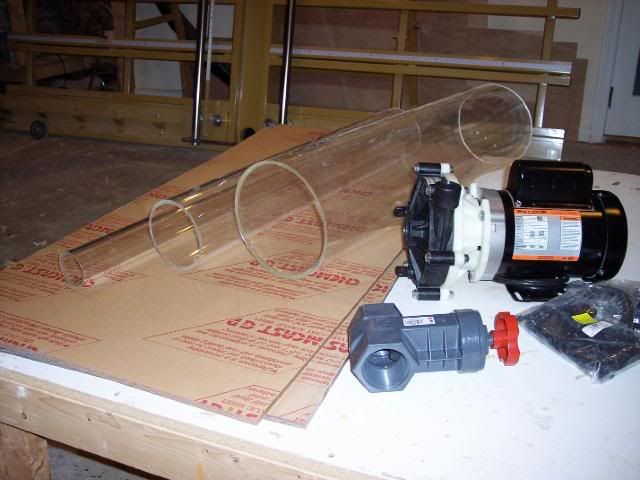 This is going to be a big boy. Its based on Barr Aquatics design for their "Ultra Skimmer" to be released this month, thanks Zeph for the idea. Its a dual beckett 48" high with an 8" main body and 2-2.5" injector tubes. It's going to be powered by a Sequence Reeflo Marlin.
__________________
Paul I've spilled a drop or two of water in my day. (click red house for my build thread) |
|
#174
09/08/2007, 08:13 AM
|
|||
|
|||
|
Here are the plans for the skimmer. I was first thinking of a needlewheel type but after talking to Jonathan and Sherman I started considering other options.

__________________
Paul I've spilled a drop or two of water in my day. (click red house for my build thread) |
|
#175
09/08/2007, 10:13 AM
|
|||
|
|||
|
make the cup bigger dammit, or else it will compress the foam head!!
I really like my skimmer, but when space is at a premium, like for under tank installs, becketts are hard to beat. There's so many ways to get good skimming though. I wish you could see mine in person! Did you see the videos I posted of it?
__________________
Jonathan--DIBS Breeder and Card carrying member of the Square Skimmer Brigade (Click on the Red House to see my pics garage) |
|
|


 Linear Mode

