|
|
|
#1
 07/23/2006, 08:35 PM
|
|||
|
|||
|
120 AGA Reef DIY Stand / Set up start to finish Day 1
Hope this works,never done this before posting a pic that is we'll see , started the stand today hopefully the pics come through nothing much to date just the top and bottom of the stand as you should be able to see in the pic This is for more my benifit to keep a record of what I've done, if anyone else learns from my set up great even better . The main reason I am doing this , is because I learned so much from this forum I figured I would give some back . The pics following hopefully if I can figure this out will be be the entire set up start to finish diy stand/ refuge plumbing etc be patient this is day 1 and will be on going |
|
#2
07/24/2006, 06:39 PM
|
|||
|
|||
|
Day 2 of construction , framing of for the bottom stand complete next job plywood on interior and exterior 3/4 inch marine grade plywood or cabinate grade
Construction costs so far 8 2X4s = $20.00 4 2x2s = $15.00 2 boxes of 3 inch screws = $15.00 Product Costs Tank 125aga 72x18x22 = $400 Lighting 2x660 icecap ballasts 6x SLS parabolic reflectors 2x ATI 80 watt aquablue 3x ATI 80 watt blueplus 1x GE daylight 6500k retro kit (reef geek) = $664.00 Protein skimmer (ASM) G3 with gate valve MOD will show pics when get to that stage = $290.00 Total costs so far =$ 1404.00 
|
|
#3
07/26/2006, 06:04 PM
|
|||
|
|||
|
Day 3
Working time = 8hrs Construction Costs 3 sheets of plywood = $66.00 Total costs to date $1404.00+ $66.00= $1470 Plywood went on today ,ordering the doors tomorrow not cheap by the way $50.00 a piece and I need 5 of them 3 for the front and 2 for the sides , in my opion there is no such thing as too much accessabilty plus I need 1 door for some kind of switch panel so each pulg has it's own switch ( just makes it easier) , if anybody knows any threads let me know I need some ideas ,thanks in advance 
|
|
#5
08/01/2006, 06:40 PM
|
|||
|
|||
|
One of the biggest concerns of anybody building a stand from scratch is structural integrity whether or not it will hold up once water, sand, live rock ect, are added . personally 2x4s are adequate as long as the weight is supported on the vertical part of the 2x4 NEVER SCREWED TO THE SIDES OF THE 2x4 why? you may ask , screws nails over time sag and possible rust over time if this is what 's holding the weight , lending one side of the tank to twist , this is a very bad thing so don't do it.
Some people tend to be over kill on there stands better safe than sorry theory using 4x4s , on tanks 150gls on down they are really not necessary , not to mention it reduces the space under the tank . If you really think it is necessary to use 4x4s be careful with pressure treated especially when wet as they dry out they tend to shrink twist and split , look at any exterior decking, a higher grade of 4x4 may be better. Day 4 Working Time = 10 hrs Total costs to date = $1470.00 Attached plywood today openings on front of stand are for 3x 30''x18'' doors and one 30''x18'' door on each side of the stand one door for a switch panel and the other so I can slide the sump underneath the stand later date next will be the switch panel , may take some thought 
|
|
#6
08/04/2006, 06:59 PM
|
|||
|
|||
|
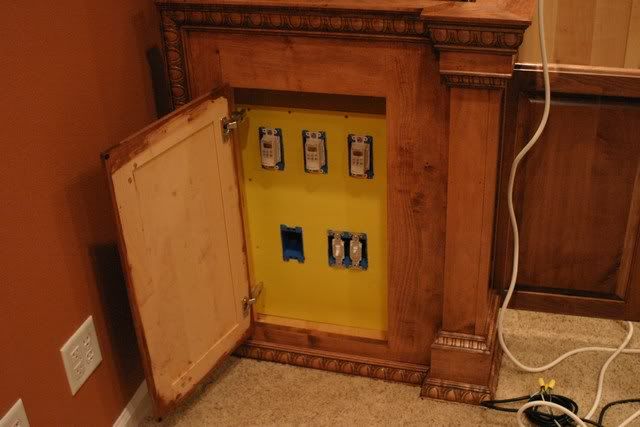
Thanks for the switch info but I think I am going with something more diy , this is my switch board where I'll be able to control turning off and on any of the eletrical items by the flick of a switch instead of having to unplug a said item , the panel will go at the end of the stand , the panel is recessed 1.5 inches to allow for switches another panel with the receptacles (not complete yet maybe tomorrow) will 4 to 6 inches beyond that enclosing the wires to the eletrical boxes so they are not exposed to salt water .
I may need some opions on how to incorporate timer into the power supply I knpw I can plug a simple timer into the receptacle and then plug the lights into that but I am looking for something more professional, lack of a better word or maybe simplicity is best thanks in advance anyway more tomorrow . 
|
|
#7
08/05/2006, 09:18 PM
|
|||
|
|||
|
DAY 6
Working Time 15hrs Construction Costs $30.00 misc electrical Total Costs To Date = $1500.00 Got the cut outs done for the switches and receptacles , there will be a door on the front to hide the switches the rest you can see via the pics . Epoxy paint on the interior I think will be next 
|
|
#9
08/06/2006, 09:16 AM
|
|||
|
|||
|
RE the timers, RC member fmellish did a power panel similar to yours and used some digital timers from home depot, I think (the leftmost things on the panel). I believe the top two banks of outlets are on the timers, and the bottom two are manually controlled with the switches. I think he described it on his blog:
http://fmellish.shackspace.com/aquarium/index.html  
__________________
"Misers get up early in the morning; and burglars, I am informed, get up the night before." - GK Chesterton |
|
#10
08/06/2006, 11:01 AM
|
|||
|
|||
|
I used those same timers on my panel. Bought them from Home Depot. Not cheap, about $33 each but so far they work great.
 I now have cover plates on and need to take an updated picture. I also built a panel for my equipment room.  Being able to flip a switch to turn off equipment is very nice. I don't like grabbing a plug when possible having saltwater on my hand. Nice job on your set up by the way! |
|
#11
08/06/2006, 05:09 PM
|
|||
|
|||
|
Funny , just got back with a timer from Home Depot but I believe it's the wrong one paid $20.00 for it ,on the back of the package
it read DO NOT USE WITH ELETRONIC BALLAST there must be another one that is compatible with eletronic ballasts if you have the brand let me know , thanks . By the way I based the design of my stand on yours we'll see how it comes together . Your stand is one of the best I've seen on here , good job thanks for the info Crumbletop thanks for the thread lots of good information just what I needed to continue on . |
|
#12
08/07/2006, 05:51 PM
|
|||
|
|||
|
DAY 7
Working Time = 16.5 hrs Construction Costs $30.00 Epoxy Primer Total Costs To Date = $1530.00 The one thing I noticed more than anything when it comes to the interior of the stand is that no attention is paid to protecting wood on the interior of the stand for example some people have 30-50gl sumps on up , no matter how careful or well planned your plumbing is saltwater is going to end up on the bottom of your stand , anyone who's owned a fish tank knows what happens next the wood deteriorates over time . My solution is this bought some 2 part epoxy primer and coated the interior of the stand as well the top , where the tank sits on after the primer has cured I caulked the inside corners of the stand and coated the bottom of the stand where the sump will sit with an epoxy waterproof membrane plus 1.5 inches up the vertical part of the stand . What does this do you may ask , if I spill any water it is easily wiped up , if I have leak that isn't noticed the bottom of the stand will hold 3-4 gls without doing any damage to the wood a sump within a sump so to speak don't have pics yet but will soon if people don't understand the explanation |
|
#13
08/08/2006, 06:54 PM
|
|||
|
|||
|
DAY 8
Working Time = 17.5 hrs Construction Costs $20.00 Epoxy Membrane $67.00 2xElectrical Timers (home depot) Total Costs To Date = $1597.00 Found the timers got 2 for dusk dawn effect , probably would need them anyway having 2x 660 ballasts . Applied the membrane today so the bottom is waterproof , next will probably building the sump or finishing the electrical or maybe a little of both sump design will be copied from melvin's sump 
|
|
#14
08/08/2006, 11:43 PM
|
|||
|
|||
|
Great job waterproofing inside the stand. That looks cool! Can't wait to see the finished product.
|
|
#15
08/09/2006, 05:11 PM
|
|||
|
|||
|
Thanks
Day 9 Working Time = 18hrs Construction Costs $97.00 4'x8' sheet 1/4 inch plexi glass 8oz can weldon 4 ,applicator Total Costs To Date = $1694.00 Purchased the plexi today for the sump from left to right it will go overflow / skimmer = 3 baffles =return = refuge . Dual overflows both will go to skimmer/overflow one will be split with a ball valve to control the flow into the refuge once in the fuge will then flow into the return . |
|
#16
08/09/2006, 05:52 PM
|
|||
|
|||
|
tagging along...
one of these days i will be able to set my 90g up. but waterproofing the inside of the stand sounds like a great idea, esp since i will have a 30-40g sump in it. i like the electrical panel as well. those timers from HD seem to do the trick, i have seen a lot of guys using them for their tanks recently
__________________
people write stupid things in this space |
|
#17
08/11/2006, 06:16 PM
|
|||
|
|||
 Cut the pieces for the sump today got the weldon 4 ( adhesive for acrylic ) hope I cut the pieces right should start putting together sunday going to thw water park tomorrow with the kids, pic should be self explanatory Day 9 Working Time = 19hrs |
|
#18
08/13/2006, 02:02 PM
|
|||
|
|||
|
DAY 9
Working Time 22hrs Those water parks and kids will wear your *** out , late start today but got done what I wanted put the sump together , went better than I expected weldon 4 adhesive very easy to use nothing to be scared of as long as you follow two very important rules make sure the pieces you cut are straight square and accurate stray from these rules and you may regret it , oh and work on the flatest surface possible ,I say this without doing a water test but I'm fairly confident when you glue the pieces together the joint becomes clear so you know where to add more adhesive ,the surface I was working on was perfectly flat so I didn't have shim the pieces up (very important) , then using the applicator apply the glue to the joint ,I held everything in place via tape ,clamps , squares . Attached the end piece first ,let dry 15 mins Then the side piece as well as the corner joint Then the end piece as well as the joint Then the opposite side piece as well as the two vertical joints making it now waterproof Forgot to mention placed one baffle and the two other sections to act as spacers forget this and the pieces you cut may be to big or two small . After the perimeter was done the other pieces were easy like I said water test next  
|
|
#20
08/13/2006, 06:47 PM
|
|||
|
|||
 DAY9 Impatience got the better of me assembled the skimmer running it know , so silent it's bliss better than I expected to make it even quieter I need to cap the pipe with the floss drill a hole in the top with some filter floss althiugh it's so quiet right now I don't think it's necessary , the mod came from bill and eliane supposed to work real well |
|
#23
08/15/2006, 12:00 PM
|
|||
|
|||
|
Start work on the durso and plumbing to the sump next , I have one goal and that is to make it quiet as possible , two problem areas where noise comes from the overflow and the sump toilet bowl syndrome as people like to call it the over flow will be solved by the durso , to lessen the noise more I plan to cap off the top pipe drill 3\8 inch hole insert plastic tubing 3-4 inches into the durso , supposed to help the air escape pics will follow .
The second problem the sump the return line will approx 1 inch below the water level in the first chamber I believe the problem arises in where air cannot escape so it purges back up the pipe creating noise to hopefully solve this problem (sandmans idea ) is to have a tee where the water level is in the sump therefore allowing air to escape hopefully creating a very quiet tank will shall see and will give an honest opinion pics will follow to make it easier to understand |
|
#24
08/16/2006, 07:10 PM
|
|||
|
|||
|
DAY 10
Working Time 20 hrs Construction Costs $30.00 Plumbing for durso mod Total Costs To Date = $1724.00 Durso's were a piece of cake to put together learnt this mod from a prior thread adjustable valve from home depot , just drill hole in cap and insert using glue or silicone , may need to adjust length of 1/4 inch OD tubing we'll see when up and running the idea of the tubing is to let air escape can't remember the exact wording it's on durso's web site , one thing that is missing 2 inches of filter floss at top of cap ( deaden noise even less than what it already is hopefully) one view is exploded one put together I have two for dual overflows , most pictures I see of these are up and running , this should be easier to understand 
|
|
#25
08/20/2006, 04:48 PM
|
|||
|
|||
|
DAY 11
Working Time 24hrs Construction Costs 3/4 inch maple 1@1x6 3@1x8s 16 oz shellac = $200.00 Total Costs To Date = $1924.00 Got the maple yesterday worked on it today sanding to 220 grit cut,fit and glue to opening ,when glues dry will sand joints smooth ,the shellac is for finish stage no importance right now ,pic below is just the front need to finish sides then the canopy also working on a duct system where 3 stealth fans will blow air into, directing the air onto the T5 setup the ballasts I overdrive the bulbs so I need to counter act that by cooling the bulbs via the fans like I said still in design stage will show pics when I get to that . 
|
|
|


 Linear Mode

