|
|
|
#1
 09/09/2007, 11:51 AM
|
|||
|
|||
|
Vortech controller DIY
The stock Vortech controller has several limiting factors that keep it from being used with wave making devices. After looking at the design I believe I can cure several of these and make it usable with most any wave maker.
I use an Aqua Controller III and want my pumps integrated with it. Neptune now makes a module called Aquasurf for the Tunzes and it looks wonderful. I wish Neptune made a similar product for the Vortech. The major limiting factor is related to code corruption of the processor when pulsing the controller power on and off. Many have reported this problem. I have experienced the myself and had to exchange one of my own units. I have solved this problem by not pulsing the power at all. With the DIY I will post today, we will not be able to turn the pumps completely off but we will be able to decrease the speed to it's lowest setting and back your highest setting rapidly without cutting the power to the processor. This will solve the code corruption problem. You will set the high speed with the little knob as you usually would and use your wave maker to make it go to the lowest setting. Some have solved this problem by applying power to the battery back up port (BB) and pulsing the power to the main power unit. This has several short comings. 1. You can no longer use the BB as a BB up. 2. It will shorten the life of your battery back up if you use it. 3. When the pump's main power is out and you are on BB the pump runs faster than the lowest speed possible. I plan on using parts from radio shack to do this DIY so most anyone can do it. If you can solder, you should be able to do this. If you cannot solder, I bet you know someone who can. Stay tuned... I will post more today.
__________________
Giovanni _____________________ For my "Aquasurf your Vortech WWD, the DIY" thread, Click the little red house up top. . |
|
#3
09/09/2007, 12:23 PM
|
|||
|
|||
|
If I understand the Vortech's properly, they are a DC motor.
To build a conlroller for those, I would use a dual 555 timer IC to make a Pulse Width Modulator drive circuit that drives a power MOSFET. To contol the pulse width of the 555 timer IC, I would use a digitally controlled Potentiometer ( I used to use the XICOR EEPOT but not sure if they still make them ). The PWM would control the DC current to the motor. To change the speed, you would just set one pin of the EEPOT high or low to set it to faster/slower, then pulse the second pin. This increases or decreases the resistance of the potentiometer and thus varies the speed of the PWM. Instructions for how to make a PWM are in the 555 timer IC instruction manual at Radio Shack. All the parts for this ( except the EEPOT ) can be had at RS. With another 555 timer IC and a couple of extra components, you could even make the timer IC walk the EEPOT up & down at an adjustable rate. This would make the controller self varying without the use of a separate controller. Stu
__________________
Some people think that I have Attention Deficit Disorder. They just dont understand that........ Hey! Look a chicken! |
|
#4
09/09/2007, 12:45 PM
|
|||
|
|||
|
I am going to take a much simpler approach. In this first step will will only need a relay, some wire and an inexpensive extension cord. Very simple so anyone can do it in about 20 minutes.
The vortech are a simple stepper motor.
__________________
Giovanni _____________________ For my "Aquasurf your Vortech WWD, the DIY" thread, Click the little red house up top. . |
|
#5
09/09/2007, 02:02 PM
|
|||
|
|||
|
A big old capacitor will do what I think your trying to do. Ive never seen the psu to these but they should have a capacitor like most others. Increasing the capacitor size to something much larger should store enough energy to keep the motors from shutting down.
Don |
|
#6
09/09/2007, 02:13 PM
|
|||
|
|||
|
Don,
What I am doing is a little different. Using a relay is crude but will work well for most. I am in the process of doing the DIY now. It will take an hour or two as I have to take photos and post procedures. Stay tuned you are going to like this. 
__________________
Giovanni _____________________ For my "Aquasurf your Vortech WWD, the DIY" thread, Click the little red house up top. . |
|
#7
09/09/2007, 02:40 PM
|
|||
|
|||
|
These Vortech powerheads/pumps, whatever they are, aren't they like $300. Are you sure you want to do a crude DIY to them? Why don't you do it in a more professional/reliable way. If you are going to void the warrantee(which I have heard is needed with these devices), why not do it right?
__________________
Joe Cude Save a reef, trade a frag! |
|
#8
09/09/2007, 03:14 PM
|
|||
|
|||
|
Yea they are $350. If you do not own one and have not followed them you would not understand. My warranty is about out anyway. I call this DIY crude but it really is not. Hold judgment till I post it.
I am done with the DIY and will post photos and procedures next.
__________________
Giovanni _____________________ For my "Aquasurf your Vortech WWD, the DIY" thread, Click the little red house up top. . |
|
#9
09/09/2007, 06:17 PM
|
|||
|
|||
|
Theory:
The little knob we use to adjust the speed of the vortech is called a potentiometer (pot). It has three electrical connections. The one in the center leads to an analogue to digital (A/D) pin on the controllers processor. As you turn the pot it varies the voltage of the center pin from 0 volts to 5 volts. At 0 volts the controller is programmed to set the speed of the pump motor to the slowest. At 5 volts it is programmed to set the speed of the pump to its maximum speed. What I have done is put a relay in the circuit that will change the voltage on the center pin to 0 volts regardless where the pot is set. This make the pump go to its slowest setting as soon as the relay is actuated. I am using a small reed relay that is actuated by 12volts and use 12volt wall wart to power it. When the power is off to the wall wart, the relay is open and the pot sets the speed of the pump. When power is applied to the wall wart, the relay is actuated, the pot is over ridden and the speed is set to minimum. Meat and potatoes of the DIY Materials: 1. Screwdriver 2. Soldering iron 3. Solder (small diameter) 4. 9-12volt wall wart power supply. $5.00 5. Short length of small wire. (You can cut the from the wall wart wire if you like) 6. Relay radio shack part number 275-233. If you have a 5 volt wall wart use PN (275-232) $2.99 7. Electrical tape 8. Vortech controller  
__________________
Giovanni _____________________ For my "Aquasurf your Vortech WWD, the DIY" thread, Click the little red house up top. . Last edited by Giovanni; 09/09/2007 at 06:25 PM. |
|
#10
09/09/2007, 06:18 PM
|
|||
|
|||
|
I will assume you know how to solder for now and skip the details of that. First cut the end off the wall wart (WW) and then cut three inches of wire of the end to use later. There are 4 pins on the relay. The two on the very ends we will save for later. The two side by side that are offset to one side are where the wires from the WW will be soldered. It doesnt matter which of the wall wart wires goes to which of the offset pins. Just make sure you done solder them to the ones on the ends. Also dont hold the soldering iron on the pins very long as it could ruin the relay and you will have to spend another $3.
  
__________________
Giovanni _____________________ For my "Aquasurf your Vortech WWD, the DIY" thread, Click the little red house up top. . |
|
#11
09/09/2007, 06:19 PM
|
|||
|
|||
|
Now solder the three-inch piece of wire to the pins on the end of the relay.
 It should look like this 
__________________
Giovanni _____________________ For my "Aquasurf your Vortech WWD, the DIY" thread, Click the little red house up top. . |
|
#12
09/09/2007, 06:19 PM
|
|||
|
|||
|
Now put a little electrical tape to protect the pins from shorting out. Then wrap the whole thing in a little electrical tape to keep it from shorting out against the controller board.
 
__________________
Giovanni _____________________ For my "Aquasurf your Vortech WWD, the DIY" thread, Click the little red house up top. . |
|
#13
09/09/2007, 06:20 PM
|
|||
|
|||
|
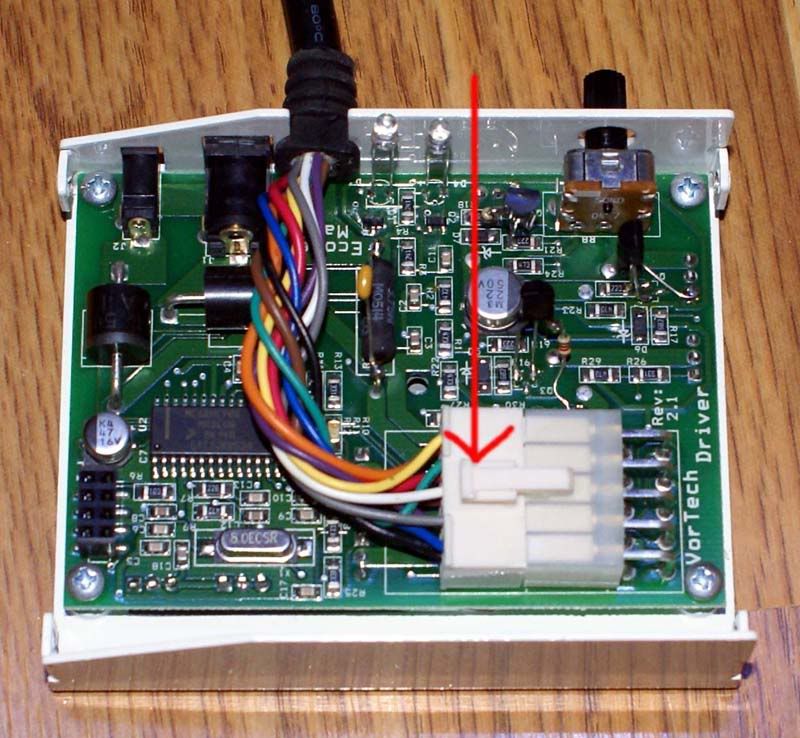
Now remove the lid of the controller by taking out the 4 black screws holding it on. Inside you will see a big connector that the wire coming from the pump connects them together. Remove it but take note of the little latch in the center. Just give it a little wiggle but do not force it.
__________________
Giovanni _____________________ For my "Aquasurf your Vortech WWD, the DIY" thread, Click the little red house up top. . |
|
#14
09/09/2007, 06:21 PM
|
|||
|
|||
|
Now note the pot I talked about in the theory section Photo 12. The two outside pins are the ones we want to deal with. Dont be tempted to solder to the back of the pot, as you could ruin it. Go ahead and remove the board from the frame by removing the 4 screws pointed out in photo 13. When you remove the board there will be a little gray rubber sheet for electrical insulation of some transistors on the board photo14. Pull it off and note there is some white heat sink compound that helps keep the transistors cool by transferring heat to the case. Make sure you put the rubber sheet back on the way it came when we put it back together. In photo 14 I have circled in red the area we will be working in.
  
__________________
Giovanni _____________________ For my "Aquasurf your Vortech WWD, the DIY" thread, Click the little red house up top. . |
|
#15
09/09/2007, 06:21 PM
|
|||
|
|||
|
Now we will solder the two wires that are attached to the ends of the relay to the board in the locations shown in the next tow photos. It doesnt matter which wire goes to which spot. Just make sure you use the two spots indicated in photo 15 with the red arrows.
 
__________________
Giovanni _____________________ For my "Aquasurf your Vortech WWD, the DIY" thread, Click the little red house up top. . |
|
#16
09/09/2007, 06:22 PM
|
|||
|
|||
|
Now put the rubber pad back on the board and put the board back in the frame using the 4 silver screws, making sure not to pinch the new wire between the board or transistors and the frame. See photos 17 and 18.
 
__________________
Giovanni _____________________ For my "Aquasurf your Vortech WWD, the DIY" thread, Click the little red house up top. . |
|
#17
09/09/2007, 06:22 PM
|
|||
|
|||
|
Echotech Marine was nice enough to leave us some room to put the relay inside the housing. Reconnect the big connector that goes to the pump motor. Lay the wall wart wire in the groove where the motor wire goes and then put the motor wire in on top of it. Now put the lid on and put the 4 screws back in to hold it all together. That is it your are done.
 
__________________
Giovanni _____________________ For my "Aquasurf your Vortech WWD, the DIY" thread, Click the little red house up top. . |
|
#19
09/09/2007, 06:24 PM
|
|||
|
|||
|
That is it simple and inexpensive. Start your pump up and set your max desired speed. When you put power to the wall wart the pump should go to the minimum speed the pump will go to. Use whatever wave timer you want by hooking it to the wall wart. Leave the pump power on all the time. If you want to stop the pumps completely for feeding, just hook on control channel the vortech power supply/s to shut them down completely. I find that the slow speed with the DIY is slower than stock. Just fast enough to keep fish and shrimp from going in.
The next one I will make a Video for youtube if anyone feel it is needed.
__________________
Giovanni _____________________ For my "Aquasurf your Vortech WWD, the DIY" thread, Click the little red house up top. . |
|
#23
09/09/2007, 06:55 PM
|
|||
|
|||
|
That's creative alright.
Btw, I saw your SCWD mod thread last night, and that was very interesting. My question is about these two black things (upper left near the POT) that appear and vanish in various pictures. Where are they going? Now you see them: Now you don't: Now you see them: Now you don't: Are you photoshopping them out of the images for some reason?
__________________
Marc Levenson - member of DFWMAS |
|
#24
09/09/2007, 07:02 PM
|
|||
|
|||
|
LOL No photo shop. I needed more photos after I got the first one done so I took photos of my none DIY driver. The first photo you refer to is an early version of the board put out by Echotech Marine and has some non-surface mount transistors. The second photo is of rev 2.2 board and Echotech Marine had gone to surface mount transistors to replace the them. If you look closely you can see the first one has rev 2.1 and the second one has rev 2.2 in a different spot.
It is not uncommon for small modification to be added to electronic in an early production run and then have them incorporated in later productions. P.S. I had to send one of my drivers in after having the code get corrupted. The one they sent me back was this later version.
__________________
Giovanni _____________________ For my "Aquasurf your Vortech WWD, the DIY" thread, Click the little red house up top. . Last edited by Giovanni; 09/09/2007 at 07:11 PM. |
|
#25
09/09/2007, 07:09 PM
|
|||
|
|||
|
melev
BTW, How did you run across that SCWD mod thread? I thought it was long dead. I almost took the photos to it down the other day.
__________________
Giovanni _____________________ For my "Aquasurf your Vortech WWD, the DIY" thread, Click the little red house up top. . |
|
|


 Linear Mode

