|
|
|
#1
 03/10/2007, 11:09 PM
|
|||
|
|||
|
Lets see your DIY stands; pictures wanted
Guys,
I am about to finally make my own stand here pretty soon. I have made a few for friends. I just moved, had to sell everything, and I am ready for a new setup. This is my plan- a 90 gallon reef setup. I was thinking of doing a 4x4 posts in the corners that are notched out so the framer that the tank sits on will be supported by 4x4s instead of screws. Here is a link of what I was thinking. http://www.arbreptiles.com/cages/75g_stand/index.shtml I also want to add a water catch in the bottom, this is what I was thinking... take some vinyl flooring(linoleum) and attach it on the bottom and bottom sides, caulk it. This way it makes a seal at the bottom for spilt water and any other mess. Then I will kilz the whole stand to seal it from the moisture. I NEED PICTURES OF YOUR STANDS!! I am really looking for special add-ons, WOODWORKING AND TRIM PICTURES, and of course and suggestions. Also, is this a good design? Thanks for everything, and please send me or attach pictures of the outside and insides of your stands. Especially different but helpful ideas. Thanks, Chris
__________________
Click the red house to see my 90 SPS build. Always accepting frags!! |
|
#2
03/10/2007, 11:10 PM
|
|||
|
|||
|
P.S. I will be putting this stand on hardwood floors. Do I need to do anything special? i.e. a rug or carpet section under the stand to make up for any irregularities?
__________________
Click the red house to see my 90 SPS build. Always accepting frags!! |
|
#3
03/11/2007, 01:09 AM
|
|||
|
|||
|
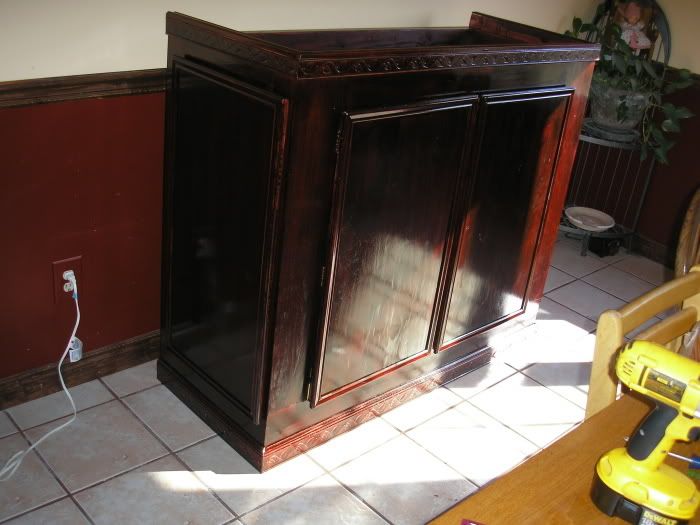
Hello chrismhaase ,
I recently built a 90Gal setup. Here is a link to the build thread. DIY 90Gal Reef But since you asked for pics, here is a pic of the Stand:   My tank is on Hardwood floors too! the plan wasent to have anything under the tank, but I put a peice of carpet upsidown at the beggining, thinking I would slide it out later, But I ended up just triming it around the feet and leaving it. Let me know if you have any questions. |
|
#4
03/11/2007, 02:22 AM
|
|||
|
|||
|
Here's mine. Just finished the installation a few weeks ago and I'm happy as a pig in ... well you get the idea.
The cabinet is laquered MDF.  The stand frame is stainless steel.  Under the "hood" ... WFO 
__________________
Pásate por mi Blog en Español www.arrecifemadrid.com |
|
#5
03/11/2007, 02:25 AM
|
|||
|
|||
|
By the way... full details and many more pictures on my Blog http://www.arrecifemadrid.com/blog/?p=94
__________________
Pásate por mi Blog en Español www.arrecifemadrid.com |
|
#6
03/11/2007, 09:46 AM
|
|||
|
|||
|
friend to the fish, what was your approxiamte total cost, and do you think the carpet is necessary item? Nice stand and tank. Thanks, Chris
Emora, great built in look. this is somewhat what I was thinking. I have a few questions, 1. where did you get that stand, did you do it yourself? Cost? 2. When you attached it to the wall, did you cope your woodwork to match the wall and did you caulk along the wall so no light escapes? 3. do you have heat issues? Thanks. Chris
__________________
Click the red house to see my 90 SPS build. Always accepting frags!! |
|
#7
03/11/2007, 09:48 AM
|
|||
|
|||
|
Emora. Do you think I should use the carpet to act as a buffer? This way if everything is not level, it will level out because the carpet will act as a medium between the stand and hardwood floors?
__________________
Click the red house to see my 90 SPS build. Always accepting frags!! |
|
#8
03/11/2007, 09:50 AM
|
|||
|
|||
|
Here is ours (not quite finished yet)
In the works: 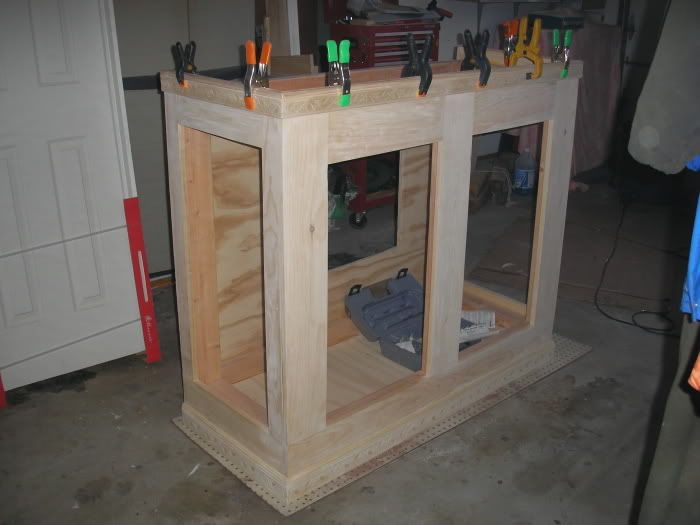 Closeup of trim: 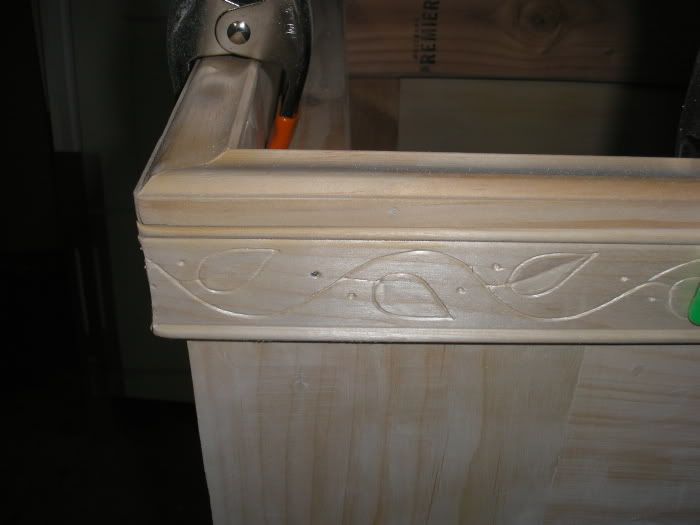 With one coat of stain/poly: 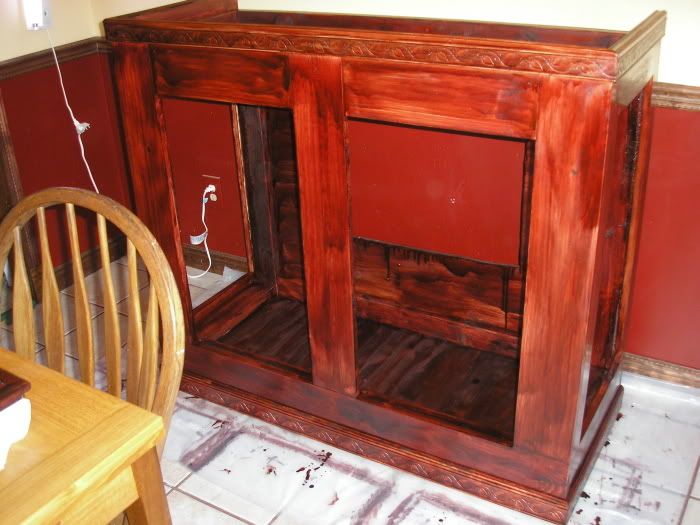 I'll have access to the sump from the front and both sides. The side doors will be pop-ons, while the front doors will be hinged. Total cost: a little under $200 Oh, and it's for a 75 gallon and measures 49" X 19" X 42".  --- Wendy |
|
#9
03/11/2007, 09:55 AM
|
|||
|
|||
|
Wendy, the picture where it says "close up of trim" is that two seperate pieces (one on top and the other going down the side?) I like that wood work. Are you gluing the trim? Or are you using a nail gun?
__________________
Click the red house to see my 90 SPS build. Always accepting frags!! |
|
#11
03/11/2007, 12:02 PM
|
|||
|
|||
|
Here is the one I did for my 90. I built it also with the water leak theory in mind. It has a 4" lip that goes all around bottom of inside of stand. Its been all caulked and sealed so it will hold a good amount of water before hitting the floor if needed. Tank sits inside of stand as well as canopy sits over the edge so all the tank trim is hidden.
It was made with 2x4 supports that hold the weight of top frame and 2x6 spans across the top so I could go without center brace. It was then primed with primer and then marine enamel applied over the top of that. Outside is just stained and then 3 coats of poly. Other pics on pg 6,7 of my gallery.  When I firsat got tank switched over from my 65 and just got water and rock in it. 
__________________
-Mike |
|
#12
03/11/2007, 12:39 PM
|
|||
|
|||
|
Quote:
I'll post a picture later on because it looks as if we'll be able to finish the stand this afternoon. --- Wendy |
|
#13
03/11/2007, 12:43 PM
|
|||
|
|||
|
Mine is here.
http://archive.reefcentral.com/forum...readid=1043063 |
|
#14
03/11/2007, 01:04 PM
|
|||
|
|||
|
i wanted something a little more contemorary in design..im not a huge fan of a ton of molding and stained wood, so i built this..
 in hindsight, the only thing i would change is making it 36" tall instead of 30" tall. |
|
#15
03/11/2007, 01:16 PM
|
|||||
|
|||||
|
Quote:
Quote:
Quote:
Quote:
Quote:
__________________
Pásate por mi Blog en Español www.arrecifemadrid.com |
|
#17
03/11/2007, 01:21 PM
|
|||
|
|||
|
Quote:
__________________
Pásate por mi Blog en Español www.arrecifemadrid.com |
|
#18
03/11/2007, 01:50 PM
|
|||
|
|||
|
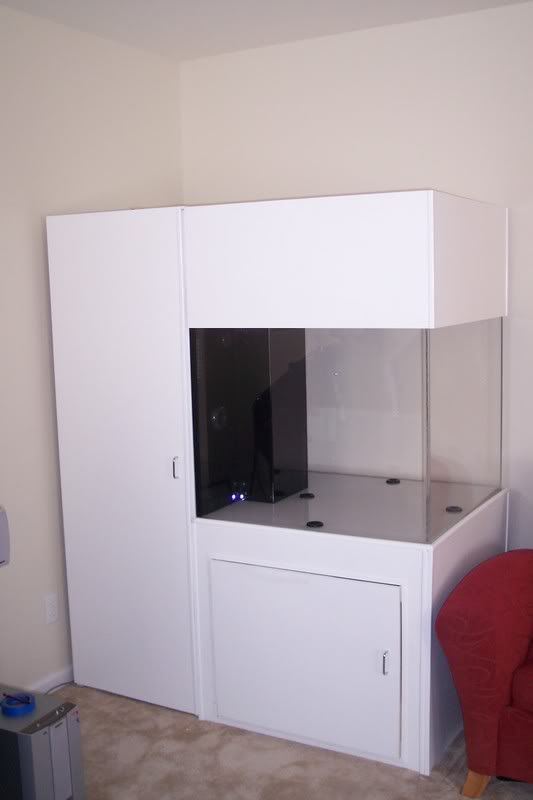
This is my stand for an oceanic 110 I'm working on now. I'll be doing the doors tomorrow.
He's where I'm at now.   
|
|
#19
03/11/2007, 02:02 PM
|
|||
|
|||
|
Here is a picture of my first stand. It supported my 100 gallon tank until I replaced it witht the stainless steel stand picured above.
I built it with wood and MDF.  The back plate of MDF gave it side shear bracing. It was fine for over a year but I was planning to anchor it to the wall for greater support. When I found someone to weld the steel frame I replaced the wood stand.
__________________
Pásate por mi Blog en Español www.arrecifemadrid.com |
|
#20
03/11/2007, 03:28 PM
|
|||
|
|||
|
I know you're looking for wood stand ideas. I built mine out of steel, but since I skinned it with wood it might give you some ideas. I used 3/4" plywood and common trim, and the accents are nameplate blanks from the hobby section at Walmart.
  
__________________
-Mike- "There either is or there isn't life out there. Both possibilites are frightening." (someone help me out - who said this?) |
|
#21
03/11/2007, 04:29 PM
|
|||
|
|||
 this will be for my 640 display |
|
#22
03/11/2007, 04:43 PM
|
|||
|
|||
|
Here is the finished stand. Whew!
 --- Wendy |
|
#23
03/11/2007, 06:39 PM
|
|||
|
|||
|
for my cube

|
|
#24
03/11/2007, 07:47 PM
|
|||
|
|||
|
Mine, wanted something different also. Didn't have to worry about sump space since all workings are now in the closet next to the tank.

__________________
Jesse I want to be a bear turd when I grow up. ~ Bart All butts must be sniffed for identification purposes. ~ Mutt Tequila makes my clothes fall off ~ crp |
|
#25
03/11/2007, 10:23 PM
|
|||
|
|||
|
It moved into the house yesterday, and I have not completed the doors yet.
 John
__________________
John L. Ford I never want to be an expert, I just want to know all the stuff they know. Then I can decide for myself if it is valid information. |
|
|


 I never put a finish on the stand....oh well..I will someday

 Linear Mode

