|
|
|
#176
 10/27/2007, 08:12 PM
|
|||
|
|||
|
To keep the access panel door closed tightly against the frame, I added this roller catch from Rockler. It works very well.
  Curiosity got the best of me, so I threw in the tank to see how it would look.  I didn't stop there....I filled the tank with water and planned on testing my VorTech pump, but never got around to it. The stand had no problems with the weight of the filled tank.  I traced out where my lights would go on the light panel, then cut out the excess material. These cutouts took 7.5lbs off the weight of the top section. The four block assemblies are the T5 endcap/reflector mounting blocks. 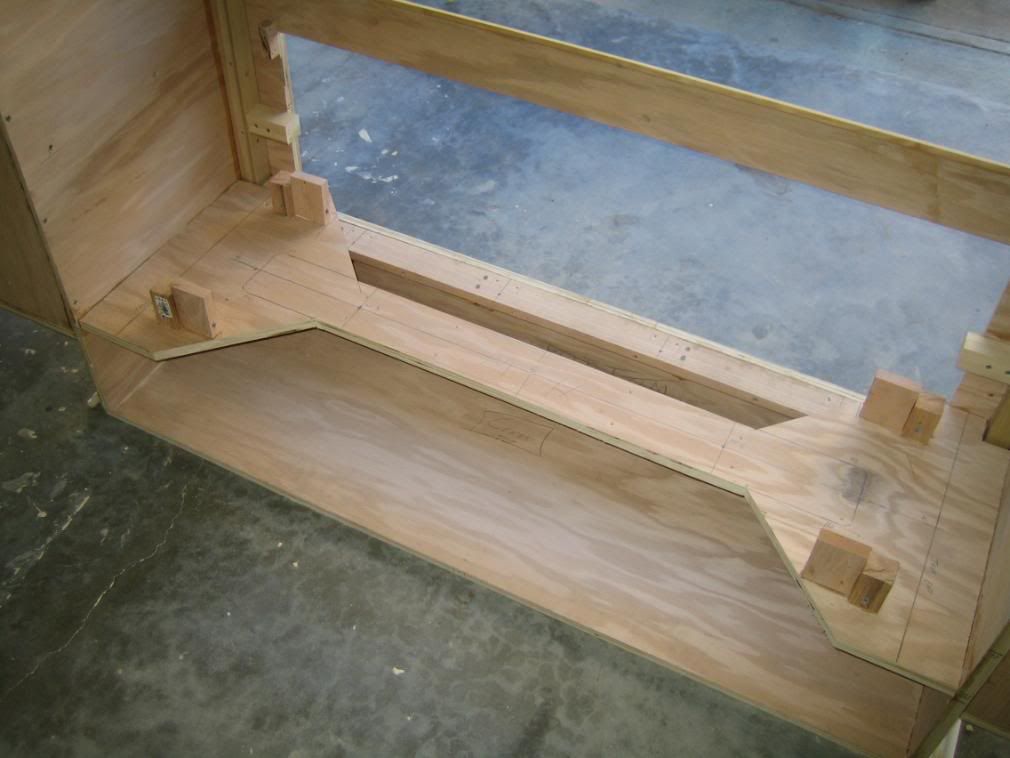 A close-up of the T5 mounts. Simply a 2x2 and 1x3 piece of oak screwed & glued to the light panel.  I bought a 2-1/2" hole saw bit and drilled two holes for the overflow/return  I drilled an additonal hole to run wires from the sump area to the left cabinet area, where the electrical outlets/Aqua Controller will be. 
__________________
90g reef/29g sump, DIY cabinet, 2x250w MH, 2x54w T5 actinics, ER RS135 skimmer, VorTech pump, 18w UV sterilizer |
|
#177
10/27/2007, 08:13 PM
|
|||
|
|||
|
Great design and build thread.
One question: How did you determine that this structure would hold the weight of the tank/water? I'm staring at a custom stand build for a 150g and that is THE major thing I'm worried about...
__________________
Did I say that out loud? Good. Somebody needed to. |
|
#178
10/27/2007, 08:22 PM
|
|||
|
|||
|
Quote:
Additionally, and I'm no structural engineer by any means, but I do have a B.S. in building science so I have ran the numbers first-hand and proved to myself in school how strong wood can be. A lot of do-it-yourself folks on RC don't really understand just how strong engineered wood (plywood) is....hence all the grossly overbuilt stands on this forum. If it makes you sleep better at night, fine, but in reality all the extra wood does nothing more than that.
__________________
90g reef/29g sump, DIY cabinet, 2x250w MH, 2x54w T5 actinics, ER RS135 skimmer, VorTech pump, 18w UV sterilizer |
|
#179
10/27/2007, 08:38 PM
|
|||
|
|||
|
Before priming/painting the cabinet, I primed a test sample of plywood first. The result was frustrating...even after three coats of primer, sanded between coats, the oak woodgrain was still 100% visiblle. This wouldn't suit my tastes, as I wanted a totally smooth look, so I began testing various ways of finishing the plywood.
 Through all the trial & error mockups I finally had my gameplan for a smooth finish: 1) Orbital power sander, 120 grit 2) Apply a skim coat of wood filler paste, with water added to the filler to make it a little thinner, to help it get down into the grain. 3) Hand sand, across the grain, 220 grit followed by 320 grit 4) Apply a thick coat of sanding sealer 3) Hand sand, 320 grit 4) Apply primer, with roller where possible, to avoid brush marks 5) Hand sand, 320 grit 6) Apply 2nd coat of primer, same process as before 7) Hand sand, 320 grit 8) Apply acrylic paint, with roller where possible This process leaves a mirror-smooth finish, totally hiding the oak wood grain. Obviously it would have made more sense to use a paint-grade ply, rather than killing yourself covering up oak grain, but I realized this too late, and well, here we are. It is what it is, and it worked 
__________________
90g reef/29g sump, DIY cabinet, 2x250w MH, 2x54w T5 actinics, ER RS135 skimmer, VorTech pump, 18w UV sterilizer |
|
#180
10/28/2007, 06:25 PM
|
|||
|
|||
|
Your holes for the return will need to be bigger unless you plan on putting in the tank with the unions already on it. I had a hell of a time getting my unions good and snug through the access holes I created. It is quite difficult to get a wrench up there when going through the hole.
__________________
If my phaser discharges off by as little as .06 terra watts, it would cause a cascading exothermal inversion. |
|
#181
10/28/2007, 07:07 PM
|
|||
|
|||
|
Quote:
I'm planning to tighten the bulkheads on the tank, then place the tank w/ bulkheads on the stand (aligning the bulkheads with the holes, then sitting the tank down). My bulkheads have 1-1/4" threaded male ends, and the holes in the cabinet are 2-1/2".
__________________
90g reef/29g sump, DIY cabinet, 2x250w MH, 2x54w T5 actinics, ER RS135 skimmer, VorTech pump, 18w UV sterilizer Last edited by RedEDGE2k1; 10/28/2007 at 07:22 PM. |
|
#182
10/28/2007, 07:22 PM
|
|||
|
|||
|
This weekend I got a lot of final finish work accomplished on the cabinet...a full weekend of it.
Friday night I skim-coated the entire cabinet exterior with Elmer's Wood Filler (with water added to make it a little more gooey). I didn't bother with the inside areas of the cabinet, as they will be unseen and I don't care if the wood grain is visible in those areas. I spent all day Saturday sanding the wood filler on the bottom section with 220 grit sandpaper, followed by 320 grit. I had to do this by hand with a sanding block because the power sander was removing the wood filler from the wood grain, even with 320 grit sand paper and light pressure. I was able to finish the bottom section by the end of the night Saturday. Today (Sunday) I tackled the top section. By 5pm I was finished, and was ready to clean all the dust off the two cabinet sections. I went to Lowe's to buy some tack cloths, but instead came home with a new Porter-Cable air compressor. The $169 was worth every penny, as I was able to blow all the dust particles off the entire cabinet in about 20 minutes. Plus, it'll come in handy for future projects, as I can use it to power nail guns. Note how visible the wood grain is now. The wood filler dries white. This gives you an idea of how many divots are in oak wood grain. I could have saved myself $60 ($10 per sheet of plywood) and ~16hrs of labor if I would have just used paint-grade ply! Blah...live & learn.  I did a little mutli-tasking today also. I masked off the tank with plastic and 2" painter's tape in preperation for painting, and placed it on a 9'x12' plastic sheet in my garage. For paint, I used American Tradition gloss black enamel spray paint from Lowe's. I bought one can, but ended up going back for a second when the first ran out. I used two full cans on the tank, with probably 12-15 very light coats. I painted the sides and back of the tank, as only the front panel is viewable in my cabinet.   I sprayed very light coats, allowing 20-30 minutes between each thin coat.  The tank complete after two cans of paint and probably a dozen very light coats. I didn't spray the tank while the cabnet sections were in the garage; this picture was taken after I had put everything back in the garage and closed shop for night. 
__________________
90g reef/29g sump, DIY cabinet, 2x250w MH, 2x54w T5 actinics, ER RS135 skimmer, VorTech pump, 18w UV sterilizer Last edited by RedEDGE2k1; 10/28/2007 at 07:31 PM. |
|
#184
10/28/2007, 07:44 PM
|
|||
|
|||
|
Well if you had to do maintenance on the bulkhead it may be difficult to get a wrench on it.
__________________
If my phaser discharges off by as little as .06 terra watts, it would cause a cascading exothermal inversion. |
|
#185
10/28/2007, 07:45 PM
|
|||
|
|||
|
Quote:
Even with birch or the "sanded ply" they sell, I still think I'd have to skimcoat it with wood filler and sand it smooth in order to get a smooth-as-glass final finish.
__________________
90g reef/29g sump, DIY cabinet, 2x250w MH, 2x54w T5 actinics, ER RS135 skimmer, VorTech pump, 18w UV sterilizer |
|
#186
10/28/2007, 07:52 PM
|
|||
|
|||
|
Quote:
__________________
If my phaser discharges off by as little as .06 terra watts, it would cause a cascading exothermal inversion. |
|
#187
10/28/2007, 11:12 PM
|
|||
|
|||
|
i gotta say looking awesome doing a great job insperation for me to get cracking on my stand for my 90 i need one reallly bad
|
|
#188
10/29/2007, 05:13 AM
|
|||
|
|||
|
I don't remember what it is called but they do make plywood that has paper, like drywall paper, on the surface of the plywood. We use it a lot at work because we often but decals and painted murals and stuff right on the plywood. The final product when painted is very smooth. It probably isn';t more than oak plywood.
|
|
#189
10/29/2007, 07:36 AM
|
|||
|
|||
|
That would be MDO plywood. It probably is more expensive.
__________________
If my phaser discharges off by as little as .06 terra watts, it would cause a cascading exothermal inversion. |
|
#190
10/29/2007, 12:23 PM
|
|||
|
|||
|
Quote:
I'm officially taking back everything I said about birch plywood. I stopped by Home Depot today to look at the birch stuff out of curiosity, and I wanted to slap myself in the face for not buying it instead of the oak ply. I must have been looking at something else when I decided the oak ply was smoothest. The birch today had no grain divots, and was totally smooth. I could have saved myself four days of labor and $40 in sanding sealer/sandpaper if I would have known to buy birch. The freakin cabinet would already be finished and in my living room. Hindsight....blah.
__________________
90g reef/29g sump, DIY cabinet, 2x250w MH, 2x54w T5 actinics, ER RS135 skimmer, VorTech pump, 18w UV sterilizer |
|
#191
10/29/2007, 12:36 PM
|
|||
|
|||
|
Haha a bit ironic, last night I picked up 2 4'x8' sheets of 3/4 Birch for my stand build. I agree it's got a great finish. After reading your heroic sanding/finishing adventure I figured it well worth the 5 bucks more. They also had a couple 2'x4' and 4'x4' precut 3/4 Birch which were great dimensions to cut the sides from. Lowes that is.
__________________
**speed doesn't kill... it's the stopping fast that hurts** |
|
#192
10/29/2007, 12:59 PM
|
|||
|
|||
|
Yeah, pretty darn frustrating.
With all the wood filler and sand paper I went through, I probably could have made the $25 construction grade plywood smooth Ok, no more talking about it, I'm trying to forget it and move on!
__________________
90g reef/29g sump, DIY cabinet, 2x250w MH, 2x54w T5 actinics, ER RS135 skimmer, VorTech pump, 18w UV sterilizer |
|
#193
10/29/2007, 01:27 PM
|
|||
|
|||
|
I've been following your build for a while now, and I just have to say that you are doing an awsome job. The stand looks fantastic. I'll be starting my own build in the next month or so for a 125 gallon stand. It will not be nearly as detailed as yours but I may have to PM you if I run up on any questions or snags. Awsome work, can't wait to see the finished product.
__________________
Pain is the greatest teacher. The only problem is that no one wants to attend class. |
|
#194
10/29/2007, 03:45 PM
|
|||
|
|||
|
After tallying up all my receipts, I've spent $908 building the cabinet. This includes everything needed to finish the cabinet (sandpaper, paint, brushes, etc). The only thing that total doesn't include are the tools purchased for/during the build. Really not bad (especially if you already own the power tools), considering a mass-manufactured solid wood stand/canopy combo will run you $600-$800 in stores.
The cherry stand/canopy I was considering purchasing a few months ago at Marine Fish here in Atlanta was $800....and that's for a plain-jane setup that looks like what everone calls a "fish tank stand." I didn't want that...I wanted a piece of furniture that would add appeal to our living room, not take away from it. I think I've accomplished that, and I think my money has been well-spent. If you can't tell...I highly recommend DIY
__________________
90g reef/29g sump, DIY cabinet, 2x250w MH, 2x54w T5 actinics, ER RS135 skimmer, VorTech pump, 18w UV sterilizer Last edited by RedEDGE2k1; 10/29/2007 at 03:57 PM. |
|
#196
10/29/2007, 10:07 PM
|
|||
|
|||
|
After work this evening I brushed on a coat of sanding sealer to the outside of the top & bottom sections. I'll sand with 320 grit sandpaper tomorrow evening, and hopefully get the first coat of primer on if I have the energy.

__________________
90g reef/29g sump, DIY cabinet, 2x250w MH, 2x54w T5 actinics, ER RS135 skimmer, VorTech pump, 18w UV sterilizer |
|
#197
10/30/2007, 01:46 PM
|
|||
|
|||
|
Very very nice work, I just read your whole thread. One question I have is how are you going to position your vortechs once the stand is assembled and the tank in place? Is there going to be enough room from the access panel to get your arms down to the sides of the tank to move them around?
__________________
~Jayson |
|
#198
10/30/2007, 03:20 PM
|
|||
|
|||
|
Quote:
I plan on positioning the VorTech while the top section is off of the bottom section. There is 3" of space between the side glass and the inside of the cabinet, so I'll be able to position the top section back onto the bottom section without touching the VorTech. I realize it'll be a pain to remove the top section, but I don't intend to remove it very often, once everything is set up and in place initially. I'm going to try and keep my hands out of the tank this time
__________________
90g reef/29g sump, DIY cabinet, 2x250w MH, 2x54w T5 actinics, ER RS135 skimmer, VorTech pump, 18w UV sterilizer |
|
#199
10/30/2007, 03:43 PM
|
|||
|
|||
|
I'm going to try and keep my hands out of the tank this time
Good luck with that!!!! LOL
__________________
Fish List:2 Yellow Watchman Gobies,2 Green Mandarins,2 Maroon Clowns,2 Green Chromis,1 Lawnmower Blenny,1 Blue Tang Nano: 2 Black Ocellaris Clowns |
|
#200
10/30/2007, 07:32 PM
|
|||
|
|||
|
Quote:
__________________
**speed doesn't kill... it's the stopping fast that hurts** |
|
|


 Linear Mode

