

|
|
|
#1
|
|||
|
|||
|
Foam & Live Rock commbo
These pics are in my 180g build in Large Reefs forum but thought i'd put a few shots here as the DIY rock wall is applicable to any tank.
Lots of detail in the build thread (180g UK Reef) but here's a few pics ....have to say, having gone through cement rock, reef ceramics, etc , etc - this is the best i have done and wished i tried it before! Cable tie real rock to crate: 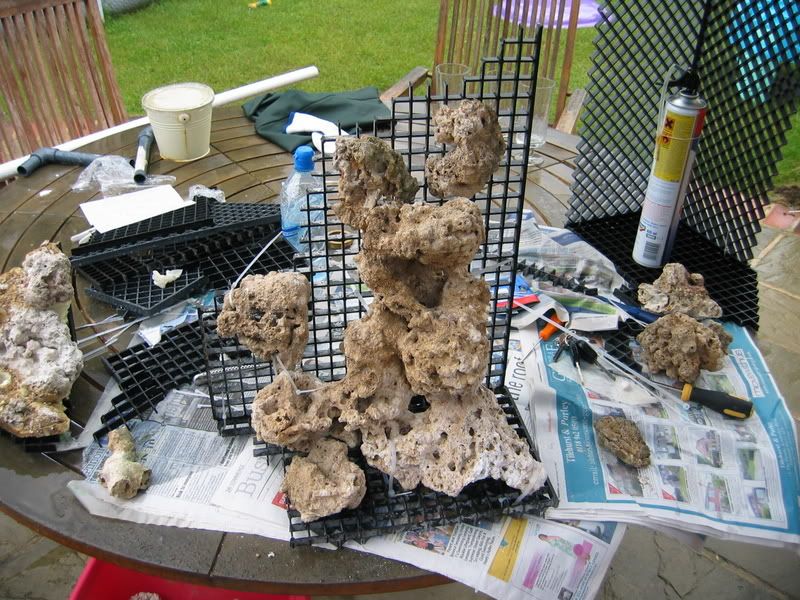 Foam it: 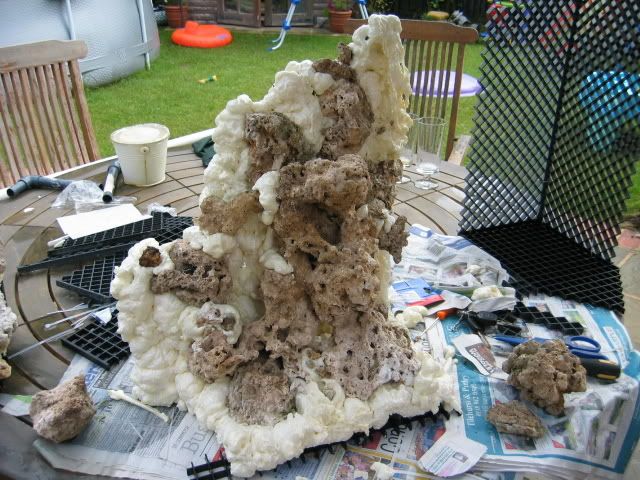 Trim foam, cover foam in epoxy resin and sand and crushed coral: 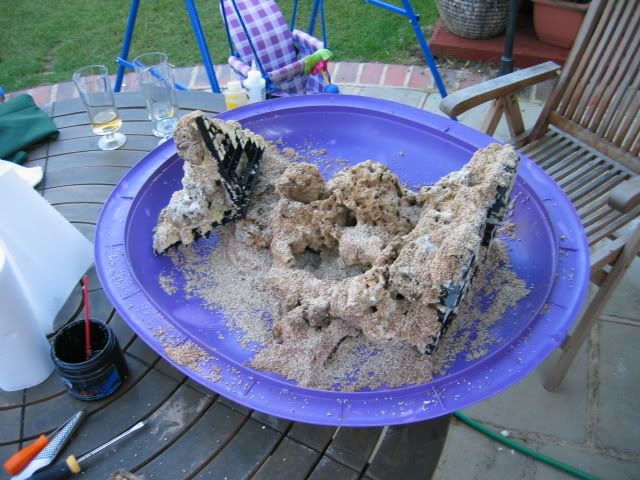 This is 3 bits so far:  This is the way it will look when done (covers the weir in the corner and 3 islands in the center:  This shows how much i've done and whats left to do (the blue bits) 
|
|
#2
|
|||
|
|||
|
looking real nice!
|
|
#3
|
|||
|
|||
|
Which epoxy resin did you use?
Would it be heavy enough to compensate for the foam extreme floating ability? It looks very nice  Tempting for my next project. Tempting for my next project.
__________________
Stephane Levesque The Shrimp Guy! |
|
#4
|
|||
|
|||
|
I used an epoxy finishing resin from a toy model shop (sort of place where the owner has a beard)
and yes......the foam floats like ballon! I have to apply the foam then hack it away leaving only what is needed.....i then test float it in a large container - when it sinks i then apply the resin and gravel. this pic shows how i cut it away from behind to get rid of the foam thats not needed - and also make lots of caves behind the rock.....there is huge space between the rock and crate (relative to what you'd expect) and ample room for fish to hide out the way if they want to. 
|
|
#5
|
|||
|
|||
|
Wow that looks GREAT and it doesnt look to hard so it just might be something I can pull off. Could you post or message me some pictures with it assembled in your tank??
Thanks |
|
#6
|
|||
|
|||
|
its not in the tank yet and will be another couple of weeks before its all done - lots of deatil in my build thread but happy to answer any questions.
|
|
#7
|
|||
|
|||
|
Tiggsy: WOW I mean WOW !!!!!!!!!! You have definatly set the bar. I 've seen alot of work with the foam I even did it my self but your idea is ingenious and I am defiantlry kicking my self in the a$$ for not thinking of that lol. I just sprayed the back of my tank with the gray foam and shaped it . I am defianlty happy with mine b/c the rock covers alot of it so it blends very good, But your trick is definatley the way to go. Great job I can't wait to set up another tank to try this out.
|
|
#8
|
|||
|
|||
|
thanks very much
 .....and theres still loads more to do! .....and theres still loads more to do!what i will enjoy most is putting it in the tank - the section above is 3 bits, the rest of the rear wall will be another 2 and the 3 islands will be in 2 bits each......so a total of 11 sections. means i can lift my entire aquascape from back yard to tank in about 30 mins 
|
|
#9
|
|||
|
|||
|
oh...and a few people have asked about the hole in the overhead shot.....its a 40mm pipe hidden in the rock, one of my sump returns will enter into here in 32mm (so it will just poke into the 40mm pipe - not a tight fit)
it sends my sump water to the bottom and flushes out behind this rock wall......with no danger of flood or syphon (if a 40mm snail blocked the pipe it would just overflow out of the top and down the front of the rocks. |
|
#10
|
|||
|
|||
|
Cool idea, good combination of some of the other techniques that have been used. Keep us updated as this project progresses please!
__________________
It could be that the purpose of your life is only to serve as a warning to others.... |
|
#11
|
|||
|
|||
|
awesome idea... i may try it myself
|
|
#12
|
|||
|
|||
|
Sorry if this is a dumb question but where is your build thread at?? New to reefcentral

|
|
#13
|
|||
|
|||
|
Instead of using resin to glue the crushed coral and sand, could you just press it into the wet foam...kind of shaping it as you go? Glad I caught this thread, cause your DIY ROCKS!!!
__________________
Join the fight to stop Puppy Mills...DON'T SHOP....ADOPT!!! |
|
#14
|
|||
|
|||
|
WOW I couldent see it visually till the cardboard model, now i totally see it....NICE IDEA
So ive seen his done with ceramic sections before, looked like allot more work because of the firing part. I have also seen people drill holes, and slide rock over pvc pipe, to get the same effect, but also looks fairly time consuming. Are you going to add live rock to this setup? DISCLAIMER: Ok, so here comes the stuped questions Doh' #1 Does the foam want to float at all? i mean lift up, when submerged?? do you have to "mount it before the water is added? Doh' #2 How do you keep the anerobic (spelling...lol) bacteria out of the dead/ non movement areas on the backside? Doh' #3 Does the foam "rot" or deteriorate in the water over time
__________________
Will A.K.A. ModernReefKeeper NOTE: Please forgive my spelling....lol, its the thought that counts right? |
|
#15
|
|||
|
|||
|
Thanks for all the positive feed back
 To answer a few of the questions above..... My build is in the Large Reefs forum called UK 180g Reef. Pushing anything into the foam is hard - it takes about 3 hours to hard but skins over in seconds so sand just falls off. Gravel can sort of be pushed in while its very wet (first seconds after applying) but it tends to break the foam down and is just a bit of a mess really (and i wanted resin used as explained below) The foam floats like crazy - i was amazed when i put a lump weighing 15kg in large tub of water as i was interested how heavy it was submerged (i assumed it would loose half its eight under water).....it floats like a boat! Thats why i have to apply the foam to cover any cable ties, link sections of rock together (to give the structure stability and also make it look very organic instead of like a pile of individual rocks and then cut of any excess - i must hack away at least 50% of what i apply before it will sink. This is the middle section above with foam just applied:  At first i thought the round shapes of the foam looked good and was annoyed to hack them away to get it to sink - but once coated in gravel the harsh edges of the trimmed foam look far better (and it means there is more real rock on display) The only way of shifting water behind the structure is via the return pipe that exits behind this....however, i dont believe that muck collecting behind rocks is a big deal if you have the right clean up crew (just my opinion) and also this rock is many times more "gappy" that a traditional stacking of rock. Good flow in the display will cause movement back there simply because the holes between the rear of the rock and the front are so well spaced (although they are not obvious due to the construction - it would be easy for any large tang to get between the front and rear of the rock in many different places - very open) Does it rot? .....i hope not! All i have read seems to indicate that water is not an issue but UV light might be enough to cause it to go brittle - hence the epoxy and gravel. This should be enough to keep it protected....but if its not it shouldn't matter - the foam is not holding the rock up - the cable ties do that. If the foam became so brittle it broke free of the points in joins rock to rock the rock wouldn't fall down, it would just become loose on its ties and wobble if pushed (not ideal, but no big deal) I am pretty confident it will be fine for years (the epoxy coat is like 1mm of plastic covering all the foam + gravel) I will have LR in one of my sump tanks (i have a sump shed)...BUT i believe the rock here will be VERY useful for filtration. A few UK reefers have said "looks nice, but no filtering"...which is wrong. Of course the LR is dead at the moment and will need to be given time to become live but when it does only about 15% of its surface is covered by foam - and the open layout means it is exposed to flow far better than a normal pile of rocks.....it wont be my only filtration - but it will work. Heres a tank shot showing the very first bit (which i had to re-do as it floated!) and the layout of the wall around the weir......loads of space left in front for the islands. 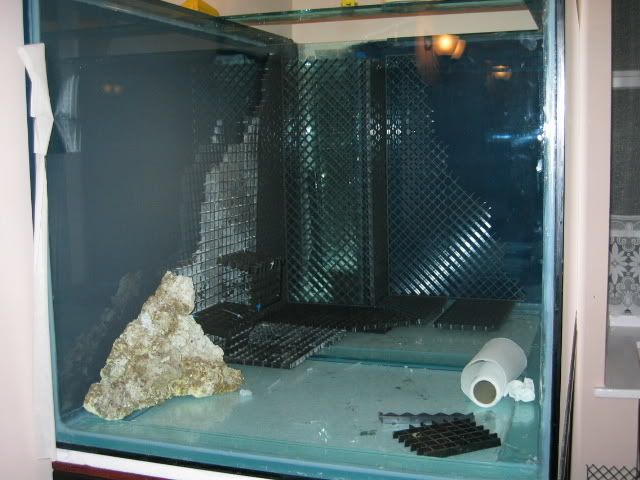 Just to add - although i mention tangs above i dont plan any large fish in this, just LOTS of small ones (big fish ruin the aesthetics of a short tank IMO)...and my last tank had 3 gem tangs so i kind of done the tang thing anyway 
|
|
#16
|
|||
|
|||
|
Wow! looks great! I never would have thought about doing this, but it looks great, I might have to save this thread!
Just a tip I would like to add, http://www.uscomposites.com/ is where I get all of my fiberglass/epoxy/2 part foam from as they are the cheapest I've found. They can answer any questions about what they sell and what it will stick to, etc.. However they may not know whats "reef safe" But again, prices are nice... |
|
#17
|
|||
|
|||
|
Alright Tiggsy! I think you solved my problem with my 75g Montipora Only Tank. I was a little worried about how much space will show through between the rocks on my setup, but I didn't think about filling it with foam. Thanks for the idea.
__________________
Travis Stevens |
|
#18
|
|||
|
|||
|
Well, I'm pretty good at the DIY stuff, so you've convinced me to try this for my new up-grade...the stability of the project is a BIG plus...you don't have to worry about anything falling down...KUDOS to you for a GREAT project.
Is the epoxy resin you use a 2 part one that is mixed prior to application?
__________________
Join the fight to stop Puppy Mills...DON'T SHOP....ADOPT!!! |
|
#19
|
|||
|
|||
|
Quote:
Actually, i meant the gap between the glass, and the plastic grid the rock is on, (behind the back edge, and in between the bottom of the tank and the drocrations. That gap caused by the grate would almost act like a gap left with an under gravel filter. It will create "deadwater" movement areas. Also you say you used epoxy to seal it...did you "seal" the back side and bottoms of the pieces also??? I think what you got is GREAT looking, I just had some concerns on actual implementation, and livestock survival Also the biodiversity will grow on EVERY surface of the decoration, so it will be like a huge Jinormus live rock piece within a few months. But i would still recommend some fresh live rock in the sump/refugum. Look forward to seeing it all in the tank
__________________
Will A.K.A. ModernReefKeeper NOTE: Please forgive my spelling....lol, its the thought that counts right? |
|
#20
|
|||
|
|||
|
What is the crate material and where did you get it?
Thanks |
|
#21
|
|||
|
|||
|
Quote:

__________________
Travis Stevens |
|
#22
|
|||
|
|||
|
Thanks: His looks different than that. I read that the regular light diffuser egg crate can give of chemicals that promote algae growth. The thread stated that you need to use acrylic egg crate, so I was wondering what was used it this thread because it looks different that the stuff you show.
|
|
#23
|
|||
|
|||
|
Quote:
This pic is not great but you can see that behind the rock there is a big gap where water/fish can flow. 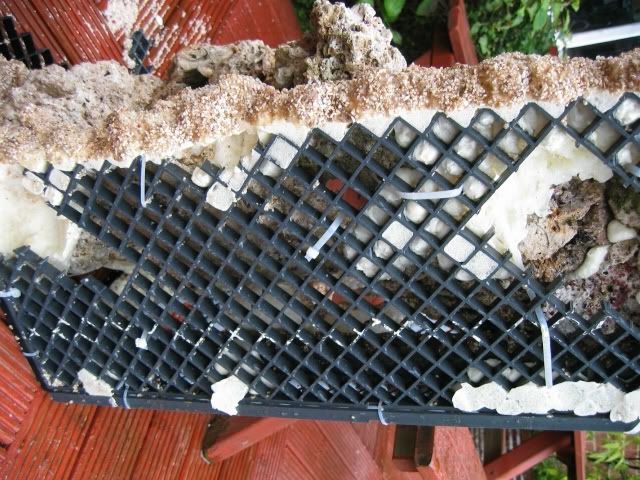 This rather simplistic cross section shows how little foam is used relative to the rock and how open the rear is - as a vertical cross section it doesnt show all the holes and gaps that link the front and rear allowing water and fish back there. As the crate is full of holes there is no "trapped" dead spot any more than there would be if you just stuck a sheet of the crate to any tank wall. In fact, notice how at the base there is LESS space for food and muck to get trapped! 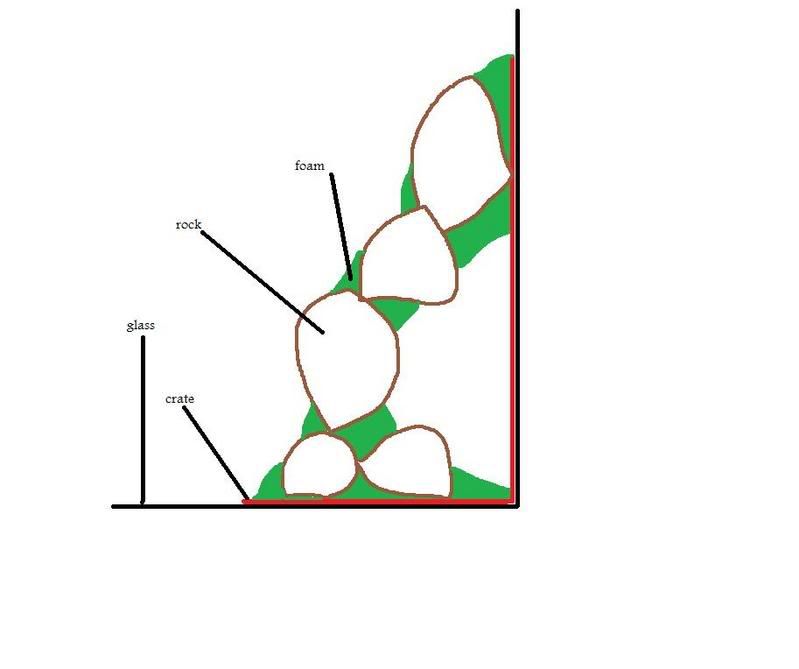 As for epoxy - i only covered areas that i thought UV would get to and might be visible (as the visible areas extended to places UV would never get this was the primary focus) This leaves the rear and underneath of some bits of foam uncovered.....i dont believe that's an issue as i believe it will only corroded if exposed to UV light. |
|
#24
|
|||
|
|||
|
Quote:
|
|
#25
|
|||
|
|||
|
The stuff that Tiggsy is using looks more like a hard rubber than the stuff used in eggcrate material. I find acrylic light diffusers are actually very brittle and I think handling it with the weight of the rock ect. would cause it to crack. I wonder if the material used in large milk crates would work? That's a little heaver and a bit more flexible.
__________________
Join the fight to stop Puppy Mills...DON'T SHOP....ADOPT!!! |
|
|