|
|
|
#1276
 02/17/2004, 11:20 AM
|
|||
|
|||
|
That is just not right, totally jealous
|
|
#1277
02/17/2004, 11:58 AM
|
|||
|
|||
|
Weatherson that is the most beautiful skimmer Iâve ever seen.
 How did you first learn to work with acrylic? I would like to start working with acrylic since itâs such a useful thing to know how to do in this hobby. How did you first learn to work with acrylic? I would like to start working with acrylic since itâs such a useful thing to know how to do in this hobby.
|
|
#1278
02/17/2004, 12:19 PM
|
|||
|
|||
|
SKIMMER
Very nice work, I keep learning from you.
Pride of ownership goes up with quality craftsmanship. |
|
#1279
02/17/2004, 02:22 PM
|
|||
|
|||
|
You guys have really been an inspiration for me and I have really learned alot about your tanks.I am currently starting a rather smaller reef tank (55 gallons) what do you suggest I start my tank off with?,end ?,lighting? ,what fish should I incorporate?corrals? thanks email me please with any answers at dmward99@yahoo.com
|
|
#1280
02/17/2004, 03:14 PM
|
|||
|
|||
|
Well, let me pick up where I left off last night. Or should I say early this morning?
 I had to give up when the site went down. Although just before noon should prove to be challenging but I'll give it a shot anyways. First, let me catch up on replies. I had to give up when the site went down. Although just before noon should prove to be challenging but I'll give it a shot anyways. First, let me catch up on replies. Spanker: Thanks and having seen some of your handy work, this is a worthy compliment. smurf04: Well, it couldn't be just run of the mill for my tank when it comes to all things mechanical.  Seriously, I'm pleased with the end result. Stay tuned. And sorry, but no, the old skimmer is not for sale. I like backups just in case. Seriously, I'm pleased with the end result. Stay tuned. And sorry, but no, the old skimmer is not for sale. I like backups just in case. Typhon: It's good to hear my work is appreciated. Thanks for the kind words. Lunchbucket: I agree and this is one of the reasons I like working with half inch stock. It's definitely stronger and allows for better joints but... it sure is beautiful when finished up all shiny. To give reference, the middle flange is 12" X 15", the base is 15" square and the collection cup flanges are 8" circles.The Jasper circle cutting jig is also used for speaker building so you can check out Parts Express HERE. I think I mentioned above that it cuts circles in 1/8th inch increments but it's actually 1/16th of an inch. Sorry about that. dieselfish: No need for jealousy. You too can play with acrylic by taking my one hour course on acrylic mastering for just 24 easy payments of $29.99. Some restrictions apply. No liability for severed fingers or loss of life. Seriously, thanks.Jeremy S: See the above post. I started right about the time I started my first reef tank. Hmmm. I think I see a correlation there. Being able to work with acrylic comes in very handy when dealing with corrosive salt water. For me, it was simply a matter of applying my woodworking skills to all things plastic. It also helps to have heavy-duty power tools. However, keep in mind that with power tools comes danger to life and limb. Safety and caution are paramount.Ken Sellick: Thank you and I couldn't agree more.  REEFERINDC: Thanks for posting and I'm glad we have helped you with your new tank. You may be better off starting a thread to get some answers rather than posting your email here. Not to mention you are just asking for junk mail by doing so. Good luck with the new tank.Joseph |
|
#1281
02/17/2004, 03:16 PM
|
|||
|
|||
|
So, back to the skimmer's main body. Next is a shot with the base finished and the 10" cylinder glued in place. The plan called for bulkheads so I needed to drill holes in the cylinder and flatten the immediate area to make for a watertight bulkhead. I drilled the holes with hole-saws with extreme care. Then I carefully heated the area around the hole with a hand held torch set at the lowest possible flame. This takes patience, as you don't want to heat the acrylic too quickly as it will "boil" and leave bubbles on the surface. Once I felt the acrylic was pliable enough, I quickly inserted the bulkhead without the rubber gasket and tightened it down. This clamps and flattens the area where the gasket will sit and makes it watertight. Here's a shot of one the hole already drilled;
 Next, the bulkhead installed. You can see here that it's slightly recessed where it was heated and bent flat. 
Last edited by Skipper; 04/04/2004 at 10:46 AM. |
|
#1282
02/17/2004, 03:22 PM
|
|||
|
|||
|
Here's a quick shot of one of the two side holes for the injector inputs drilled and prior to flattening. The smaller hole just below is for a drain valve I installed considering the great quantity of water this skimmer holds.

Last edited by Skipper; 04/04/2004 at 01:57 AM. |
|
#1283
02/17/2004, 03:31 PM
|
|||
|
|||
|
The ouput plumbing is of the 2" size so I needed to provide bracing so there would be no stress at the bulkhead. To aid in this, I created a support brace that allows me to remove half of it for output pipe removal. More half inch stock and stainless steel button head allen bolts to secure everything. And yes, I polished the stainlees steel too.
 Here's a shot showing the strap clamp while glueing the brace in place onto the cylinder. Those with a really, really good memory will recognize this strap as the same one used to hold the tank to the dolly to move it into the house. Remember? Go back a few pages. 
Last edited by Skipper; 04/04/2004 at 10:48 AM. |
|
#1284
02/17/2004, 03:37 PM
|
|||
|
|||
|
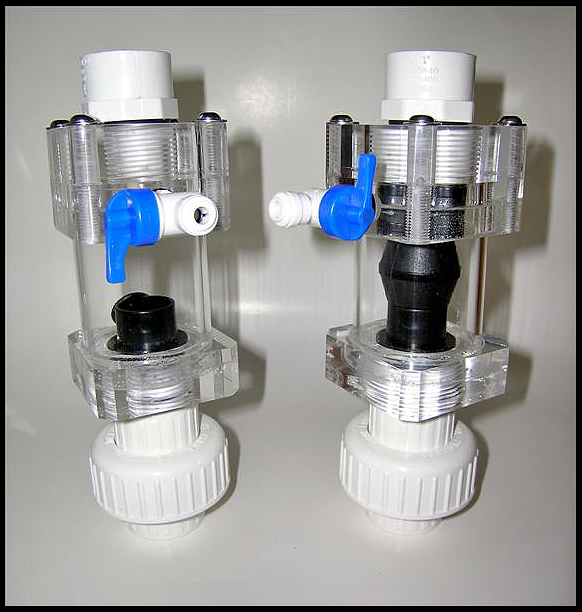
Unfortunately, while concentrating on assembly of the skimmer, I failed to shoot pictures of this process. However, the finished shot should explain most everything else. First, a shot of the injector housings from before as these were the first items I made for this skimmer.
Last edited by Skipper; 04/04/2004 at 10:50 AM. |
|
#1286
02/17/2004, 04:18 PM
|
|||
|
|||
|
We'll have to fast forward to the finished product. This shot shows the extension tube in place below the collection chamber. I decided to run the skimmer initially without this but thought I would include it for this photo. Here are some specifics about the materials and design;
The output is a single 2" line with a gate valve for level adjusting. A single 1â? line that is split into two with a wye piece feeds the injectors. The line that continues straight up to one of the two injectors has a ball valve installed for balance between the two injectors (flow is more likely to travel the straight path). Plumbing below or after the injectors is 1 and 1/4" and the blue pipe is "clear" PVC. This allows for viewing of the froth from the injectors. Internally, at the air/water mixture outlets, I placed three-way connectors so the output is forced in two directions, one up and the other slightly to the side. This creates a swirl motion within but also sends air/water upward. The small valve seen at the left of the image on the left feeds a 3/8th inch acrylic tube for level indication. Its input at the bottom is below the air mixture so it has water only within this tube. This is the true water level despite all the bubbles. Iâve found this to be a good way to monitor the internal water level. So, without further ado, here's the shot of the completed skimmer; 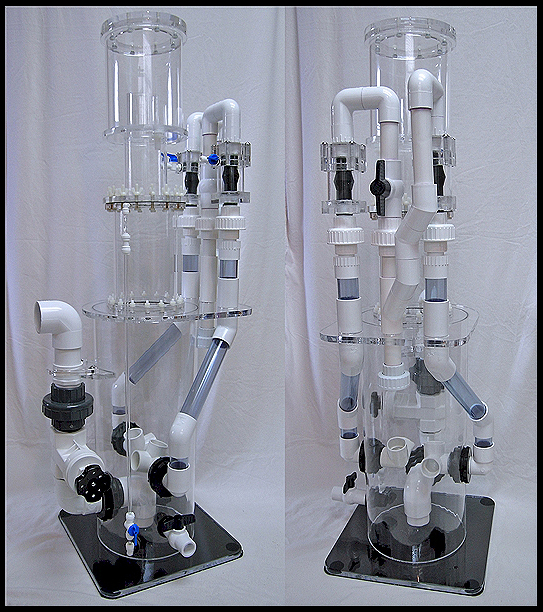 In addition, here is a link to a much larger version of the same image for better-detailed viewing. Note that this is big so dial-up beware. LARGE image of skimmer. I should also mention that I increased my skimmer pump from an Iwaki 55 to a 100, doubling the GPH. Joseph Last edited by Skipper; 04/04/2004 at 10:52 AM. |
|
#1288
02/17/2004, 04:36 PM
|
|||
|
|||
|
that is it joseph you are no longer allowed to play with the rest of us,seriouly i've been following this since the begining and you are truley an inspiration. great work.now to see if my wife will let me practice with the tools.
__________________
Alex "The sea is everything... An emmense reservoir of nature where i roam at will...." CAPT. NEMO |
|
#1289
02/17/2004, 04:40 PM
|
|||
|
|||
|
Twize: Yep, I made an error in the naming of the photo but it should be all good to go now.
And no, there will be no orders accepted as this will be the last skimmer I make in my lifetime. tor101898: Thanks for the humorous and kind words. Perhaps if you up your life insurance plan, she will let you . Joseph |
|
#1290
02/17/2004, 04:43 PM
|
|||
|
|||
|
I forgot to mention that I attached with silicone a 1/8th inch black sheet of acrylic to the bottom. Just for asthetic reasons.
Joseph |
|
#1292
02/17/2004, 05:47 PM
|
|||
|
|||
|
Ted: Thanks. I really appreciate that. Yes, the sheet was mandatory. Shooting proper photos of clear acrylic is harder than you would think.
Joseph |
|
#1294
02/17/2004, 07:59 PM
|
|||
|
|||
|
dude you have to be FREAKING JOKING????? that thing is AMAZING!!!!!!!!!!!!!!!!!!!!!!!!!!!!!!!!!!!!!!!!!!!!!!!!!!!!!!!!!!!!!!!!!!!!!!!!!!!!!!!!!!!!!!!!!!!!! !!!!!!!!!!!!!!!!!!!!!!!!!!!!!!!!!!!!!!!!!!!!!!!!!!!!!!!!!!!!!!
i am absolutely amazed, astounded, baffled, OMG!!   i need to go clean my shorts out now...thanks  i want to see this thing in action!!!! Lunchbucket
__________________
Trying to lose weight by walking is like trying to bake a cake w/ a cigarette lighter - Lunchbucket - "Nancy-Boy Extraordinaire" - maxxII- |
|
#1295
02/17/2004, 08:17 PM
|
|||
|
|||
|
Holy S%@t! You have some serious skills Joseph.....AWESOME WORK! Make sure to post some pics of it in action when your tank is up and running.
__________________
Jimmy C. Elos 70 (30"x22.5"x20) Semi-Cube (36"36"x24" old setup) DIY Stand Build Thread http://reefcentral.com/forums/showthread.php?s=&threadid=1207997 |
|
#1296
02/17/2004, 08:29 PM
|
|||
|
|||
|
Holy S***!!!!! That thing is incredible! Good thing I can still type with my mouth hangin' wide a** open. Joseph, do you plan to fill it with salt water.....or rocket fuel?
Outstanding job. Please post pics during and after the launch! Mike |
|
#1298
02/18/2004, 12:51 AM
|
|||
|
|||
|
Skipper: Thanks for the kind words.
Lunchbucket: Can I take it from your comments that you like the skimmer? I'll post a photo with it up and running as soon as I can. Thanks for the delicate words of praise. nanoguy: Thanks for the kind words. As above, photos coming soon. By the way, for clarification, the tank has been up and running for several months now. Mike: No rocket fuel required and it has salt water running through it now. It took about 10 hours to break in and keeps improving with time.spanker: Thanks, glad you like it. Joseph |
|
#1299
02/18/2004, 01:19 AM
|
|||
|
|||
|
Weatherson,
Absolutely beautiful!! I just finished reading from post 1, took me like 7 hour total over two days!! I can not thank you and everyone else enough for all of your fantastic info and experiences. As far as your lighting goes, you seem pretty stuck on ice cap ballasts. Have you looked at PFO Lighting? They build great equipment and make dual and quad ballasts for both 250w and 400 as well as pc and vho ballasts. Also there prices are quite reasonable. And finally, could you overlay a plumbing/flow diagram on the picture of that killer skimmer? I can't quite make out how it works. Keep up the good work, and I will continue to check back frequently, as I am in the process of planning for a 180 after I move in August. Thanks Again
__________________
16g bowfront, 2x65wPC,Bakpak,2xMiniJet404 Domino Damsel, Devils Hand Leather, 2x Sarcophyton, 3x Toadstool, 2x Pincushion, 3x Cabbage, Xenia, 3x Monti (plating), Monti Cap, Asst. Ric, Asst Mushrroms, Green Candycane, Purple Candycane, 5x Asst Acro, Green Hydnophora, Carnation Porites, Birdsnest, Green Pocillopora, Colt, 3x Colonies Asst. Zoos, Giant Green Polyzoos, Red Leg Hermits, Blue Hermits, Red Linkia, Green Serpent, Assorted Snails, Strawberry Conch, Deep Sand Bed |
|
#1300
02/18/2004, 07:12 AM
|
|||
|
|||
|
mastiffpal: Thank you very much and it pleases me that you enjoyed the lengthy read. As to my allegiance to IceCap, they and their products have gained my admiration and respect. I've had a 660 VHO ballast that's run for (and still running) over 8 years without a single issue. That would be everyday, approximately 12 hours a day... non-stop. The second 660 ballast I have had a fuse blow after several years of use. I contacted IC, sent it in for repair and received it back in a week. It's functioned flawlessly ever since. The dual 150 MH ballast I've had for about 4 years and it still keeps on firing the bulbs. So yes, I am a bit stuck on them and their ballasts.
While I don't mind saving money, I am willing to pay a little more for what I have found to be a proven product. By the way, I have 4 IC 250 watt MH ballasts coming this week. I will be incorporating PFO pendants though. Here's the photo you requested and I hope it helps; Joseph 
Last edited by Skipper; 04/04/2004 at 10:54 AM. |
|
|


 Linear Mode

