|
|
|
#326
 07/28/2004, 02:42 PM
|
|||
|
|||
|
Today, the tank is much more clear. The sand is really being displaced by the current. Seriously, I can't believe Tunze Streams are needed, nor a closed loop.
When I got up to check in the tank, there were a million microbubbles. I went into the fish room, and the skimmer had drained about 3g of water into a bucket. The sump water level was lacking the equivalent, because the return section is so small! Wondering if the bubbles were being caused by the lowered water level or because of the anti-siphon holes, I opened the ball valve 100% on the Ampmaster 3000, watching the water levels rise in both overflows to match the water level in the display area. Still tons of bubbles. So I added 5g of RO/DI and reduced the flow again, and the bubbles are going away. I took a few pictures of what I can see. Remember, the only lighting I have over the tank are two URI Super Actinic VHOs (72"), plus what light shines in from the 55g's 10,000K XMs. I bet getting some lights over the tank will make a big difference. Here are a couple of pictures of one or two tangs. 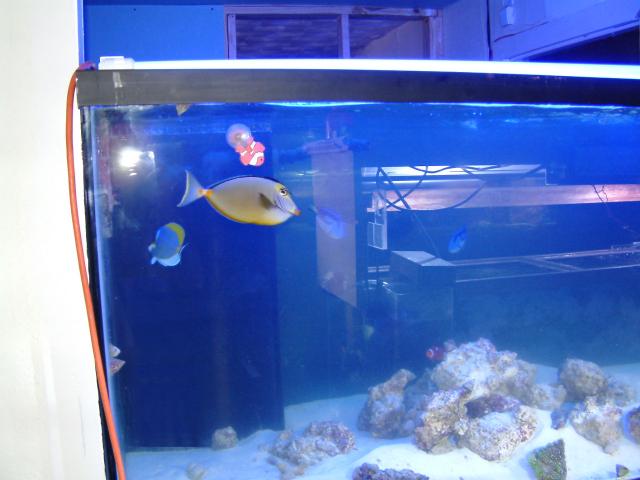 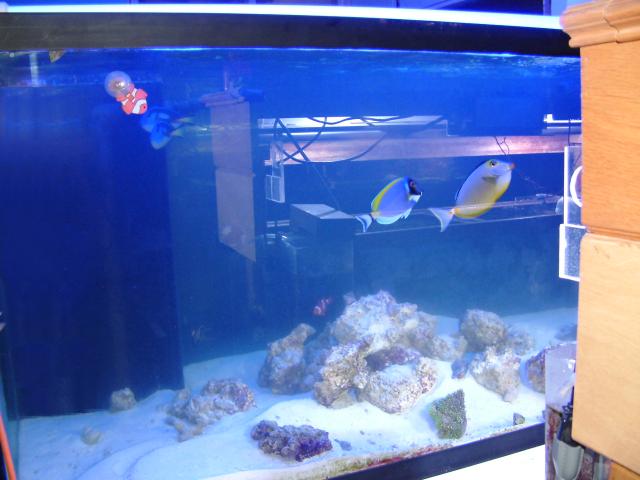 And one of the Fighting Conchs. 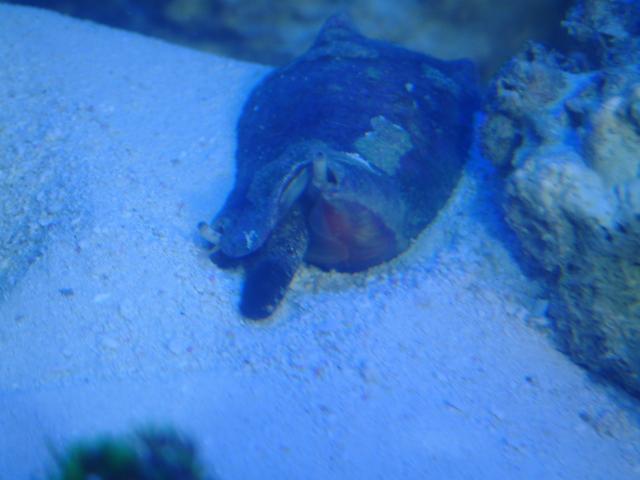 I have more LR in my 55g sump that I can move over to the 280g, but they have aptasia.  You guys are funny. There is plenty of room for more Jedi knights. 
__________________
Marc Levenson - member of DFWMAS |
|
#327
07/28/2004, 02:47 PM
|
|||
|
|||
|
I bet your just loving it with all that room to work with now.
__________________
Isn't life just wonderful. 24g Aquapod MJ 900 Standard Pump Standard 72w PC Lighting |
|
#328
07/28/2004, 03:02 PM
|
|||
|
|||
|
As I've mentioned before, I have a LifeReef Skimmer. Never having one before, I've been trying to understand how it works and what issues it has. To be frank, it is pretty simple in design, but not working as well as I'd hoped.
The crub it was accumulating in the riser tube of the collection cup was vile in nature, but it wasn't filling the cup yet. When I'd close the gate valve on the output of the skimmer, the water level would rise in the main chamber, and water would leak out the neck of the skimmer. My fish room floor has gotten wet a few times in the past couple of days as water dripped off the top of the skimmer body. Basically, I felt the design needed tweaking. Late last night, I decided to take the cup off and wash it thoroughly. When I was finished, I noticed an O-ring around the tube that fits into the skimmer's main chamber, pressed up against the skimmate cup. I decided to remove the O-ring and insert it into the neck of the tube the cup inserts into, and then force that cup into and through the O-ring. Problem solved, now it is water tight and does not drip any longer!  Leaving the skimmer running with the water level high up in the body last night, some crisp foam began to finally collect in the cup. Finally I had it set correctly, right? As noted in my previous post 30 minutes ago, the bucket under the skimmer collected about 3 gallons of water. Oops.  At least it did pull fluid out of the tank. At least it did pull fluid out of the tank. Each day, I learn one new thing about some of this equipment I never had before.
__________________
Marc Levenson - member of DFWMAS |
|
#329
07/28/2004, 03:08 PM
|
|||
|
|||
|
Quote:
 To Reef Central First post!!! Where have you been spending all of your RC time? You signed on over a year ago. And by the way, if you are a Mad Scientist, why aren't you the Cu_kid?
__________________
Marc Levenson - member of DFWMAS |
|
#330
07/28/2004, 03:14 PM
|
|||
|
|||
|
Hey Marc, Im also interested in purchasing your SCWD haha
|
|
#331
07/28/2004, 04:02 PM
|
|||
|
|||
|
Yes sansui i agree nice work !1

__________________
JOHN boy |
|
#332
07/28/2004, 04:32 PM
|
|||
|
|||
|
Marc,
well I finally got back in town and it appears that you are all done!! are you still needing some help or are you almost done?? let me know - i will pm you via dfwmas - thanks and the tank is looking great. gerard
__________________
Maintaining work place 92 gallon mixed reef and planning future home tank |
|
#334
07/28/2004, 05:17 PM
|
|||
|
|||
|
Thanks Skipper!
Guys, I have a lighting question. When I got the tank, the MH mogul bulbs were hanging over the tank where the bulbs were aligned from front to back. (Perpendicular) A club member told me that was all wrong, and that they should run parallel. If that is true, then the reflectors will shield my eyes from blinding light when I open the canopy. Which is correct? Remember, the surface area is 72" x 30", and there are three 250w MH mogul bulbs. I have three spider reflectors. (that need cleaning. )
__________________
Marc Levenson - member of DFWMAS |
|
#336
07/28/2004, 05:35 PM
|
|||
|
|||
|
i'd just like to point out that this post has had over 16,000 views

__________________
Sam H. No, Officer i swear, its just kalkwasser |
|
#337
07/28/2004, 05:37 PM
|
|||
|
|||
|
Quote:
Your foam level should be at the top of the large tube body. It will pull the nasties out on it's own. Mine pulls some very nasty and very dark brown stuff out. Shells like.... well you know. LOL Also make sure it's making lots of small bubbles. If not you will need to clean the injector port (that's the small connector on the input that has the small hose on it. RO/DI water does a good job.
__________________
You Don't Have to be the Sharpest Tack in the Box - Just the Most Persistent! |
|
#338
07/28/2004, 05:39 PM
|
|||
|
|||
|
Quote:
__________________
You Don't Have to be the Sharpest Tack in the Box - Just the Most Persistent! |
|
#339
07/28/2004, 05:59 PM
|
|||
|
|||
|
Quote:
__________________
J.R. |
|
#341
07/28/2004, 06:33 PM
|
|||
|
|||
|
Marc -
Lights don't matter, but conventional wisdom says to run them parallel. That's the way most folks run them and probably why you got the comment that they were wrong! I'd run them parallel to keep the lights out of your eyes as mentioned!
__________________
I told her she had a sweet looking wrasse, and she SLAPPED me!! Go on, Click the little Red House! |
|
#342
07/28/2004, 09:44 PM
|
|||
|
|||
|
Marc everything is looking fantastic. I have been following your thread since day one. Looks to me like you are doing a fantastic job. I look forward to seeing your aquascaping. That tank should allow you to make some really natural looking rock work. You will have a challenge by not being able to drystack the rock structure. But I am sure many of us have stacked enough rock to be wonderful rock builders.
What bulbs are you going to go with. I too use XM 10,000k's and was wondering if you here going to go this route again. If you are I will recommend Hellolights.com for the purchase. They are very nice and fast service. I just rec my second XM from them. Also some of my club members have had great success from them also. I look forward to contued information about your tank and dream of my GIANT tank in the next few years.
__________________
Eric AvianArt.net |
|
#343
07/28/2004, 11:22 PM
|
|||
|
|||
|
Thanks guys. I have 10,000K XMs over my 55g right now (175w) and don't really like the color to be honest. Looking at JB NY's 250w comparison page makes me lean toward 14,000 Coralvue bulbs. Thanks for the suggestion about HelloLights.com. I've used them in the past with good results. The XMs came from CarolineCorals.com and they were very fast and the price was great.
I cannot believe how long it is taking to finish out the room. Part of the problem is the lack of space in the garage, but with it raining outside, I can't fill up the driveway with all the sundries of construction, nor my equipment. The inside of the room is roughed in, wired, and rocked. I bought an insulated steel door and that worked out nicely. Btw, the opening was too large. 34.5" x 82" would have been better. In the pictures, you may notice to top of the door doesn't touch the sheetrock, so I'll have to use some tape and bedding to mask that. As you can see, the ceiling is a wavy mess.  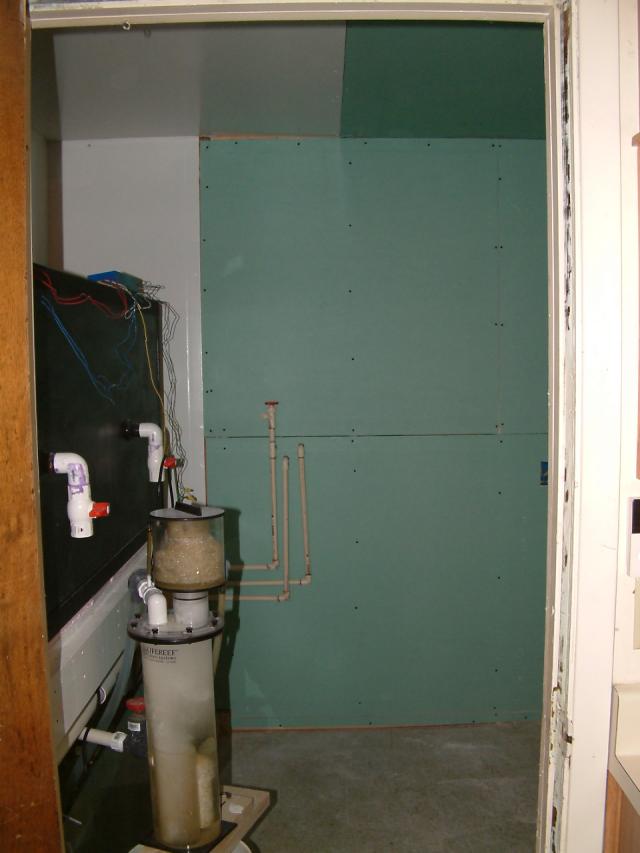 The new 32" door, with metal threshold and doorknob. 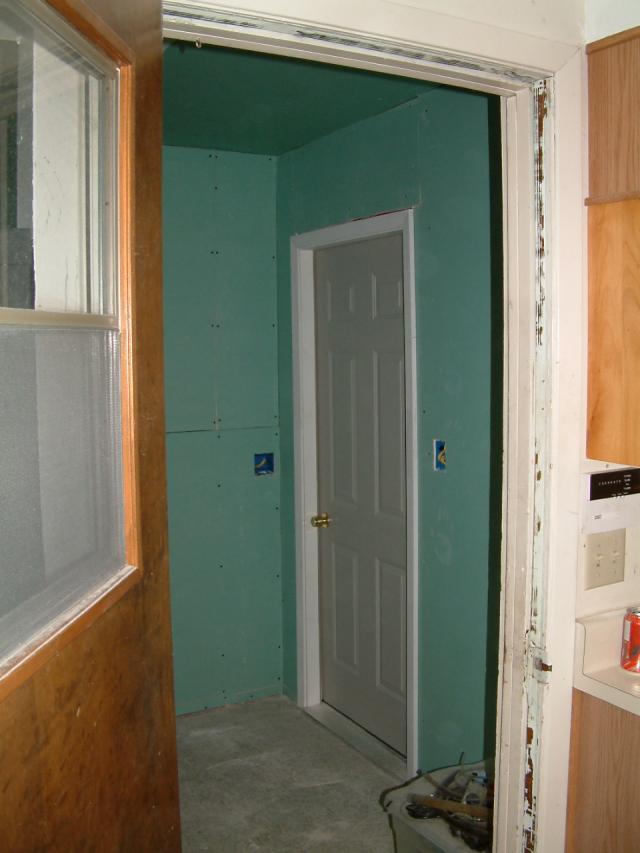 The outside of the room needs to be finished tonight, because my water heater is disconnected again to allow me to run the pipes through the sheetrock. Water is shut off to the house. The rocked section has insulation, the section on the right is what needs to be done in a few minutes.  The skimmer is pulling out some cool looking foam right now. Think that is all drywall dust? 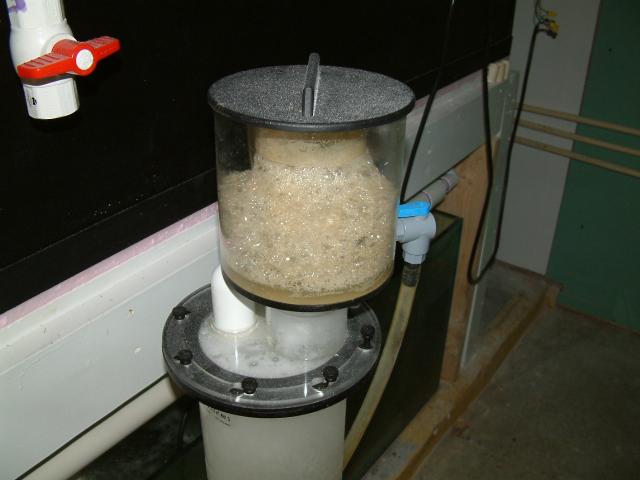 The wiring was run in the walls to the various gangboxes, but are not connected to any circuit. I thought it would be wise to go ahead and get that ready in case I decide to crawl in the attic and run one more circuit. I say in case, because it is hot in the summer and I'm not really that motivated, but I do have reason to get that done. I want to relocate the light that is in the garage area to the fish room, and run a new light to the center of the garage with a shoplight. The current light switch will turn on the light in the fish room, and the new box outside of the room will have a switch for the area where I work to make sumps and such. The sooner I get all this sheetrock stuff done, the more quickly I can reclaim space in the garage for the rest of the things that need doing. It looks like I'm not going to have any time to work on the tank tomorrow, so I lose an entire day unfortunately. I've got a number of jobs to do tomorrow and that is how it is. Maybe I can get the tape, bedding and painting done at least. Then Friday I can tackle the lighting of the tank. I thought I would have started on that by today.
__________________
Marc Levenson - member of DFWMAS |
|
#345
07/29/2004, 01:35 AM
|
|||
|
|||
|
Marc,
Sorry, I forgot you were keeping the live sand within the tank. That makes perfect sense then. That and an able bodied helper willing to scrape away. Are you considering no screen at all over your prefilters? Even with a 1/2" gap, you are sure to lose snails, hermits and not-so-bright small fish. I'm surprised IA used typical egg-crate as the square holes are 1/2" too. I'd be afraid that there would be an accumulation of small critters in your sump that potentially could make their way to the critter pulverizer we call pumps. I believe there is plastic gutter screen that has smaller openings but not so small that they will require constant clearing of debris. In fact, I may be removing my weirs to do this very thing to allow for more flow in my tank. Regarding the light bulb orientation, if you can, try hand holding the fixture (bulb and spider reflector) and aim it when lit at a large wall to see the light throw pattern. That might help you to decide. Just a thought. I wonder if it might be a good idea to install a small drain passageway on the garage side wall of the new room? Perhaps some large diameter PVC pipe fit through a drilled hole and a flapper on the outside to prevent air from entering. If you plan to install tall baseboards and silicone all around the room, this will hold the water as it drains and prevent wall damage. If not, you may have quite a bit of standing water in there doing lots of sheetrock damage in the event of a leak or spill. In addition, have you considered installing a sink in your room? Are there any drain lines in this area? You have the hot and cold-water source but the lack of a drain would put a halt to this. Joseph |
|
#346
07/29/2004, 03:19 AM
|
|||
|
|||
|
If you read GregT's Sump article #3, he recommends going toothless on the overflows. His reasoning is that teeth, eggcrate and mesh tend to trap various foods and algaes which act like bait for the fish. By running smooth overflows, the fish don't go over the top.
At least in theory. I do agree that snails, and even those daring hermits may be able to get into the next area, and the downtube, and the skimmer section, then the refugium and finally the return section... and challenge death face to shell as the Ampmaster awaits patiently, hour after hour. I have time to think about it, but eventually I'll just have to go with one method or another.I can make teeth easily enough, and insert them. Good idea on the lighting. I'm still seeking a third 250w bulb, but I did get an email today from a member in the club with one extra. A drain in the fish room... I wish I could. The kitchen sink is only 4 steps away from the room so I'm not concerned about cleaning stuff up. However, when things leak, that is a different matter. I do have the sheetrock off the floor by about 1", but if there was a decent flood it would still get it wet before it could seep out into the rest of the garage floor. I'd not even thought about baseboards, let alone silicone. Why are you trying to keep water in the room? I realize your room is in your home vs mine in a garage. I probably should have cut some slots in the bottom plate to allow water to leak out of the area. In the meantime, I had my first flood. Not like you'd think though. After the sheetrocking was done by the waterheater area, I rejoined the CPVC with couplings and waited. The cold water side didn't look very well glued because it wasn't aligned nicely. I had my doubts, but turned on the water. While installing some outlets in the new gang boxes, suddenly whoosh and water was shooting out of the new wall and pretty much over the waterheater. Madly dashing for the front of the house, I turned off the water main. This time I re-glued it better, and waited 30 minutes before reattaching the other end to the water heater. When I turned on the water, it held. I considered standing guard by this fitting for the next 24 hours, but... So the room is ready for the mudwork, the floor is drying as we speak, and the adventure continues.
__________________
Marc Levenson - member of DFWMAS |
|
#348
07/29/2004, 04:55 AM
|
|||
|
|||
|
Marc,
I have the base boards and silicone sealing to keep any possible water spills within the room and prevent walls and adjacent rooms from becoming water damaged. This hasn't come into service yet, but it's there if catastrophy should strike. OK... Here's a scenario for you. You leave for work in the morning, your Tangs are in their regular butt slapping, territorial aggressive modes, but this time, they've taken their battle close to the prefilter box. One slaps the other and its means of avoidance takes him over the falls. In a moment of panic, it frantically swims upward directly into the inlet of the drain line and becomes wedged in for the waterâs force. The circulation pump, unaware of the stuck fish, keeps on moving great amounts of water into the tank. Problem is, it has nowhere to go but over the top. Then, the water makes contact with electricity, throws your GFI circuit, and kills the power to your tank. Good news... the circulation pump stopped over filling the tank. Bad news... your tank is sitting for hours with no oxygenation, heating, cooling, etcetera and you come home from work to a tank full of death. So, now you're thinking... "That's a one in a million chance of happening". Are you willing to take that chance? I know I'm not. I'm sure I could come up with a design that would allow a much greater amount of flow than the stock weirs and still provide a guard to prevent critters from doing the falls. In fact, I'm thinking slotted bolt holes and threaded adjustable weirs with better flow and the ability to allow me to decide where the tank's water level should be, regardless of the amount of water I pump into the tank. Hmmm. Joseph |
|
|


 Linear Mode

