|
|
|
|
|
#1
 01/13/2005, 03:33 PM
|
|||
|
|||
|
Durso's 180 gallon in wall tank.
I love following threads detailing the construction of reef rooms and in wall tanks. Some people have really great ideas... I'm not far enough along yet to have my own but I'm ready for some suggestions.
Let me start by saying I'm a corporate type, sit behind a computer most of the day. Construction work is not my strong point.  I've painted a bit, but I've never done framing, electrical, sheet rocking, etc... every step is something new for me. As much as I would like perfection, I don't think I'll achieve it. I've painted a bit, but I've never done framing, electrical, sheet rocking, etc... every step is something new for me. As much as I would like perfection, I don't think I'll achieve it.Luckily my father is type who can do just about anything (except computer stuff ). His help and guidance was invaluable in getting this project moving.Some may ask why i don't pay someone to do it, but if I did that then I wouldn't have any funds to setup the tank. Besides, now that I'm a home owner its time to try this stuff. This project is taking some time... OK a lot of time. I'm over a year into this. And I'm finally at the point I can start a thread of my own. 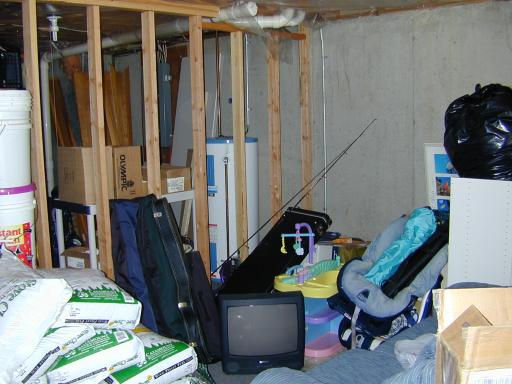 This shows my basement in December 2003. The wood frame is left over from the previous house owner who had plans on making a finished basement. The location of the wall was good enough that I didn't need to move it. Other than this fame, I only had 4 concrete walls to work with.  This shows the back side of the framed wall where I plan on putting the tank. As you can see the basement is a cluttered mess of items from when we moved in. Not an ideal construction zone but its what I have to work with.
__________________
Rich Durso Visit My Chunk of the Ocean, click the Red House above. Last edited by original-reefland; 01/13/2005 at 03:46 PM. |
|
#2
01/13/2005, 03:41 PM
|
|||
|
|||
|
This next image is a few days later.
 I made the cut out about a foot taller then the height of the tank. I plan on having a disguised door on the top to allow tank servicing from both sides of the wall if needed. I know most people with inwall setups have a true picture frame setup but I think it would be easier to clean the glass and do tank work if I could access both sides. 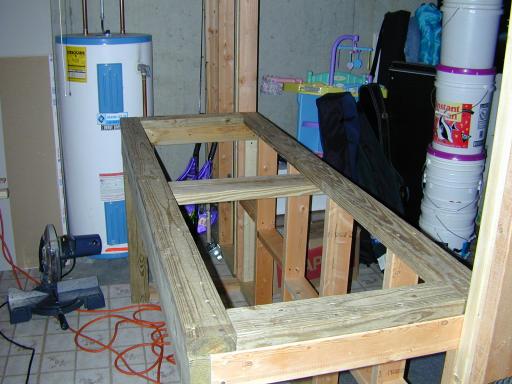 About a week later the design of an open tank stand was complete and built. It is double 2x4's on end front to back resting on "deadman" studs. The length is double 2x6. The vertical posts are 4x4's. The top is rimmed with 2x4's. The structure is SOLID. Takes considerable effort to make it budge. I'll top it with styrofoam and center the tank on the flat rimmed 2x4's.
__________________
Rich Durso Visit My Chunk of the Ocean, click the Red House above. |
|
#3
01/13/2005, 03:46 PM
|
|||
|
|||
|
Looks like a nice project Rich. I agree with your front access panel. My friends has one on his 180 and its extremely handy. I have just the picture frame look on my 170 and its a pain to do some projects from the back. Not being able to see better is one.
__________________
Doug |
|
#4
01/13/2005, 04:14 PM
|
|||
|
|||
|
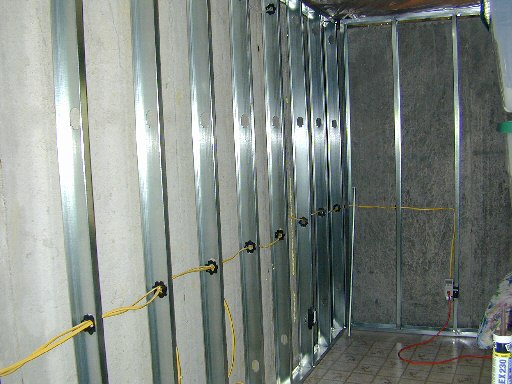
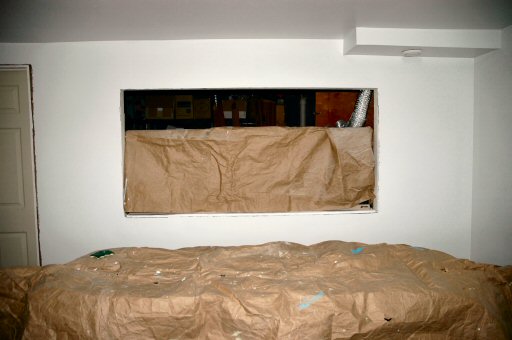
This picture is at the end of December 2003.
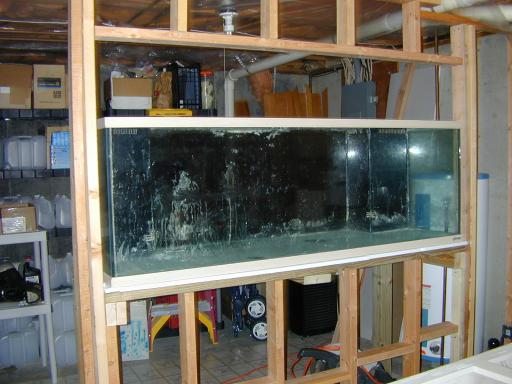 The tank is in the wall, still dirty from when I took it down during our house move. Progress was pretty quick here as I've yet to get hung up in building code and inspections. The following picture is April 2004. The room is now framed using steal stud. As is typical for old houses the walls were not very square. I couldn't use the walls themselves. My father brought over his laser line thingy and we drew out where the new walls would be. 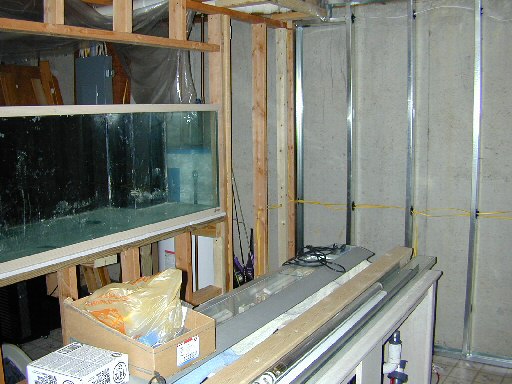 This picture also shows the electrical wires in place for the reef viewing room. The yellow wires are for outlets. The white wires on top for room lighting. Single blade circuit breakers were removed from the breaker box and replaced with dual-blade breakers (two circuits in the space that 1 used to take). Enough of these were replaced that a secondary electrical panel was not needed. Three electrical circuits were dedicated to the reef viewing room. One for each side of the room (each GFI protected) and one for the room lighting. The room lighting is low voltage recessed lighting on dimmable slider switches. The room lighting is broken up into three zones with each zone having a dimmer switch to allow different lighting levels in different parts of the room. Three electrical circuits were also dedicated to the reef room itself. Two 20 amps for water circualtion and one 15 amp for the tank lighting. Water circulation will be divided between the circuits in a way that if one GFI trips the tank will not be without circulation, it will only have reduced circulation. For example, I'll have skimmer and return pumps on one and power heads, tunze streams, etc on the other.
__________________
Rich Durso Visit My Chunk of the Ocean, click the Red House above. |
|
#5
01/13/2005, 04:27 PM
|
|||
|
|||
|
This is the other side of the reef viewing room:
 The electrical inspection went fairly smooth as all the electrical work was technically correct. However, according to the electrical code in our area the grounding screw in an outlet box must be green. So every ground screw in every outlet provided by the manufacture had to be removed and replaced with a cute little green screw. A waste of time if you ask me! And yes the building inspector had to come back later on to confirm I now had pretty little green screws.  By June 2004 all the electrical work was done and most of the insulation was done. 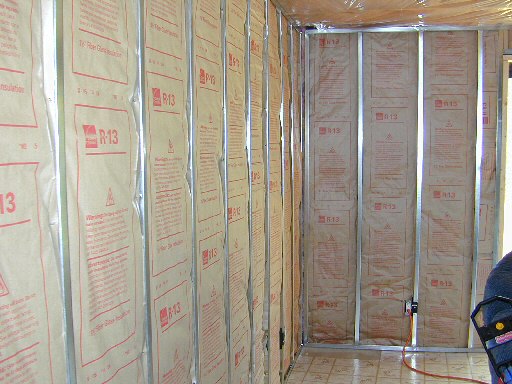 This step was pretty easy. And yes, the building inspector needed to check it out before I could start sheet rocking. This inspection was a waste of time as well. He basically walked into the room spun around once and said it was good, and walked out.
__________________
Rich Durso Visit My Chunk of the Ocean, click the Red House above. |
|
#6
01/13/2005, 04:52 PM
|
|||
|
|||
|
Ahh... sheet rocking. Words can not express how much I hate sheet rock. It started the minute it arrived.
The sheets were to large to make it down my staircase to the basement. My town house is in the middle section so walking with each sheet around the house was not practical. Instead I rented a 15 foot tall sheet rock lift and placed it outside my back deck. My back deck is about 20 feet from a lake and the yard is sloped downward to the water. If the sheet rock lift tipped over the sheet rock would likely have gone into the lake. We had to carry each sheet through the front door, down a hallway, through the dining room passed the living room and out onto the deck, over the railing and then balance the sheet on this fully extended lift which was off balance and wanted to fall over. I had my wife hold the sheet rock as I ran downstairs and outside to operate the lift and lower the sheetrock down. Then bring in the sheet rock to the reef room. I don't recall how many times we did this, but we had a full pallet of sheet rock. I'm going to guess that was close to 30 sheets. This picture is from the end of August 2004. 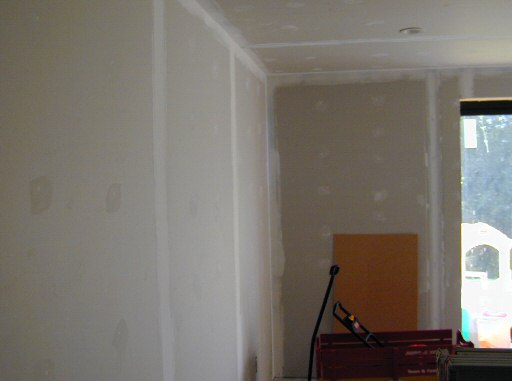 While I had the lift I used it to complete the ceiling that day. The problem is that I got a unit tall enough to be used outside by the deck. However, this large unit did not go down low enough once inside. Home Depot rents units for 8 foot ceilings and 12 to 15 foot ceilings. The tall unit I had was still 7 foot tall when fully collapsed - I could not use the tilting & loading features. Meaning that I had to lift the sheet rock 7 feet into the air before I could get it onto the lift. 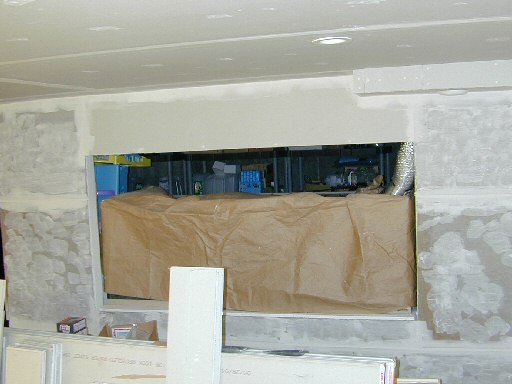 The bottom of the tank wall and the sides of the tank wall were done with concrete board. Even green board will still deform if left in standing water. Concrete board will not -- it can be fully submerged and will not deform at all. The draw back is that it is not paper smooth like green board, it is designed for tile backing. Since I was not going to tile this wall a skin coat of compound was needed to make it smooth. By the end of August 2004 all the sheet rock was completed, the seams were taped and the first layer of compound was applied. About the only thing I hate more than sheet rocking is compound.
__________________
Rich Durso Visit My Chunk of the Ocean, click the Red House above. Last edited by original-reefland; 01/13/2005 at 05:04 PM. |
|
#7
01/13/2005, 05:00 PM
|
|||
|
|||
|
looks nice
|
|
#8
01/13/2005, 05:13 PM
|
|||
|
|||
|
Between September 2004 and December 2004 things went pretty slow. I was really overwhelmed by the amount of compound needing.
I used four large buckets of it! It was so amazingly boring that I started to lose interest in the project. There were a few weeks I wanted nothing to do with this. I really hated the sanding part. I felt I made everything worse each time I sanded. Applied more compound to correct which of course needed more sanding. It seemed endless.... week after week after week. I have no idea how someone could make a profession out of this. The pro's sure make this look easy. I made a few trips to local fish stores and read some threads on how others were constructing rooms and the acrobug bit me hard again. I know I'm getting close and getting water in the tank is just a month or two away.
__________________
Rich Durso Visit My Chunk of the Ocean, click the Red House above. |
|
#9
01/13/2005, 05:22 PM
|
|||
|
|||
|
Come on Rich!
I know you can do it! I have the same problem with caulking. 2 tubes later and it still looks like crap. I have been following your site for a few years, and my 120 has 2 modified "Dursos". Thanks for the relative silence. DC
__________________
There is an island of opportunity in the middle of every difficulty. Miss that and you are doomed. |
|
#10
01/13/2005, 05:28 PM
|
|||
|
|||
|
Lately every night I've been spending a few hours working in the basement. Luckily my wife is a pretty good painter and she is able to help. Between the two of us the primer went fast.
 This picture is from this morning. The entire room now has two layers of primer applied. The skin coat of compound on the concrete board around the tank and endless sanding is complete. The wall is nice and smooth, finally everything is looking pretty good. Six panel doors are hung as well. 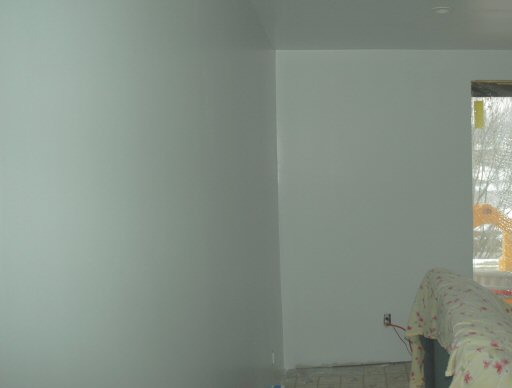 Hopefully the room will be painted this weekend. We've picked out a bluish/grey color for the walls with a creamy white for the trim and the ceiling will be the typical ceiling white. I couldn't do anything bold like red as that color is used upstairs. Since i used steal stud framing there is nothing to nail into so waynescoat is out of the question. Any baseboard or ceiling trim will likely need to be glued in place. I might be able to use screws and puddy it over and paint it. I'll have to try different things. The room still needs a final electrical inspection and then an overall final building inspection (looking for smoke alarms, etc. final check list before giving it a certificate of occupancy). Good chance I can get the final electrical inspection done next week. Once this room is done, I'll focus on the reef room itself.
__________________
Rich Durso Visit My Chunk of the Ocean, click the Red House above. |
|
#11
01/13/2005, 06:19 PM
|
|||
|
|||
|
Can't wait to see it when it is finished. Good luck, and keep us updated.
|
|
#12
01/14/2005, 11:06 AM
|
|||
|
|||
|
Nice pics Rich. Coming along fine.
I also have no love for doing the putty job, but lucky my son in law is a contractor.  I can ask him how they do trim work on steel studs if you wish. I can ask him how they do trim work on steel studs if you wish.
__________________
Doug |
|
#13
01/14/2005, 11:18 AM
|
|||
|
|||
|
Nice work. I remember you saying you used cement board on the sides walls of the tank area and the bottom wall of the tank??? How much mudding did it take to smooth it???? I'm in the same process as we speak
|
|
#14
01/14/2005, 05:27 PM
|
|||
|
|||
|
Quote:
__________________
Rich Durso Visit My Chunk of the Ocean, click the Red House above. |
|
#15
01/14/2005, 05:29 PM
|
|||
|
|||
|
Quote:
__________________
Rich Durso Visit My Chunk of the Ocean, click the Red House above. |
|
#16
01/14/2005, 07:35 PM
|
|||
|
|||
|
Rich, this is going to be an excellent thread. If you read my 280g thread, you'll see my exact sentiment about sheetrocking, mudding and painting. I didn't have to deal with as many sheets as you did (maybe 1/2), but I did want my project done in 14 days, so I could only grit my teeth and bear it.
You are much closer to getting the tank running than before. Btw, we used to use trim guns to shoot trim onto steel studs. Trim nails tend to have small serrations on the sides, which do grip the metal well. Some places you may have to shoot an extra nail perhaps, or if the wall is way out of whack you'll have to fill the void with caulk.
__________________
Marc Levenson - member of DFWMAS |
|
#17
01/15/2005, 02:04 AM
|
|||
|
|||
|
Quote:
BTW - got the ceiling paint done tonight. Expect to paint the walls tomorrow. If only one coat is needed, might be able to get update pics tomorrow night.
__________________
Rich Durso Visit My Chunk of the Ocean, click the Red House above. |
|
#18
01/15/2005, 02:10 AM
|
|||
|
|||
|
Yes, pneumatic air guns, used for nailing trim to the walls. They have 'pin' guns for shooting 7/8" or less, and "trim" guns for 1" to 2" finishing nails.
__________________
Marc Levenson - member of DFWMAS |
|
#19
01/15/2005, 11:13 AM
|
|||
|
|||
|
Rich, my contractor son said something similar to Marc. He said to use a good Brad nailer and finishing nails. However he said they glue it first, as the nailer sometimes does not hold it as good. Once the glue sets, its usually well secure.
He did mention that when they do steel studs, they plan in advance for trim work by installing some type of wood backing to the studs, before gyp- rocking. But as I always tell him on my projects. "now you tell me that". 
__________________
Doug |
|
#21
01/18/2005, 01:12 AM
|
|||
|
|||
|
Quote:
Quote:
Issue is that we can't get a good clean border between white ceiling and blue walls. Tried to use blue painters tape but it damaged the paint under it when we tried to remove it. So it looks like trim will be needed to hide that area. It looks fine from a distance but up close... ehh. Got two coats of the blue paint on this weekend. I'll post a picture tomorrow hopefully. Vaccumed and dusted the room up and such. Looking nice. But while cleaning the clutter and moving an old door out of the way, the door hit the blue wall and made a nice big white dent. Started patching it already.
__________________
Rich Durso Visit My Chunk of the Ocean, click the Red House above. |
|
#22
01/18/2005, 08:15 AM
|
|||
|
|||
|
Being so anal, I hate painting as much as hanging drywall, because perfection is only relative. I've found that the best way to get clean corners is to use the painter's tape, remove it before the paint dries even a little, then use a 1" angled brush to touch up the inevitable areas where the paint bled through the edges.
Depending on the size of the room, I'd tape up the room first, then cut in 10-20' quickly, then remove that section of tape before moving on to the next section. HTH |
|
#23
01/18/2005, 11:09 PM
|
|||
|
|||
|
Problem I had was that the blue painters tape removed the primer under it. Tape was only in place about 15 minutes. Primer had been dry for about 4 days.
__________________
Rich Durso Visit My Chunk of the Ocean, click the Red House above. |
|
#24
01/19/2005, 12:12 AM
|
|||
|
|||
|
Updated pictue:
Two coats of the primary room color have been applied. The actual color is a bit darker than the image from the camera flash. 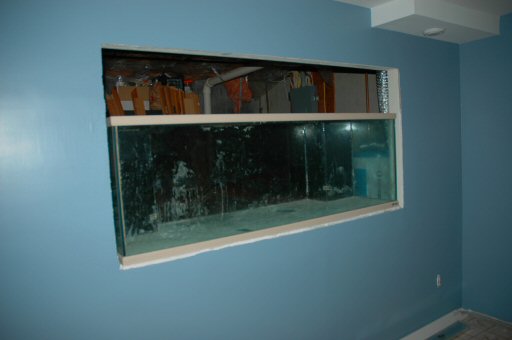 The molding still needs to be installed, that will be painted a creamy white accent color (a light butter color).
__________________
Rich Durso Visit My Chunk of the Ocean, click the Red House above. |
|
#25
01/19/2005, 12:20 AM
|
|||
|
|||
|
I got the TV connections working (each side of the room) so I can watch the NFL championship games while I'm working. I used my old Oceanic tank stand with an old door on top as a makeshift entertainment center until I get something nicer inplace.
 Cleaned the room up a bit as well to let the kids play downstairs with me. (The band saw is unplugged).
__________________
Rich Durso Visit My Chunk of the Ocean, click the Red House above. |
|
|


 Hybrid Mode
