|
|
|
#1
 09/03/2003, 03:13 AM
|
|||
|
|||
|
240 Inwall Construction (Image Intense)
OK folks, here we go. I have been working on this project for a couple of months now and decided it was time to share some info and photos. I have gained much knowledge on this forum and if this experience of mine helps anyone, I am pleased. Here's the basic idea; upgrade my existing 65 gallon Oceanic tank to a 8X2X2 Oceanic reef ready tank of 240 gallons and convert a guest room into a fish room. Some of the equipment and all the rock and critters would be transferred to the new spacious abode. The tank front is located on the main great room wall after having moved my entertainment unit to the adjacent wall. So here begins the tale of an ambitious one-man project.
I ordered the tank with two 1"bulk head holes drilled on the back centered in height and approximately 6" from the prefilter boxes. These are for the closed loop pumps inlets. Unfortunately, the tank, ordered through a local fish store, took 2 months to arrive. This ground my work to a hault due to my want to have exact measurements for "the hole in the wall". Finally it arrived and I was back under way. First, I added a sink to the room to have drainage (water changes) as well as the ability to clean and dry parts without the need to leave the room. The master bath shower backs up to one of the walls in the fish room so plumbing would be straight forward. Here's a photo of this plumbing addition for hot/cold water and the drain. The horizontal copper water lines are the new addition as well as the black ABS "T" for the drain. 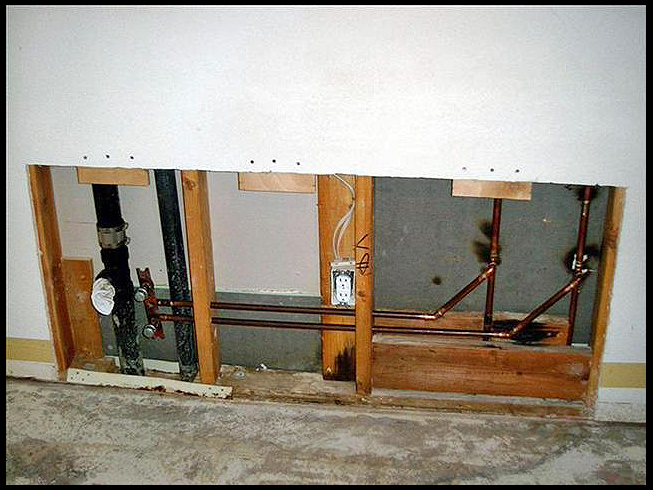 Next.. re-sheetrock, texture and paint. Then I installed the sink as seen here; 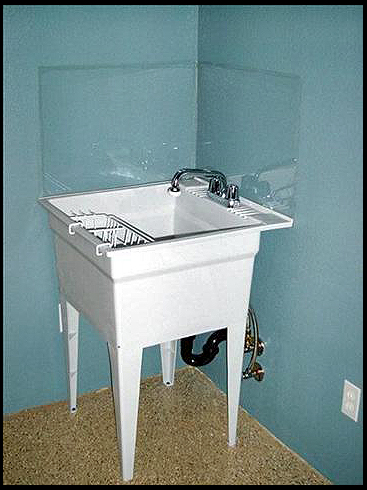 And here is a shot of the tank, newly arrived. I picked it up myself with a rented moving truck. I would highly recommend this, especially one equiped with a lift gate. With the help of some friends, family and the dolly I made, we got it into the house. 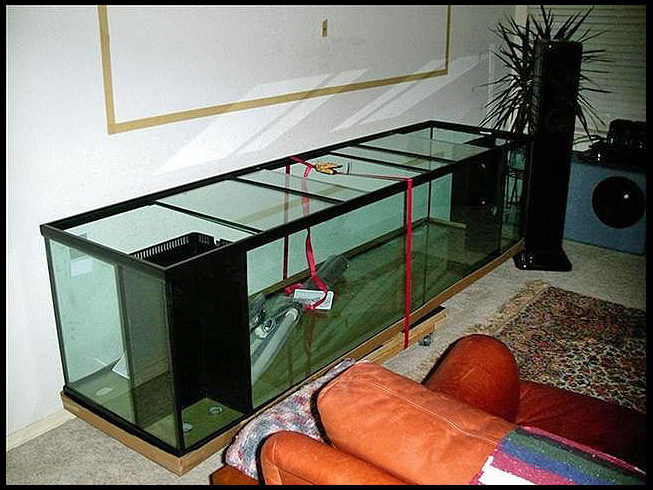 To be continued... Last edited by Skipper; 04/03/2004 at 10:16 PM. |
|
#2
09/03/2003, 03:20 AM
|
|||
|
|||
|
Looks like it's going to be a beauty. What type of tank is this going to be. If you would share some more about your setup.

__________________
Justice consists not in being neutral between right and wrong, but in finding out the right and upholding it, where ever found, against the wrong. |
|
#4
09/03/2003, 03:24 AM
|
|||
|
|||
|
I should add that in the above photo you will notice that I removed the carpet and pad and sanded the concrete floor. I then painted it with garage 2-part epoxy paint. This stuff is tough. I am very pleased with it. The shiny back splash of the sink is acrylic attached to the wall. Last of all, the tank photo shows the rough placement for the tank with masking tape on the wall. I decided to center it left to right (obviously) and centered it in height to the window adjacent to the tank wall. This placed it just slightly higher than my 65 gallon on it's stand putting the 240 bottom 40" off the floor. This worked out well in that viewing from a seated position or standing allows for full view. More to come..
|
|
#5
09/03/2003, 04:23 AM
|
|||
|
|||
|
Here are the most recent photos I have of the old tank (about 8 years running) prior to tearing it down. It's now empty, clean and looking for a new home. It was a 65 gallon "wall of rock".
 Learned the old lesson that corals do grow fast and soon your tank has no fish swimming room. It was a mixture of sps and mostly soft. The stand I built of mohagony stained birch with 4 36" VHO's and 2 150 watt MH lamps. The tank was plumbed through the wall behind into the sump room where a 55 gallon acrylic tank was located. The picture of this setup is old and prior to the addition of a DIY kalk reactor and a Knop calcium reactor. Those two units as well as the sump tank and DIY skimmer were transfered to the new tank. Learned the old lesson that corals do grow fast and soon your tank has no fish swimming room. It was a mixture of sps and mostly soft. The stand I built of mohagony stained birch with 4 36" VHO's and 2 150 watt MH lamps. The tank was plumbed through the wall behind into the sump room where a 55 gallon acrylic tank was located. The picture of this setup is old and prior to the addition of a DIY kalk reactor and a Knop calcium reactor. Those two units as well as the sump tank and DIY skimmer were transfered to the new tank.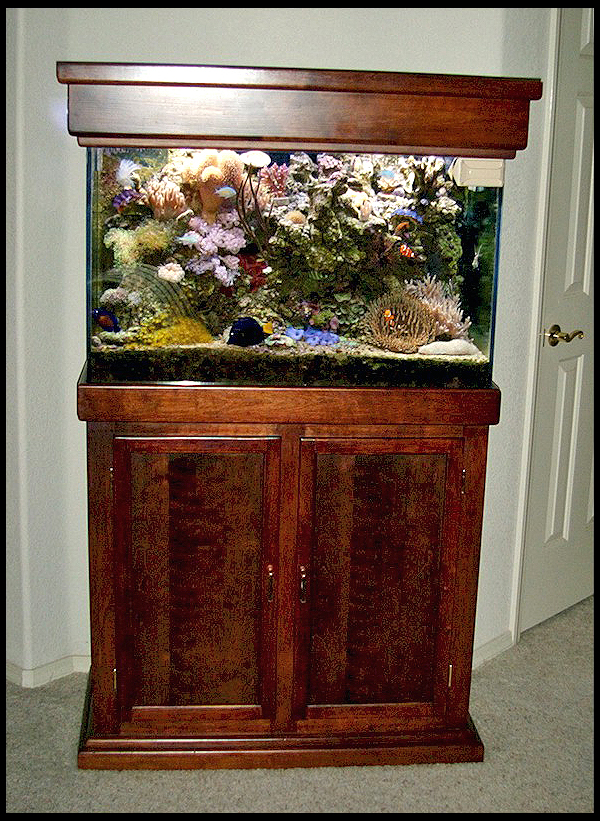 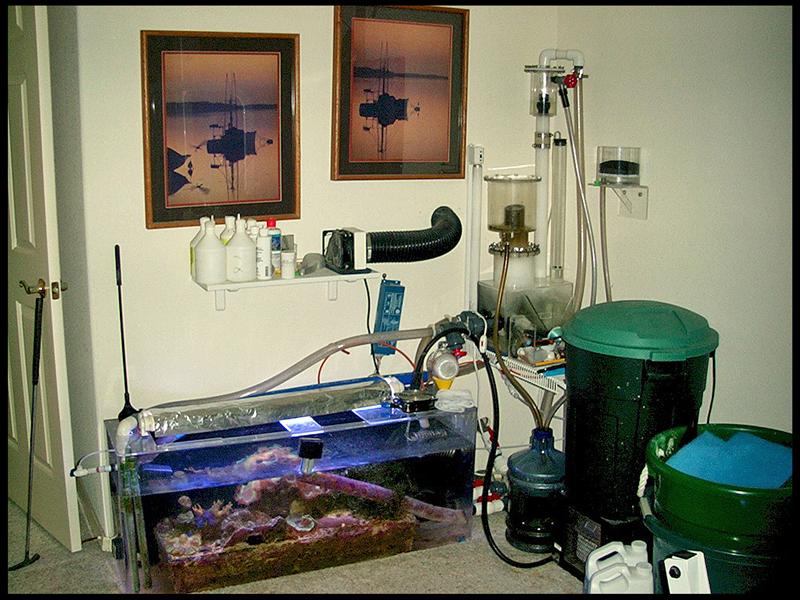
Last edited by Skipper; 04/11/2004 at 09:10 AM. |
|
#6
09/03/2003, 06:16 AM
|
|||
|
|||
|
How much are you selling the 65 Gallon Tank Set-up for ? I am very interested ! Email me at Breaker4show@hotmail.com
Thanks, Nick
__________________
5.5 Gallon - 2X32wattPC (50/50), AC300 Fuge,AQ1000 Powerhead,8lbs LR, 6lbs LS, Surface Skimmer |
|
#7
09/03/2003, 07:34 AM
|
|||
|
|||
|
sweet keep us updated!!
Lunchbucket
__________________
Trying to lose weight by walking is like trying to bake a cake w/ a cigarette lighter - Lunchbucket - "Nancy-Boy Extraordinaire" - maxxII- |
|
#8
09/03/2003, 11:51 AM
|
|||
|
|||
|
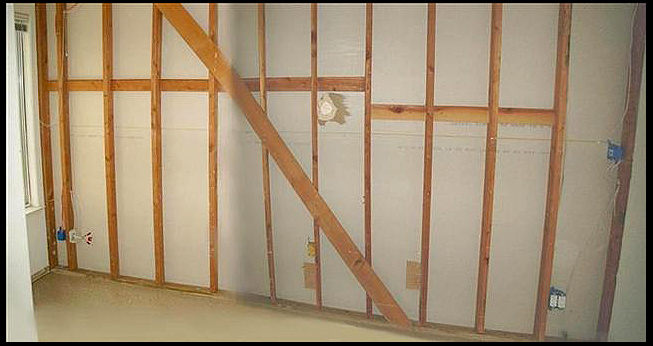
Let me pick up where I left off. A this point, it was time to dig into the wall where the tank was to go. I wanted to leave the sheetrock completely intact on the viewing side until I framed the hole. So I completely removed the sheetrock in the fish room from the tank wall to begin the framing. Here's a shot with bare studs exposed prior to any alterations.
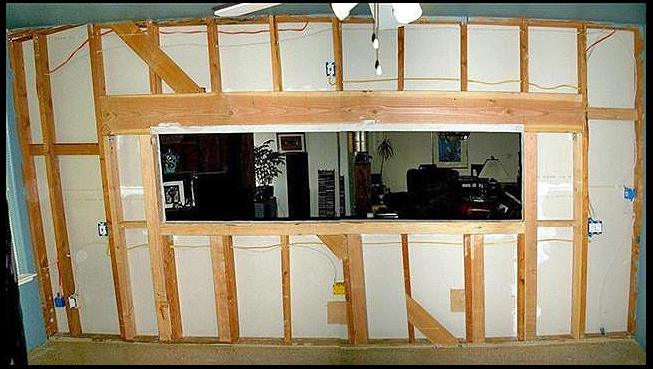
 Next I needed to support this wall temporarily as it's a load bearing wall. On the viewing side, I lag screwed a 2X4 horizontally near the cieling to which I placed 3 vertical 4X4 posts with jacks beneath. Then I slowly jacked the wall up until there was a good amount of tension. Not a science but it worked. Then it was just a matter of cutting and removing the studs at the point where they would then meet the top of the header (2"X12"). This shot shows the header installed.
Last edited by Skipper; 04/03/2004 at 10:17 PM. |
|
#9
09/03/2003, 12:08 PM
|
|||
|
|||
|
Now, with the tank available for exact measurements, I started creating "the hole" and place the needed wiring with outlets. I ran 2 new 30 amp lines from the breaker box to the double outlet box just to the right of the tank openning. From there I branched each line out to two seperate boxes, one above the tank for lighting and the other to the left for other equipment. I also chamfered the bottom edge of the beam to aid in preventing obstructioning the lights. Each outlet has it's own dedicated GFI. (Note: some of the large photos I had to Photoshop two together as my camera wouldn't get a wide enough shot. So no, that beam isn't broken.
)
Last edited by Skipper; 04/03/2004 at 10:18 PM. |
|
#10
09/03/2003, 12:26 PM
|
|||
|
|||
|
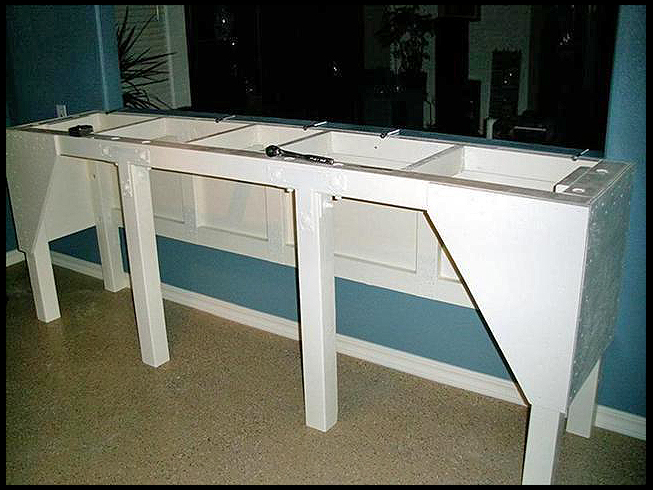
It was now time to start on constructing the stand. I made this of 4X4 and lots of 3/4" plywood for torsional stiffening. If you look at the above studded wall photo, you can see I added several 4X4 verical supports for under the tank. So the wall esentially became one side of the stand. The stand would then be lag bolted to the wall to become "one". Note that the openning is 3/4" taller than the tank to allow for the plywood base that the tank would rest on and that also helped in joining the stand to the wall. Here's a shot of the stand "dry fitted" to the wall:
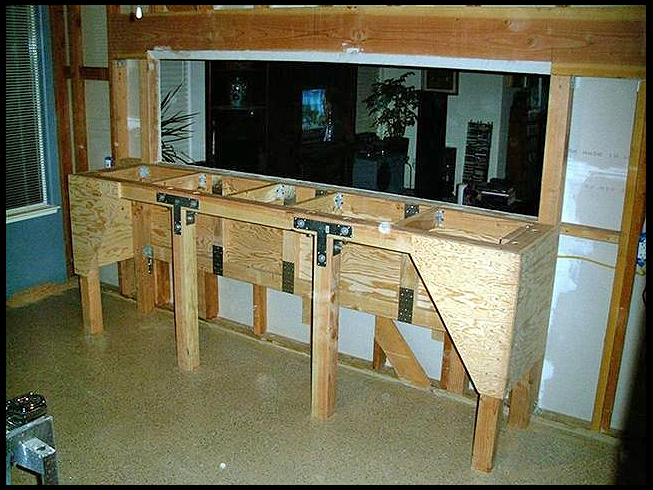 Note that I used heavy duty T and L backets on the front two supports to allow for removal in the event that I wanted to upgrade my sump in the future. Last edited by Skipper; 04/03/2004 at 10:19 PM. |
|
#11
09/03/2003, 12:38 PM
|
|||
|
|||
|
Next came time to insulate and sheetrock the wall. As seen, I used green bath board. The insulation has made for a silent viewing side of the tank, something my previous tank had always bothered me with. So here's a shot with completion near.
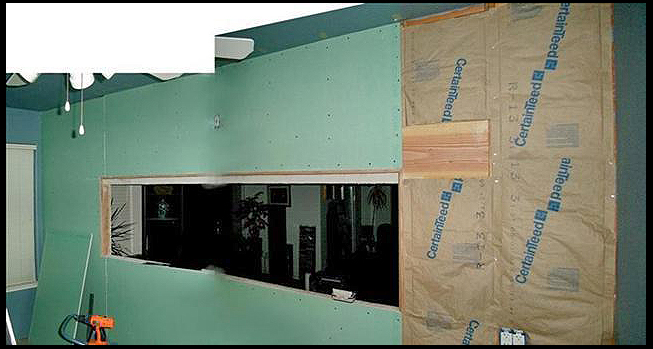 And this one shows the aplication of texturing to match the other existing walls. Not much to see but I thought I would include it. 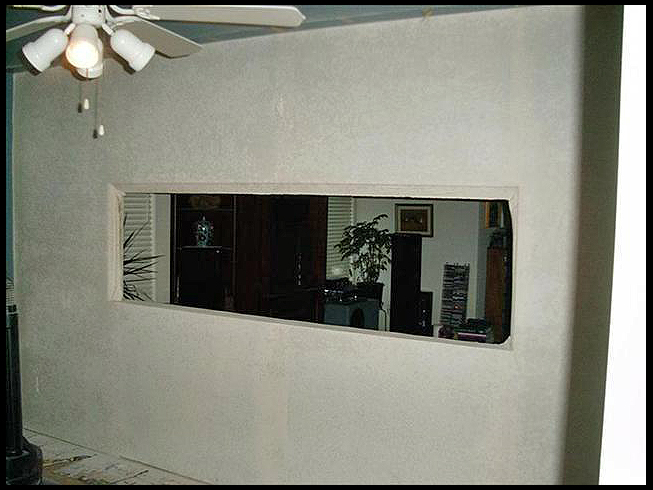
Last edited by Skipper; 04/03/2004 at 10:20 PM. |
|
#13
09/03/2003, 01:04 PM
|
|||
|
|||
|
This next photo shows the stand completed, painted and ready to bolt to the wall. Also, the walls were painted and 3" base-boards enamel painted and attached. I then silicone sealed around the room to contain any spills to this room (knock on a wooden stand
).  Next we have the stand attached to the wall with top in place. Note the overhang for plumbing, a place to place things while working and a good knee/foot support while salt water swimming. Also note the paranoid excessive use of screws on the stand. The top indentation is for plumbing routing as you will see in coming photos.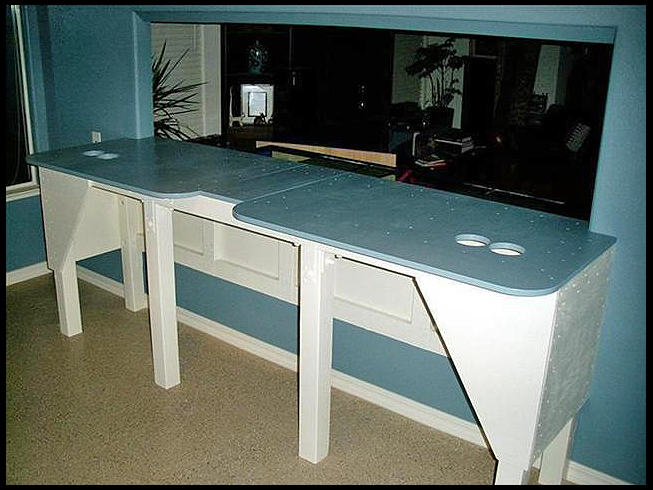
Last edited by Skipper; 04/03/2004 at 10:21 PM. |
|
#14
09/03/2003, 02:01 PM
|
|||
|
|||
|
All I can say is wow. I am green with envy.

|
|
#15
09/03/2003, 03:27 PM
|
|||
|
|||
|
Thanks for the replies. If anyone has ideas for doing something differently, albeit to late for me, please don't hesitate in adding comments for others to gain from your thoughts. I will post more photos later today as time permits. Stay tuned!
|
|
#16
09/03/2003, 03:33 PM
|
|||
|
|||
|
hey weatherson,
what do you have planned for pumps and light's?? I am doing a tank for my mothers work that is 72 x 30 x 30. It has starphire viewing panels and euro bracing. You look thru from both sides. I am planning 3 x 400 halides and some T5s for actinics. A small ampmaster one both endes and a ampmaster 3000 from the sump. |
|
#17
09/03/2003, 03:44 PM
|
|||
|
|||
|
in wall tank
Hey Weatherson,
I have a great idea for your tank, I installed an in the wall tank also, from the viewing side of the tank I can see, clean and touch three sides of my tank, did this by installing mirrors on 45% angles from the face of the wall to the rear corners of the tank. This setup has been great and you can also see behind the reef through the mirrors. Below is a picture, let me know what you think.>>>>>>>>>>>>>>>>>>>>>>>>>>>>>GEBC |
|
#18
09/03/2003, 03:46 PM
|
|||
|
|||
|
OH MY GOD THAT IS BEAUTIFUL!! I Love in wall tanks! I have one, but not that big! I will soon have a big one!
 have to get my experience on my first. Post more pics/updates!! have to get my experience on my first. Post more pics/updates!!
|
|
#21
09/03/2003, 03:55 PM
|
|||
|
|||
|
another picture
Here is another pic, ill try to get a closer shot and post it.>>>>>>>>>>>>>>>>>>GEBC
|
|
#22
09/03/2003, 04:06 PM
|
|||
|
|||
|
in wall tank
Here is a side view, you can see the corners of the tank in this one.
|
|
#23
09/03/2003, 04:09 PM
|
|||
|
|||
|
WOW!!
__________________
MY GOODNESS. |
|
#24
09/03/2003, 04:23 PM
|
|||
|
|||
|
awesome..
__________________
updated 4/15/07 SG: 1.025 Temp: 77.2 Ammonia: 0 NO2: 0 NO3: .15 (doing another water change) PO4: .01 Ca: 500 Alk: 9.0 dKH Mg: aprox. 1200 pH: 8.0 ORP: 320 average |
|
#25
09/03/2003, 04:31 PM
|
|||
|
|||
|
Are these pics in actual time!!
If so, you should be on Monster House.Very nice BTW!
__________________
"You can lead a horse to water, but a pencil must be lead." ~Laurel and Hardy To write with a broken pencil is pointless. |
| Thread Tools | Search this Thread |
| Display Modes | |
|
|


 Linear Mode

