|
|
|
#1
 03/14/2007, 08:30 PM
|
|||
|
|||
|
In Wall Tank Setups
I have just moved to a new house and I have the luxury of finishing off my basement and building my 210 into the wall. Could you please post any pictures of in wall setups please. I am looking for different ideas.
Thanks, John |
|
#2
03/14/2007, 08:32 PM
|
|||
|
|||
|
http://archive.reefcentral.com/forum...readid=1064030
Here is the link to the large tank fourm it is a 210 view from 2 sides.
__________________
Help my wife is going to kill me, I'm spending my sons college funds. |
|
#3
03/14/2007, 08:53 PM
|
|||
|
|||
|
I placed my tank in a wall that divides two rooms. It's kinda like two different reef tanks in one aquarium. The overflows are on the ends and drain to the basement where the refugium and sump await.
Greg |
|
#4
03/14/2007, 08:55 PM
|
|||
|
|||
|
http://s34.photobucket.com/albums/d1...gens/Aquarium/
a couple shots in there. I'm a rookie as well and tank has only been up since 9/06. still have alot of finishing work to do. as you can see it will be see-thru as a type of room divider. ps if your going to do a closed loop. make sure you do it BEFORE you set your tank up. I didn't have enought foresight and am venting as we speak.....
__________________
No matter where you go...there you are! |
|
#5
03/14/2007, 10:23 PM
|
|||
|
|||
|
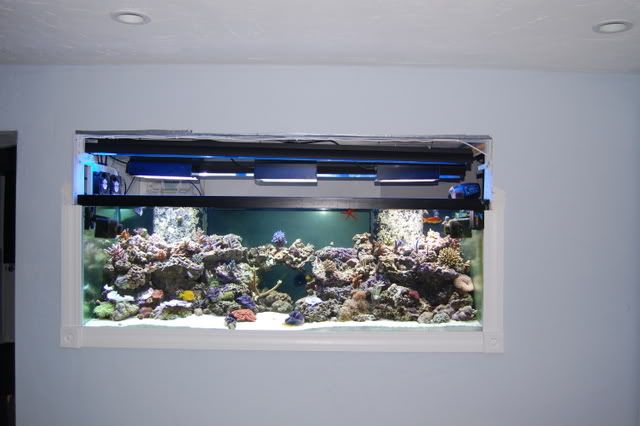
Heres mine. AGA 210 in wall with Rubbermaid 100 gallon stock tank for sump. In the middle of cycling 75 lbs of new live rock. I am transferring everything from my 75 to the 210. Heres a few pics, there are more in my gallery. I put the tank in my living room wall and built a room in the back corner of my garage to accommodate all the equipment. I welded the stand up with 2 x 2 x .125 steel. The trim around the tank is going to be painted white and the walls are going to tan/brown.
   
__________________
Jim If anything absolutely can NOT go wrong, it will anyway. |
|
#6
03/15/2007, 12:12 AM
|
|||
|
|||
|
Wow Jim, haven't seen the tank in a while. The trim looks outstanding!

__________________
Yeah. I got the memo. And I understand the policy... |
|
#7
03/15/2007, 07:26 AM
|
|||
|
|||
|
Quote:
__________________
Jim If anything absolutely can NOT go wrong, it will anyway. |
|
#8
03/15/2007, 03:25 PM
|
|||
|
|||
|
Very nice setup Jim. I am undecided how I want to trim out the front of my tank. I still want to be able to acess the tank from the front but I want everything to blend in.
|
|
#9
03/15/2007, 04:19 PM
|
|||
|
|||
|
Here's how I looked at it.....The top of the tank is almost 6 feet from the floor.... The tank is 29 inches deep and 24 wide....plus I've got two year old twins, boy and a girl, who always want to help with the tank. I figured the tank is to high, deep, and wide to reach in from the front without putting some big huge doors on it that will let light and noise through and look unsightly. Plus when the kids get a little older they will be able to access the tank through them. That would be bad....Thats why there is no access from the front and a keyed exterior door in the garage is the only point of entry.
__________________
Jim If anything absolutely can NOT go wrong, it will anyway. |
|
#13
03/15/2007, 07:26 PM
|
|||
|
|||
|
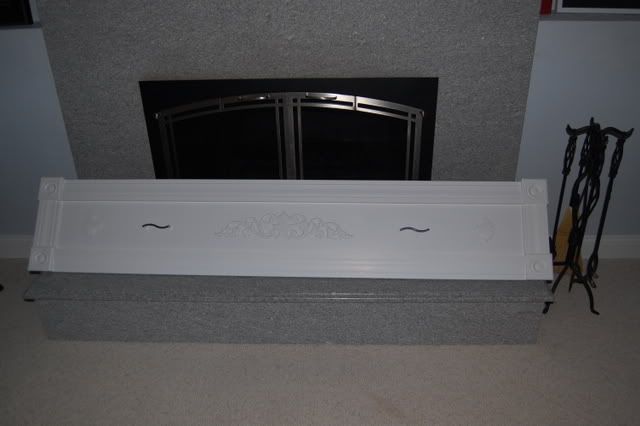
louis i had the same thing as you for a long time . i went from a sps tank to a fowler which i got sick of very fast so before i went back to a sps tank i cut the wall open. i can remove a 6' x14'' piece that i made that slides in at a very small angle. having a door would not work for me because i wanted an inset panell. not that bad to due even if your tank is full
|
|
#18
03/15/2007, 11:53 PM
|
|||
|
|||
|
__________________
What if the hokey pokey is what it's all about? |
|
|


 Linear Mode

