|
|
|
#102
 09/06/2003, 09:51 AM
|
|||
|
|||
|
You are no doubt my idol! Holy smokes! DREAM TANK! TANK OF THE MONTH FROM THE BACK
seriously, she has got one sweet *** I absolutely love your work, I would paint the back, but thats just because it would take away from the front of the tank
__________________
Dustin |
|
#103
09/06/2003, 10:39 AM
|
|||
|
|||
|
If my tank turns out 1/2 as nice I'll be proud. Great freakin work!
|
|
#104
09/06/2003, 01:12 PM
|
|||
|
|||
|
lcsonka39: Thanks for the kind words. With the mechanics so close to completion, my attention will soon focus on the inside of the tank. The coral and rock you see from behind are in the same positions as when I transferred them from the 65. I feel a day of wet arms coming!
 DNA: Can I use those rocket boosters to just run generators to power the tank?  Thanks. and I was thinking more Zen than poetry. Thanks. and I was thinking more Zen than poetry. invincible569: To clarify, when I mentioned viewing the back, it had nothing to do with the tank inhabitants. I would leave the tank back glass clear if it weren't for the fact that when viewing from the front, you see through to the fish room. This sort of detracts from the "piece of ocean" effect. I do still plan on a removable back panel so when desired, I could still view the backside of the reef.Lunchbucket: Thanks. Of all this equipment, I don't feel any is unnecessary except for the ozone generator. But I got that cheap so what the heck. Snoopdog: Definitely there will be some trim there. In fact it's laying on the floor right below the tank as I type.  One of the to-do items on the list. I'll post a pic without and when I get to it, with. One of the to-do items on the list. I'll post a pic without and when I get to it, with.D5HP: Shouldn't there be a new category? TOTM-Equipment. Thanks for the praise.Chris_Reef: Thanks. I have seen better than mine but this will do. |
|
#106
09/06/2003, 01:46 PM
|
|||
|
|||
|
Again, thanks to everyone for their comments. It provides the needed fuel to keep me motivated on this lengthy quest.
 Next, I have a shot of the tank without using the camera flash. This gives a better idea of the lighting. If it were not for the fact that I lost my carpet anemone during this transfer, the mated clowns in the sump would now be in the main tank. There's another mated pair in there now with a host so I will have to wait until I get another carpet or bubble tip. My original plan was to place each pair with host at opposite ends of the tank so hopefully no wars would come about. I'm still not sure if this will work and I think the key factor will be how happy each anemone will be and stay put. Anyway, if it weren't for these clowns in the sump, the plan was to have its light on a reverse time to the tank's daytime lights. This should help with PH stability (not that there is an issue right now). The closed loop inlet filters I hope to conceal from the front with rockwork. They are placed in a way that provides easy removal for cleaning. The Durso prefilter box returns have been wonderful. They only require a periodic drip of water through the air inlets to get the water level back to the normal 2" below the top. On my old 65, I used a gate valve to achieve the same but always felt leery of this means. Here's the shot... 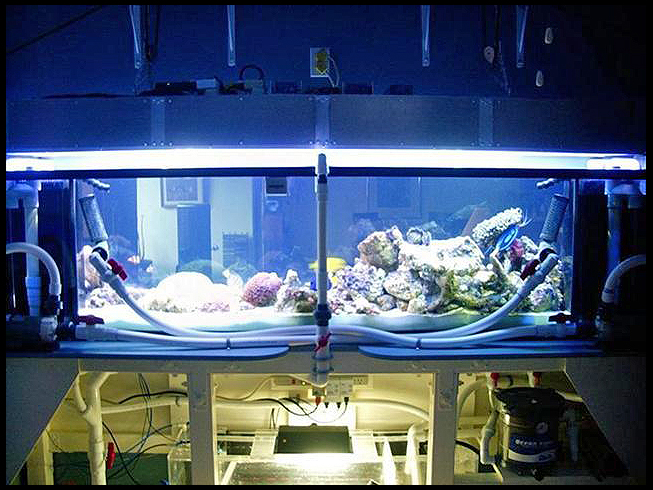
Last edited by Skipper; 04/03/2004 at 10:45 PM. |
|
#107
09/06/2003, 02:17 PM
|
|||
|
|||
|
Amazing job! I am in the process of building a wall around my 180 in my basement. I would love to see shots of your trim/moulding around the edge of your tank.
Thanks, Ernie
__________________
Why put off until tomorrow the thing you could do the day after. |
|
#108
09/06/2003, 02:26 PM
|
|||
|
|||
|
esmithiii: Thanks and I would love to see the trim also.
As soon as I install and paint it I'll post a shot. I'm trying to get to that this weekend. We'll see.
|
|
#110
09/06/2003, 02:38 PM
|
|||
|
|||
|
Here's a closer shot of hte OceanClear filter I added for this tank. The advantage is that it "polishes" the water very well. I have a filter bag in the sump at the tank over-flow outlets that catches the larger particles but this filter goes a step further. I know, I know, you are saying it's possible to over filter the water and pull out the good stuff too but I don't run this filter 24/7, just periodically. The valves just behind it allow me to put it in the flow or take it out. The horizontal pipe with valve is one of the 3 tank returns. The 2 vertical valves are inlet and outlet lines to the filter. With the valves in the positions shown, water is directed through the filter. Turn them all opposite and it bypasses it. The disadvantage of this filter is that it requires regular cleanings, the reverse of what I try to build in to the tank system.
Here's the pic... Last edited by Skipper; 04/03/2004 at 10:48 PM. |
|
#116
09/06/2003, 11:33 PM
|
|||
|
|||
|
CindySki: Serious as in seriously insane?
 SPC: Not an exact figure as you should never keep a running total of materials! I would estimate $80 for the polished sheet aluminum (I got a deal because it had slight pitting but I only used maybe half of what I bought [sold in 4X8' sheets only, need some? ], reg. $150), $90 for aluminum sq. tubing, flat and angle rod, $10 for aluminum rivets, everything else I had. So in actual materials used, perhaps $150. How much if you had to buy something comparable? I think slightly more. Thanks for the kind words.pan_tsu?: That is my ultimate goal, to make all wives a little more appreciative of their geeky husbands throughout the world!  Thanks for the positive affirmation. Thanks for the positive affirmation.JPerkins: There in lies the beauty of no children, just pets.
|
|
#117
09/07/2003, 12:54 AM
|
|||
|
|||
|
I've followed this thread since you started it and I have to say it is an awesome setup and commend you on thinking about everything.
While it's sad what happened to the fish and anemone, you have to remember that you "HAD" to make a mistake somewhere in this project!! While you come pretty close to thinking about everything, remember.. there is only 1 person who is "perfect"!! I particularly like the ideas of the closed loops crossing each other ( will have to remember this when I setup my future upgrade), and especially your water change setup. I was contemplating the exact samething, and now all the work designing it is done for me. Once again, congratulations on your incredible work!!
__________________
Remember, the Titanic was built by Professionals, but the Ark was built by amateurs! |
|
#118
09/07/2003, 01:31 AM
|
|||
|
|||
|
hmmm I wouldnt be able to decide which side I would want to put the lazy -boy on. I also fall into a trance sometimes looking under the stand.
Wow great job, I can only dream of the day. My wife would **** at the expense, she is having a hard time digesting 460 dollars for halides that I ordered 
__________________
Joe -Duu it! |
|
#119
09/07/2003, 05:31 AM
|
|||
|
|||
|
Toutouche: Thanks and glad I've been able to keep your attention. As to the mistake, couldn't it have been that I crossed the hot and cold water on the sink?
Did it have to be something with such horrible results? That sailfin was one of the first fish I bought (8 years ago). He would even let me rub his side and eat from my hand. Anyways, my attorney has instructed me to inform you that by here by reading this thread, you are bond by the laws of intellectual property and according to said laws, required to compensate the owner of said intellectual property (me) with great amounts of cash! Still want to use those design ideas? Thanks for the praise.saltaholic: Expense? What expense? I had all the equipment and the tank was a raffle prize that I couldn't believe I won. Yeah, that's it. The stand I made from old scraps of wood. The paint I had laying around. The lightbox I hammered out of soda cans. OK..got it? Thanks for the compliment.
|
|
#120
09/08/2003, 03:05 AM
|
|||
|
|||
|
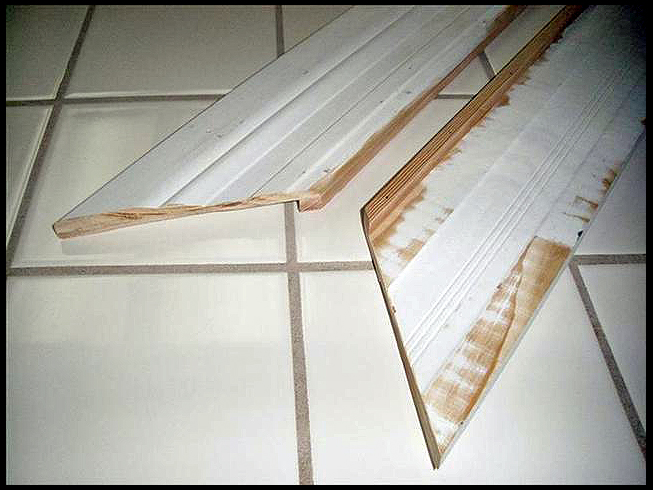
Well, the weekend flew by but I did manage to accomplish some tank tasks. Placing the molding on the viewing side was my primary objective. When I originally placed the tank on its stand, I had two options of placement that directly affected the front molding. This is due to the tank trim at the top and bottom. This trim protrudes about 3/8" from the front glass. Therefore, this means the tank front is not completely flat and this needed to be compensated for. Option one would be to place the tank so the glass was flush with the finished wall which would require a molding with recessed back to accept the protruding tank trim at the top and bottom. Most trim is almost completely flat on the backside so this would require milling a "trough" here to make proper room. Unfortunately, this design would also slightly weaken the wood molding. So, option two was considered and executed. This option was to place the front edge of the tank trim flush with the finished viewing wall and add a filler piece to the molding inside edge where it makes contact with the glass. This shot shows this 3/8" by 3/8" douglas fir wood filler that I glued and brad nailed to the back-inside edge. It also shows the profile I chose on this 4 and 1/4" wide molding.
Last edited by Skipper; 04/03/2004 at 10:50 PM. |
|
#121
09/08/2003, 03:19 AM
|
|||
|
|||
|
Here is a shot of the bottom right corner after installation and paint. The molding covers only 3/8" of the viewable glass area at the top and bottom and about a 1/2" on the sides, enough to conceal the optional black, inside tank silicone.
Installation of the molding was achieved with a bead of black silicone at the filler piece where the molding meets the tank glass and the extreme exterior where the molding meets the wall. It was also screwed to the wall with countersunk sheetrock screws. Then it was puttied, sanded and finally painted. 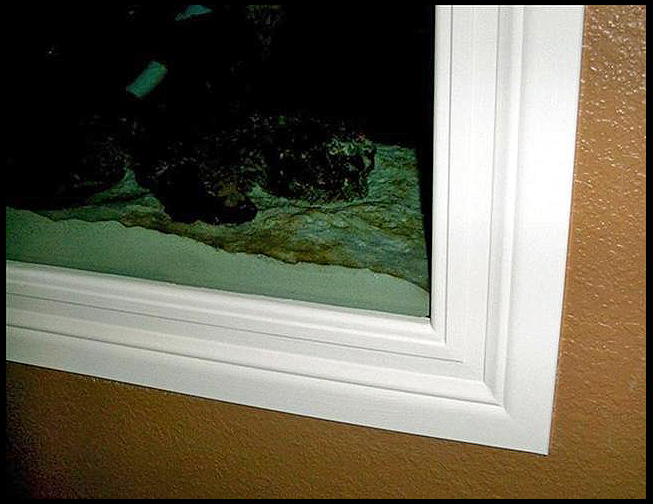
Last edited by Skipper; 04/03/2004 at 10:51 PM. |
|
#122
09/08/2003, 04:06 AM
|
|||
|
|||
|
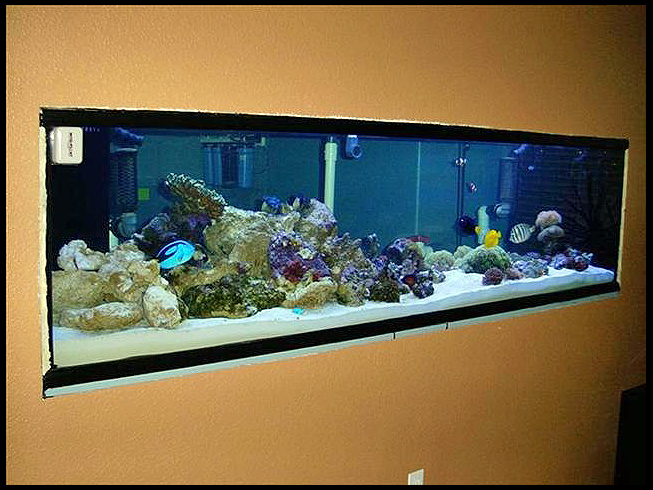
This shot shows the tank prior to the molding installation. Note that I used black silicone to seal the top edge where the tanks top trim sits a quarter of an inch below the wall opening. I filled this gap completely for safety reasons should disaster ever arise and water spills over the top, keeping all water behind the wall in the fish room. The bottom where the tank rests on the stand was given the same treatment. The side gaps between the tank and side walls were filled with expanding foam (after painting the tank sides black) the full thickness of the wall (4.5"). All this created a water barrier. The blue just below the tank is the 3/4" plywood stand top that covers both the stand and wall tops, joining them as one.
Last edited by Skipper; 04/03/2004 at 10:50 PM. |
|
#123
09/08/2003, 04:11 AM
|
|||
|
|||
|
Please note that the above photo shows the rock and corals where I quickly placed them, temporarily, while transfering from the old tank to the new one. So no, this is not my idea of aquascaping.
This major task is still on my to-do list but approaching quickly.
|
|
#124
09/08/2003, 04:17 AM
|
|||
|
|||
|
Here I have a full shot of the molding after I finished painting it last night. I will post a better shot later with tank lights on and daylight ambient light for better detail. But for now, here you go...

Last edited by Skipper; 04/03/2004 at 10:51 PM. |
|
|


 Linear Mode

