|
|
|
#76
 09/04/2003, 08:21 PM
|
|||
|
|||
|
Having a wall aquarium has always been a desire of mine also and that area I imagined would be a trouble spot, but it looks like you addressed the issue like the rest of your setup, with much planning. I especially like the way you beveled the top of the opening.
Art |
|
#81
09/05/2003, 02:15 AM
|
|||
|
|||
|
I have to say thanks also. I am about to close on a new custom home. The garage is 2&1/2 so the 1/2 is space for my inwall tank to face the gameroom. I have been so busy with planning and overseeing the house that I dread to take on the project. Your explanations will help ease the pain. I did plan on an 8 foot tank so I have the header already there with the electrical outlets and 20amp breakers. I even had extra piers and a thicker slab poured to meet the weight requirements. I too have a window for a seperate a/c unit- I just dont think my wife would appreciate seeing a window unit sticking out of her beautiful house. I also have a drain and extra plumbing for r/o and sink. In planning stage my wife scrutinized the plans and asked why the architect and engineer added so much to that certain area. I should have had 2 plans drawn - one for her and one for the builder. Its good that your wife was understanding. My wife questioned the overall price. I said dont worry honey it will be years before I can overcome the debt we are in before I can even attempt it besides my custom pool table comes first. But really the only thing I forgot to do was to add ceiling vents to evacuate the humid air. If you do go by way of window unit then that should address the issue. My only real regret is not putting in solatubes. Thanks again for all of your time in posting pics and explanations.
|
|
#83
09/05/2003, 08:39 AM
|
|||
|
|||
|
awcurl.. that beveled cut out is a HUGE HELP! I did that to mine too and it helps the light get in to the entire tank (the front). It is also a help for when you stick your hands in. If I upgrade my tank later, I am going to make that even bigger.
louis... let me know how it comes along!! I live close to you and I did a in wall tank. You are welcome to come check it out and get some ideas. Yuo can see pics in my gallery (pics are old now and since then added new equipment). If you're going to put it in your garage, I would do what I did.. and add 2 strong fans blowing cool air from the inside of your home to the top of your tank. I dotn own a chiller but will soon because I am afraid that my AC may go out one day.. or an electrical outage (generator will be used to power chiller). I have gone all summer without a chiller and have had my temps stay under 82.. august is where I hit 82.. in july.. it was under 80. And i also need to sheetrock/insulate the rest of my garage.  Good luck on your planning. Let me know if you need any assistance. Good luck on your planning. Let me know if you need any assistance.
|
|
#85
09/05/2003, 04:58 PM
|
|||
|
|||
|
Invinc 569 thanks for the offer - I will definitely take you up on that. I am currently reef ready illiterate. I have to see up close and have someone walk me thru the process. As for the garage I did have them insulate - I have 2x6 studs so I have extra insulation. I also got an "insulated" garage door and have tech shield under the roofing. I hope my planning works out for I also dont want a chiller. I dont mean to highjack the thread but I do feel that all of these tidbits in weathersons thread will help others thru the process.
|
|
#86
09/06/2003, 12:18 AM
|
|||
|
|||
|
Well I've been busy on the tank so I thought it time to show some more progress. I'll post some more photos in a moment, but first..
awcurl: Yes, that bevel made a big difference in light dispersion. I'm pleased I took the time to do it but it was no easy task as I placed the header before I had receive the tank and didn't know the width of the opening at that point(impatience on my part). Therefore, I had to wait until the side 4X4s were in place. Then I used a Skill saw held against the wall with the blade at a 45-degree angle. Definitely not an ideal situation but it worked. I also had to cut the corners by hand. Again, worth the effort. Dz99ls, nickoz, Travis: Thanks and I'm glad you found it useful. Louis Z: You are welcome. It sounds like you have some fun ahead of you. I am envious of your fresh start and the ability to build to suite. In regards to the window AC unit, unfortunately the window I have in that room is too narrow so my only option is an in-room portable unit. The real problem with this is that they tack on another $500 for this "feature". As far as aesthetics, that widow has large growth landscaping just outside so if I could put a window unit in, it would be concealed. Taoism: Sorry, but I don't recall the brand or model offhand but if you need it, I could get it. Yes, it is just that.. a manual forklift. |
|
#88
09/06/2003, 01:19 AM
|
|||
|
|||
|
OK... Sorry, went and checked on the plumbing I did today and the moonlights were on (half moon tonight) and I got sidetracked looking in the tank
. I thought I would start with the lightbox vent in more detail, not that there is alot. After realizing that the air being vented from the lightbox was extremely hot, I decided to vent this air out to the attic. I also thought I would like to capture this same air during the winter months. So I attached a black plastic, 4" flexible tube to the box and directed it into a clothes dryer heat recovery box that allows you to switch air-flow to two different outlets. One goes to the attic and the other back into the room. This photo shows the box attached to the ceiling with the front flap closed so the air flows into the attic. I also placed a flap valve in the attic at the exhaust point because I have a whole house fan that when on creates a high pressure area in the attic. Here's the photo..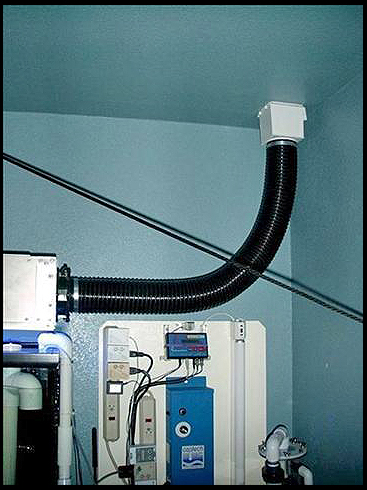
Last edited by Skipper; 04/03/2004 at 10:49 PM. |
|
#90
09/06/2003, 01:33 AM
|
|||
|
|||
|
Some of the work I did today was to redo teh closed-loop plumbing to eliminate some of the restrictive 90 degree bends. I also moved the pumps closer to the outlets at the sides of the tank. As I mentioned before, the Iwaki MD-30 pumps I am using are a little underpowered for this application but I needed to make them work as best possible. Prior to this alteration the current was adequate but not strong. With this change there has been a dramatic improvement. Still not optimal, but much better. So with the combined outputs of the return pump and the closed loop on a 6 hour alternating program, I am good to go. There's also a center-of-tank at the back return that I will eventually make a electric motor driven rotating return for to mix things u a bit. Here's a shot of the new plumbing for the closed loop. Have I mentioned how much I love this flexible 1" pipe?
 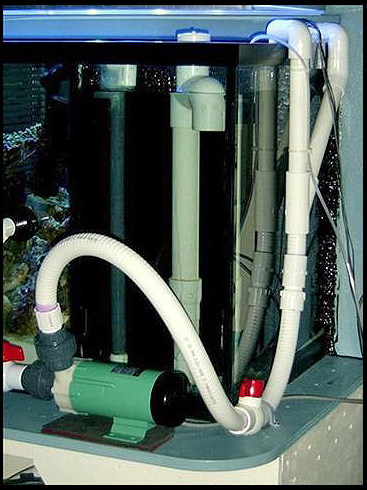
Last edited by Skipper; 04/03/2004 at 10:46 PM. |
|
#91
09/06/2003, 02:02 AM
|
|||
|
|||
|
So at this point I will say that aside from making the removable back for the tank, the fish room is pretty much complete!
 So the next series of photos will lead up to the full tank back shot. There will be a drum roll to signify this momentous event. So the next series of photos will lead up to the full tank back shot. There will be a drum roll to signify this momentous event.  I'll start with the side left of the tank. I placed heavy shelving here next to the window for all things calcium. The top shelf holds the resevoir I made to store RO/DI water fed by a line I ran around the room at the baseboard from the filters at the sink. There is a float in it that keeps the level proper (the RO unit has an auto-shut-off valve built in) and then a line gravity feeds directly into the kalkwaser reactor I made from my first skimmer, a Top Fathom. This is shown on the middle shelf at the right. Basically, I made a new top with an inlet and outlet and added a water-tight connector where an AC cord enters and connects to a powerhead. This powerhead is on a timer to mix the calcium hydroxide for one minute every 6 hours. The outlet feeds a line that connects to a float in the sump and keeps the proper amount of water in the tank. This system has worked flawlessly for years. To the left of this on the same shelf is the Knop calcium reactor I picked up used from Larry Jackson years back. Just out of picture at the bottom right is a 20 pound CO2 tank that feeds the reactor. I have to refill it about once every 8 months. The reator is fed tank water directly off the return line of the AmpMaster pump and the output drips into a small container suspended just above the water level in the sump. There is a Pinpoint PH monitor whose probe is permanently placed in this container for continous efluent PH level readings. The water from this container then drip directly into the sump. Phew, that was lengthy. I'll start with the side left of the tank. I placed heavy shelving here next to the window for all things calcium. The top shelf holds the resevoir I made to store RO/DI water fed by a line I ran around the room at the baseboard from the filters at the sink. There is a float in it that keeps the level proper (the RO unit has an auto-shut-off valve built in) and then a line gravity feeds directly into the kalkwaser reactor I made from my first skimmer, a Top Fathom. This is shown on the middle shelf at the right. Basically, I made a new top with an inlet and outlet and added a water-tight connector where an AC cord enters and connects to a powerhead. This powerhead is on a timer to mix the calcium hydroxide for one minute every 6 hours. The outlet feeds a line that connects to a float in the sump and keeps the proper amount of water in the tank. This system has worked flawlessly for years. To the left of this on the same shelf is the Knop calcium reactor I picked up used from Larry Jackson years back. Just out of picture at the bottom right is a 20 pound CO2 tank that feeds the reactor. I have to refill it about once every 8 months. The reator is fed tank water directly off the return line of the AmpMaster pump and the output drips into a small container suspended just above the water level in the sump. There is a Pinpoint PH monitor whose probe is permanently placed in this container for continous efluent PH level readings. The water from this container then drip directly into the sump. Phew, that was lengthy.  Below this shelf is my stash of Nori for the tangs and the X-10 controllers for the equipment above. So you are saying to yourself.. "can we ever see the picture?!!". OK, my fingers are cramping anyway. Below this shelf is my stash of Nori for the tangs and the X-10 controllers for the equipment above. So you are saying to yourself.. "can we ever see the picture?!!". OK, my fingers are cramping anyway. 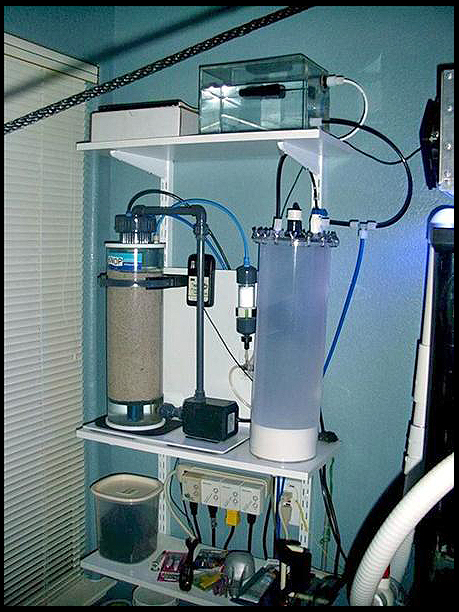
Last edited by Skipper; 04/03/2004 at 10:35 PM. |
|
#92
09/06/2003, 02:20 AM
|
|||
|
|||
|
Next we move to the right to the skimmer side. As I mentioned earlier, I made this skimmer many years ago and have altered it for improvements. I feel it will be adequate for this tank but I still plan to build a new, larger unit in the future. The waste removed by this skimmer heads down the hose into the water bottle and this hose terminates about 5" below the top. There is another output hose that heads up to the charcoal air filter mounted on the wall. This hose is terminated higher inside the waste bottle so that when the waste level rises to the top, it plugs the inlet hose and lowers the water level in the skimmer. Simple and effective. Above the skimmer in blue is the Ozotech ozone creator that is connected to one of the air intakes of the skimmer. This unit is controlled by the AquaController (love it, love it, love it!
) but at a setting where it rarely comes on. To the left of that are more X-10 controllers and some wiring I need to tidy up. Here's the shot..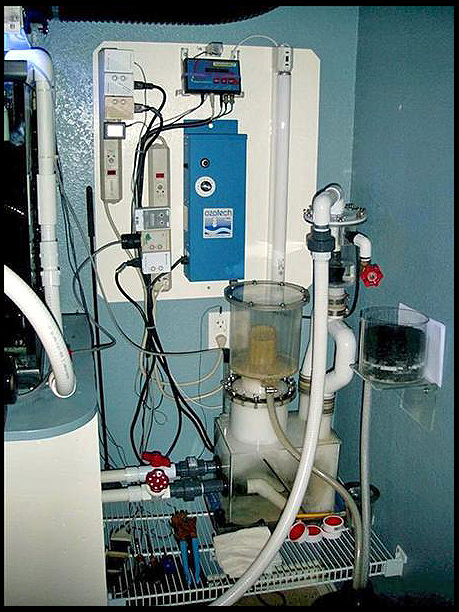
Last edited by Skipper; 04/03/2004 at 10:37 PM. |
|
#93
09/06/2003, 02:30 AM
|
|||
|
|||
|
Here's a closer shot of the whole skimmer workings. The red handled valve at the top controls the amount of air intake. This skimmer used to have dual downdraft with bio ball intakes that I most recently converted to a single Becket type. This produces finer and many more air bubbles than the previous. Technology marches on.
The black box to the left of the waste bottle is the drop-in-coil chiller.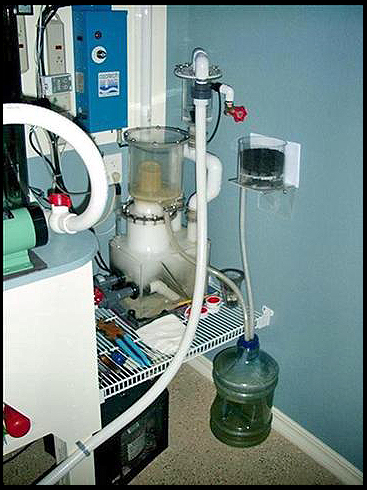
Last edited by Skipper; 04/03/2004 at 10:47 PM. |
|
#94
09/06/2003, 02:33 AM
|
|||
|
|||
|
Quote:
 Yeah it's a wonderful setup, keep up the good work, it just inspires us lazy people to get off our asses and do someting just as nice.
__________________
I am god of the sea people! |
|
#95
09/06/2003, 02:45 AM
|
|||
|
|||
|
Alright, let me preface this with the definition of a techno geek/aquarist. This someone who is equally excited and enamored by the back of his tank as the front.
Unaquivically, I fall into this category. I was that kid who tore things apart to see just how the heck they worked. Luckily, I also had the ability to put them back together. So pardon me if I get a little excited in unvailing my latest in full glory. From 65 to 240, all things mechanical. I hear a drum roll.....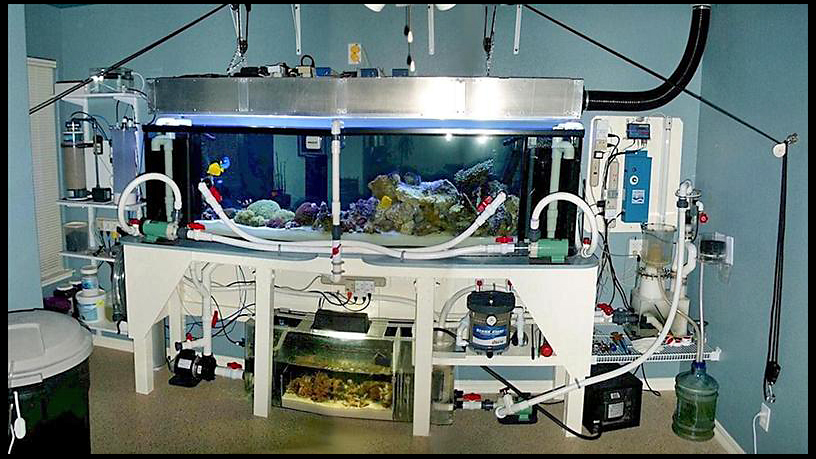 Note: This image is actually 3 combined to get the whole shot. The size of the room and my digital camera shortcomings prohibit otherwise. A little Photoshop manipulation later and presto! So, if you see some things that don't seem to line up just right, this is why. Last edited by Skipper; 04/03/2004 at 10:45 PM. |
|
#96
09/06/2003, 02:56 AM
|
|||
|
|||
|
Obviously, my spelling ability is tied directly to the time of night. I would like to take this moment to formally apologize for this and the persistent "teh" instead of "the".
 Time to hit the sheets. I'll post some more tomorrow. Time to hit the sheets. I'll post some more tomorrow.
|
|
#97
09/06/2003, 04:14 AM
|
|||
|
|||
|
as a future engineer, i appreciate the back and undersides of the tanks more than the actual tank itself!
Hell, you are actually supposed to put stuff in the tank??? By far, this is the most amazing setup i have seen... One day maybe i will have something of the same sort... GREAT WORK! 
|
|
#99
09/06/2003, 06:16 AM
|
|||
|
|||
|
BEAUTIFUL!!! I WOULD NOT PAINT THE BACK!! You are right, it does look nice from front to back! You can always hide the plumbing so you cant see it from the front.
|
|
#100
09/06/2003, 08:51 AM
|
|||
|
|||
|
man i am an equipment freak also and i must say this is like a DREAM tank. i have a TON of stuff on my 20H and would like to add more
great job and please please please get us more pics Lunchbucket
__________________
Trying to lose weight by walking is like trying to bake a cake w/ a cigarette lighter - Lunchbucket - "Nancy-Boy Extraordinaire" - maxxII- |
|
|


 Linear Mode

