|
|
|
#51
 09/04/2003, 09:14 AM
|
|||
|
|||
|
Very nice, well thought out and executed!
You mentioned not being able to see into the tank with the in wall unit. I wonder how well it would work putting a black acrylic background piece behind there so you could remove it at will when doing maintenence? I'm curious.. do you think the metal hood, even though it's aluminum, will cause any heat problems with metal halides? |
|
#53
09/04/2003, 09:31 AM
|
|||
|
|||
|
HOLY COW!! and I thought your stand was going to be the nicest things. Your light fixture is SOO NICE!! If I could build a fixture like that, I would add all kinds of kelvin rating bulbs for an SPS tank. Cant wait to see how you mount the lights above the tank.
You should have your own business building custom tanks for the wealthy or hobbiest. 
|
|
#54
09/04/2003, 09:55 AM
|
|||
|
|||
|
weatherson,
Very well thought out and very good documentation. Quite an inspiration for us all. I'm building a fishroom in my garage. It's a slow process as I'm trying to get it right the first time. I'm going to be dealing with a heat problem, too. By the way, how close are we to each other? -Terry
__________________
-Terry |
|
#55
09/04/2003, 12:49 PM
|
|||
|
|||
|
DNA: Thanks for the vote of confidence.
Addicted Reefer: The light fixture took about a week from first rivet to installation. And this included pretty much one full day of just polishing the inside portions of the frame. Yes I am running a chiller. At this point I haven't yet installed any fans on the sump or tank but do have the ceiling fan going 24/7. I keep the house at 80 degrees (don't even ask my electric costs  due to CA inflated prices) so it's rarely on. I've the thought of getting an inroom, portable AC unit that works as a dehumidifier but at this point in the year, I'll just wait until Spring of next. As to the rooms AC circuits, I ran two 30 amp circuits. With almost all of the same equipment, the old tank ran on a single with no issues. Although I'm sure it was pushing the envelope. As to the flow of the tank, I have to throttle the AmpMaster back just slightly so I have wiggle room with that one. The closed loops are another story. I reworked the plumbing once now on this for better cross tank flow but I still have two 90 degree fittings on each circuit. So one of my next tasks is to rework it again and eliminate those to try and increase flow. I went with the Iwaki 30s because one was my circulation from the 65 so it was more price saving than doing the right thing. At this point I am just going to try and maximize them the best I can until I eventually upgrade to stronger pumps. So far the floww seems good but I'd much rather have to throttle back and know that over time there will be room to increase with the twist of a valve. due to CA inflated prices) so it's rarely on. I've the thought of getting an inroom, portable AC unit that works as a dehumidifier but at this point in the year, I'll just wait until Spring of next. As to the rooms AC circuits, I ran two 30 amp circuits. With almost all of the same equipment, the old tank ran on a single with no issues. Although I'm sure it was pushing the envelope. As to the flow of the tank, I have to throttle the AmpMaster back just slightly so I have wiggle room with that one. The closed loops are another story. I reworked the plumbing once now on this for better cross tank flow but I still have two 90 degree fittings on each circuit. So one of my next tasks is to rework it again and eliminate those to try and increase flow. I went with the Iwaki 30s because one was my circulation from the 65 so it was more price saving than doing the right thing. At this point I am just going to try and maximize them the best I can until I eventually upgrade to stronger pumps. So far the floww seems good but I'd much rather have to throttle back and know that over time there will be room to increase with the twist of a valve. Chris_Reef: Great minds think alike!  My thought was to try this also but with the difference in paint color. I plan on attempting to use 2 shades of blue (very dark almost purple and a sky blue) and create a gradual transition from one to the other, dark on the bottom and light on teh top. I was originally going to do this treatment on the back glass but then thought to do it on a piece of plexi cut to fit the back between the prefilters. Then add some sort of small lip siliconed to the top of the tank back to prevent any dripped water from getting between the plexi and glass. We'll see how well my painting skills are first though.on some practice glass. As to the heat issues, the fans at both ends (push/pull system) handle any potential build up of heat inside the box. Outside was another story though. The amount of heat that was dumping outquickly heated the room so I went to plan B. You'll see in teh next photos that I vented this heated air to the attic. There's also a box at the ceiling that allows me to direct the air back into the room for the winter months. My thought was to try this also but with the difference in paint color. I plan on attempting to use 2 shades of blue (very dark almost purple and a sky blue) and create a gradual transition from one to the other, dark on the bottom and light on teh top. I was originally going to do this treatment on the back glass but then thought to do it on a piece of plexi cut to fit the back between the prefilters. Then add some sort of small lip siliconed to the top of the tank back to prevent any dripped water from getting between the plexi and glass. We'll see how well my painting skills are first though.on some practice glass. As to the heat issues, the fans at both ends (push/pull system) handle any potential build up of heat inside the box. Outside was another story though. The amount of heat that was dumping outquickly heated the room so I went to plan B. You'll see in teh next photos that I vented this heated air to the attic. There's also a box at the ceiling that allows me to direct the air back into the room for the winter months.boogs, invincible569, trmills (just up the road, Fresno) and everyone else: Thanks! |
|
#56
09/04/2003, 12:57 PM
|
|||
|
|||
|
hey Weatherson
thanks for answering all my questions. I have one more if you don't mind. Did you build the skimmer yourself? If so do you have any plans availible? thanks again adam |
|
#57
09/04/2003, 01:08 PM
|
|||
|
|||
|
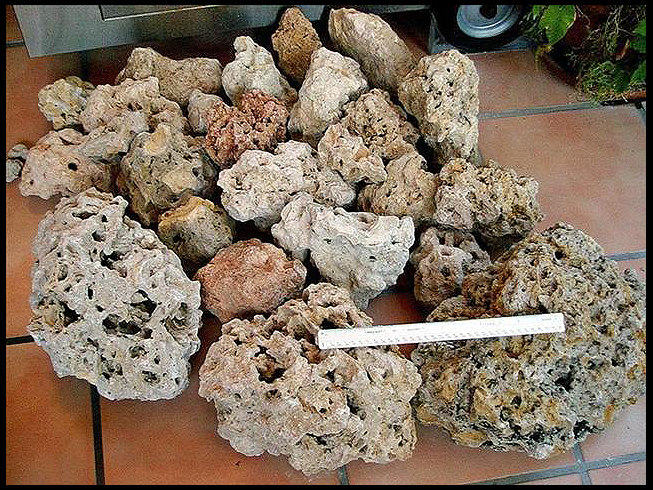
OK.. more photos. As you could imagine, I was in need of more rock due to the sudden increase in tank size. Needing to keep costs down I decided to go with the "dead" rock found on Ebay. This is Hawaiian rock (not lava but calcium based) and is extremely porous. I bought 180 pounds of it which should be enough along with the existing to complete my aquascaping design. The plan is to have the rock at it's highest points at each end of the tank. Then gradually taper down and end at the center of the tank where there will be sand between. The left side rock feature will bend toward the back and the right side will bend toward the front so that it will create a diagonal valley between. Hope that makes sense. Anyway, here's a shot of the ordered rock after an hour of blasting it to remove rock dust and any small particles. The ruller is just slightly over 12" for reference.
Last edited by Skipper; 04/03/2004 at 10:31 PM. |
|
#58
09/04/2003, 01:16 PM
|
|||
|
|||
|
A couple of other things I can mention about the above rock. The tiles it is sitting on are 13" to help in size reference. The cost was 1$/lb. + shipping= $1.41/lb. If interested, do a Ebay search for Base Rock 60LBS.
|
|
#59
09/04/2003, 01:16 PM
|
|||
|
|||
|
Just wanted to say AWESOME JOB.
 I'm moving in a few months & I have a 150 that will be in-wall. Your thread has given me some great ideas. Keep up with the pix. Smart idea with the dead rock also - I did this a few years ago & now those are some of my favorite pieces! I just bought some "lace rock" at an LFS, probably a buck a pound. |
|
#60
09/04/2003, 01:25 PM
|
|||
|
|||
|
Addicted Reefer: I did build it myself many years ago and as stated in a previous post, it's been through many transformations. Originally a downdraft with bio balls to give you an idea of how old it is. As far as plans, I hva none but the dimensions of the rectangular chamber are 8"X9"x12" (WXHXL) if that helps any. I plan to build a new one of larger size soon when time permits.
Fliger: Thanks and I'm happy you found some usefull info. |
|
#61
09/04/2003, 01:32 PM
|
|||
|
|||
|
All right thanks anyway

|
|
#63
09/04/2003, 01:55 PM
|
|||
|
|||
|
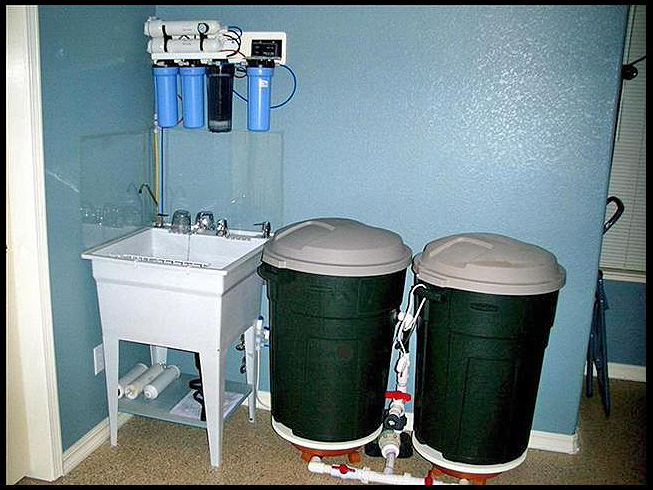
The next project was to get my saltwater mixing system up and running. I stuck with my 30 gallon trash containers for their size but this time I decided to get closer to fully automated. Not quite, but close. As seen below, there are 2 containers. The one on the left is the mixing unit and the one on the right is where the old tank water is pumped to. I did this just to ensure equal amounts were removed and replaced. So it goes like this: Left tank fills with RO/DI water with a float valve inside at top. Once filled (a few hours), add salt and set valves for circulation. This loop includes a 3/4" venturi which adds airation to the water while mixing. Then pump tank water into the right container to same height as fresh, mixed water. Then pump fresh water into the tank and last of all, pump the old tank water from the container on the right to the sink. Piece of cake!
There are bulheads at the center-bottom of each container that feed the pump inlet. The valves allow me to select which container it pulls from. The upper valve determines the output direction of the pump, either back into the mixing container through the venturi or to an output to which there is a union that a hose is attached when pumping the old water from the right container to the sink. This hose also fits a union on the tank circulation pump for transfering old tank water to the container on the right as the means of measurement. Hope this makes sense but the photo should help. The white cord hanging is the switch to turn on the pump and heater in the mixing tank. The black portion at the top of the plumbing just below the white 90 degree piece is the venturi. 
Last edited by Skipper; 04/03/2004 at 10:32 PM. |
|
#64
09/04/2003, 01:58 PM
|
|||
|
|||
|
Here's a shot of the whole sink wall including the RO unit and mixing tanks.
Last edited by Skipper; 04/03/2004 at 10:33 PM. |
|
#65
09/04/2003, 02:14 PM
|
|||
|
|||
|
Quote:
|
|
#68
09/04/2003, 03:56 PM
|
|||
|
|||
|
Reef-lite: Hardcore? Thanks I think.
 Thanks for the idea for the tank back cover. I am learning that the in-wall tank with it's back access only makes for the innevitable drips when removing things from the tank no matter how hard you try to prevent it. This would include cleaning tools, rocks, hands and etc. So my thoughts to use plexi are knowing this and to not use something that would need constant cleaning when hit with saltwater. Cheaper is good, but in this case not an option. Thanks for the reply. Thanks for the idea for the tank back cover. I am learning that the in-wall tank with it's back access only makes for the innevitable drips when removing things from the tank no matter how hard you try to prevent it. This would include cleaning tools, rocks, hands and etc. So my thoughts to use plexi are knowing this and to not use something that would need constant cleaning when hit with saltwater. Cheaper is good, but in this case not an option. Thanks for the reply.Chondro: You are welcome. Glad to share. The bulkheads on the mixing tank are standard issue. The container is plyable enough that it compresses flat when the BH is tightened. D5HP: You will need to win the lottery to afford me!  Just kidding. Thanks for the kind words and I look forward to that flight. Just kidding. Thanks for the kind words and I look forward to that flight.
|
|
#69
09/04/2003, 04:31 PM
|
|||
|
|||
|
Here's some shots for those of you interested in how I mounted the light box. Keep in mind that the complete box with lights, ballasts and electrical weighs only about 75 pounds. I didn't weigh it but this is an estimate as my wife and I lifted it over our heads to get it on the tank. She is no Ahhhrnold by any means (sorry, he's sort of the topic lately here in CA
). So what I wanted was a means to lift the box up above the tank to facilitate access. There were a couple possibilities, one manual the other electric. This is where I strayed from "hardcore". I went the manual route even though Harbor Freight Tools had a sale on a electric 2000 lb. wench for $75! Mount that in the attic with cables through the ceiling, press the up button and it raises. The down button and it lowers back to the tank. OK.. back to reality, I wanted an easy way to lift it and a way to lock it in the up position without any possibility of it ever suddenly falling to smack the tank.  So the manual pulley system it was with some really slick rope locks I found at Lowes. These are ratcheting locks that when you pull the rope through, it holds it wherever you stop and releases with the press of a button. Perfect! I also installed a safety, backup chain should something malfunction. Without this, if the box were to fall from the full-up position, it would surely smash things up and I would find out just how well I sealed that room. So the manual pulley system it was with some really slick rope locks I found at Lowes. These are ratcheting locks that when you pull the rope through, it holds it wherever you stop and releases with the press of a button. Perfect! I also installed a safety, backup chain should something malfunction. Without this, if the box were to fall from the full-up position, it would surely smash things up and I would find out just how well I sealed that room.  The mount on each side is two 1000 lb. shelf brackets lag bolted to the vertical wall studs and ceiling and tied together with a steel 1" square tube. Eye bolts mounted to this tube provide rope and chain mounting points. A bit over-kill but again, safety was the motivation. I originally used only a single pulley but found that to be too difficult in raising the box. The addition of the second made a huge difference and now I can raise it with one hand. So here's a photo of the brackets and pulleys. The mount on each side is two 1000 lb. shelf brackets lag bolted to the vertical wall studs and ceiling and tied together with a steel 1" square tube. Eye bolts mounted to this tube provide rope and chain mounting points. A bit over-kill but again, safety was the motivation. I originally used only a single pulley but found that to be too difficult in raising the box. The addition of the second made a huge difference and now I can raise it with one hand. So here's a photo of the brackets and pulleys.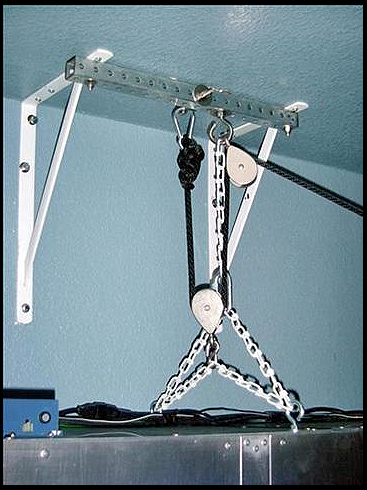 And here a photo of the rope at the wall where I used two eye-bolt lags into the wall stud. The top with pulley and the bottom with the ratcheting rope locking mechanism. 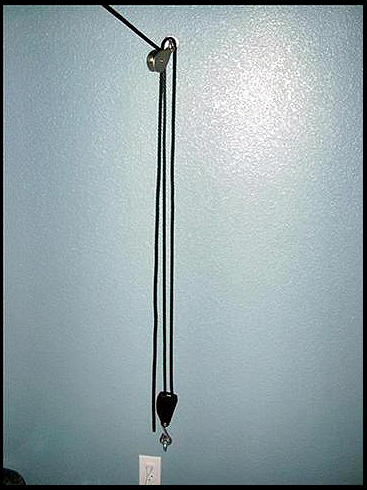
Last edited by Skipper; 04/03/2004 at 10:34 PM. |
|
#70
09/04/2003, 04:39 PM
|
|||
|
|||
|
Thank you for sharing with us. I'll be building a house in about 2 years and want an in wall tank that will be viewed from both the living room and master bedroom.
You gave some really good ideas and I'll be taking notes. Youâve even managed to point out some things that I would have forgotten. |
|
#71
09/04/2003, 04:56 PM
|
|||
|
|||
|
Do you have a job???? Or a girlfriend????
Man you are making me feel like a SERIOUS underachiever! It takes me a month to make the progress you apparently make in an afternoon! J/K Can't wait to see the lights fired up.
__________________
When life hands you lemons ... add vodka! Growing old is mandatory. Growing up is optional. Closed minds should come with closed mouths. |
|
#73
09/04/2003, 07:01 PM
|
|||
|
|||
|
It looks as though you are going to have wonderful setup. I do have a question about the opening for your tank. What did you use to seal the edges of the opening to prevent moisture damage to the wall?
|
|
#74
09/04/2003, 08:07 PM
|
|||
|
|||
|
hd_nagel: Glad this has helped. I'd love to have built a house and designed a room special for an in-wall but retrofit will have to do.
hd_nagel: Glad this has helped. I'd love to have built a house and designed a room special for an in-wall but retrofit will have to do. Fliger: I hear wifes don't appreciate girlfriends. Just to clarify to anyone who haven't read all the posts, these photos are NOT realtime! The work on this project has been ongoing for about 2 months now. So, wonder worker I am not.D5HP: Actually, if you reread the post, I misspelled it so apparently they have wenches for $75. What a bargain! awcurl: Very good question and I should have stated this. First of all, I used green wallboard and sealed the bare wood around the openning (wood sealer). Then it's sealed with several coats of gloss enamel paint. I have also silicone sealed the tank/stand joint completely around and the top of the tank front, filling the gap to the wall. I also silconed any gaps on the stand prior to placing the tank. The sides I shot expanding foam due to the larger gap (tank trim at top and bottom only) and trimmed it flush after it cured . If the tank were to overflow, all water would be directed to the fish room only. But of course an overflow will never happen.
|
|
#75
09/04/2003, 08:17 PM
|
|||
|
|||
|
awcurl: Just thought of one more thing I did to prevent water damage to the wall. In the fish room at the inside corner of the hole opening, I attached a 1/2" quarter round trim piece made of Oak up the sides and across the top and mitered the top corners together. This gave me a square inside corner that the wallboard would meet. So this prevented any exposed wallboard edges at the opening.
|
|
|


 Linear Mode

