|
|
|
#1
 02/23/2006, 04:52 PM
|
|||
|
|||
|
Building my own Frag Tank
Couple quick questions....
My design calls for the tank to be 48"x30"x12" and will be constructed out of 1/4" glass with 4"x4" triangle glass corner braces siliconed to the top. All top edges will be smothed off. The 1/4 glass should be adequate right? I will most likely be using a 250w pendant. Will that be enough light for this size tank?...I figure the lower light corals can be placed around the edges. Secondly, what size bulkhead should I use at the one end for the supply to the sump. The return will be a Mag 7. Should I do a second bulkhead as an emergency overflow? I will be running the water fairly close to the top. 
|
|
#2
02/23/2006, 06:25 PM
|
|||
|
|||
|
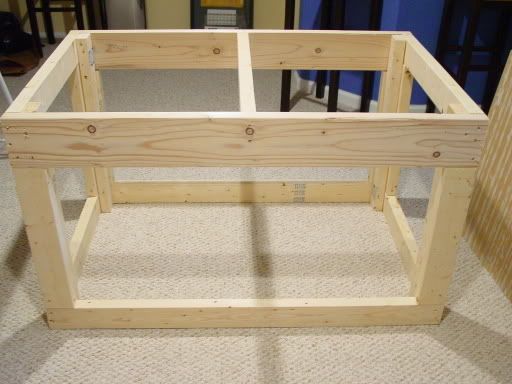
oh by the way, the sump will be behind the wall to the left. I am building the stand out of 2x4s and a 3/4 plywood top with prob a wainescoating (sp?) on the two visible sides. The bottom piece of glass with be flat against the plywood base so I was figuring there would be no need for the foam. Any suggestions on a color for the bottom? Blue, Black?
|
|
#3
02/24/2006, 03:01 AM
|
|||
|
|||
|
i dont feel that your going to be providing enough lighting ..
the 250 mh is broadcasting a lot of light in a small usable area, i would go with two 250's and some 55w pc's
__________________
pic whore #1 up the pictures |
|
#5
02/24/2006, 01:59 PM
|
|||
|
|||
|
two 250s??? I'll start with one and put the LPS frags on the outside.... I can always upgrade later. Any suggestions on paint color..if any at all?? Should I just paint the vaneer plywood top of the stand. Also what is the Silicone from Lowe's to get,,,,I know it was for doors and windows but I forget the brand name.
|
|
#7
02/24/2006, 05:19 PM
|
|||
|
|||
|
Supplies in hand, here we go, I'll be posting picts as I go.
|
|
#8
02/24/2006, 05:25 PM
|
|||
|
|||
|
agreed you need more lighting. Other then that sounds good.
__________________
I think of one later. |
|
#9
02/24/2006, 08:40 PM
|
|||
|
|||
|
Glass layed out.......1/4" glass, all sides beveled.
 1" Bulkhead...I used a dremmel, actually found the bit for cutting tile and sheetrock worked better than the diamond bit, go figure. 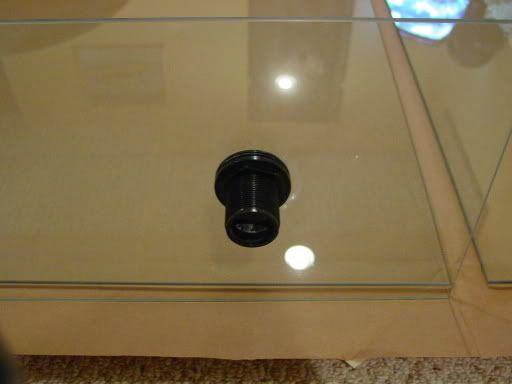 All taped up..... 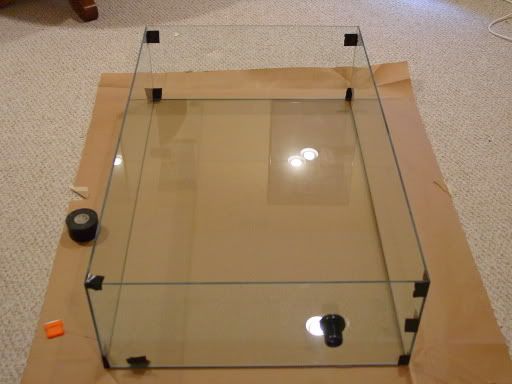 4"x4" Corners, I will use these on the top for additional support of the sides.  All siliconed 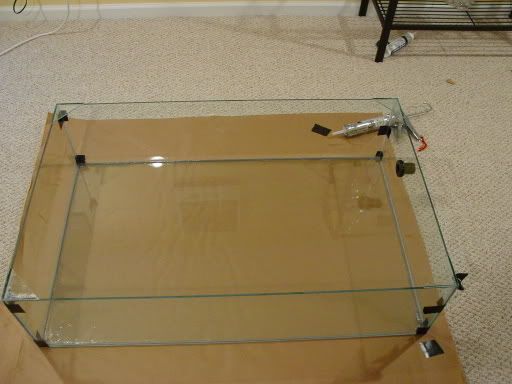 I know... my silicone job (and I don't mean that silicone job) isn't the cleanest, but nothin a razor blade can't take care of later. Now for a few questions..... Should I silicone the joints fom the outside also, to get between the glass better?? Right now I'm siliconed inside only. I ran my finger down the joints and saw the silicone getting into the joint but it didn't squeeze through....thoughts?? About how long before I try to move this baby....48 hours? |
|
#10
02/24/2006, 10:03 PM
|
|||
|
|||
|
BMP
|
|
#12
02/25/2006, 01:44 AM
|
|||
|
|||
|
I think the glass needs to be lifted slightly to get silicone between the pieces, as well as fill in the joint.
But I've never built a glass tank though. Hopefully others will chime in.
__________________
Marc Levenson - member of DFWMAS |
|
#13
02/25/2006, 04:11 AM
|
|||
|
|||
|
whoa i wouldnt trust myself. I would have tried acrylic before glass. That could be one hell of a water spill.
__________________
I think of one later. |
|
#14
02/25/2006, 08:03 AM
|
|||
|
|||
|
Is the silicone just a bead on the inside corner or is it between the panes of glass as well? From your pictures it looks as if you had it assembled and then put a bead in all of the corners. You certainly need to pull it apart if this is the case and start over with it. Cool project btw.
__________________
Geo |
|
#15
02/25/2006, 09:49 AM
|
|||
|
|||
|
Quote:
As noted above....when looking from the side, the silicone did get into the joint, it just didn't squeeze out the other side. I'll silicone the joints from the outside edge also just to be safe and then razor offf the extra. |
|
#16
02/25/2006, 10:28 AM
|
|||
|
|||
|
Acrylic too expensive,,
So here are two before picts...as you can see the silcone got between the joints...just not all the way.  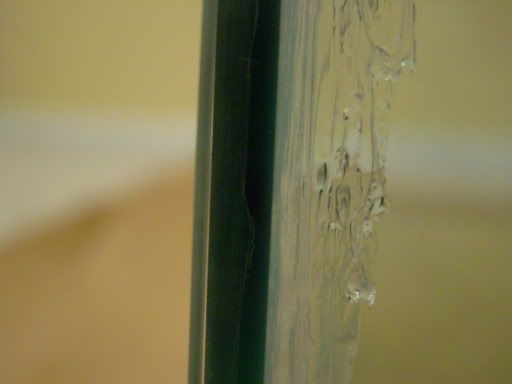 and here is after I siliconed from the outside joint......  It appears the tank is solid even without the extra silicone from the outside. Being that is is going to be totally flat on a 3/4 in piece of plywood and there will only be 8" of water, I'm compfortable with it. On to the stand. |
|
#17
02/25/2006, 11:06 AM
|
|||
|
|||
|
melev is right. 2 mh's.
I know it costs extra, but itll be worth it in the end. 4ft of coverage on one mh wont work. If you had a luminerc III on the mh, it could cover a 3x3. -alien
__________________
-Alien |
|
#18
02/25/2006, 11:43 AM
|
|||
|
|||
|
Sorry but....I would cut it apart and do it again.
The silicone is more important between the glass than the bead that you put in the corners. I havent built one myself yet, but Ive been reading a lot because I intend to make a large glass sump soon. You might get lucky with it only being 12" high, but I wouldnt risk it. Stu
__________________
Some people think that I have Attention Deficit Disorder. They just dont understand that........ Hey! Look a chicken! |
|
#19
02/25/2006, 01:24 PM
|
|||
|
|||
|
Everyone's right, ftnirishfan....you really should redo those seams. The strength comes from the silicone that actually glues the two panes together, not from the fillet of silicone on the inside.
From the pics, it looks like you got the joint pretty well full, but why risk it? K
__________________
"To subdue the enemy without fighting is the supreme excellence." Sun Tzu - The Art of War |
|
#20
02/25/2006, 01:39 PM
|
|||
|
|||
|
Not that I am an expert or anything, but I built 2 tanks that never leaked, replaced glass panes on 3 other tanks that never leaked either, and did my share of tests and trial and errors and learned alot about glueing glass. Silicone holds so hard to glass it's hard to believe. From what I see on your pics ftnirishfan I wouldn't stress any. I'd be comfortable setting that tank up in my livingroom.
This is just my opinion from my experience tho, but as most of the people that posted in this thread said, they never built a glass tank. I was also scared when I hadn't built one.
__________________
Simon 20 Long (35g sump/fuge) |
|
#21
02/25/2006, 02:29 PM
|
|||
|
|||
|
I'm impressed. It looks better in that one picture. If all of your seams look that good, it probably will be fine.
Please do let it cure for a good week before adding water. I know when Glasscages.com builds tanks for people, they make them wait 3 weeks before the tank can be set up, so curing time is very important.
__________________
Marc Levenson - member of DFWMAS |
|
#22
02/25/2006, 05:03 PM
|
|||
|
|||
|
Thanks all for the input,.....
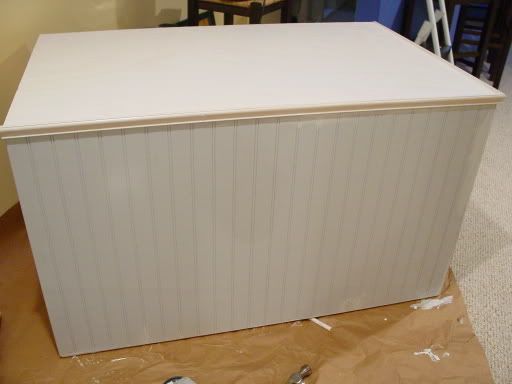
all corners look like they got siliconed pretty well, that picture above is prob the worst of them with the two tiny air pockets but still it is fine, that is a real close up picture. Here's the stand, all primed and ready for paint. I'm just going to do a simigloss white to match the baseboards and trim in the rest of the room, I figure that will also help with water and will be a good background for bringing out the corals.  
|
|
#23
02/25/2006, 11:25 PM
|
|||
|
|||
|
oops, sorry about that last post here they are...
  So here is the finished product...not bad for a few hours work. Stand and tank less than $200.00. 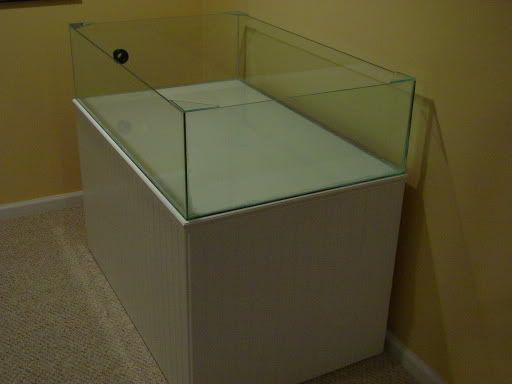 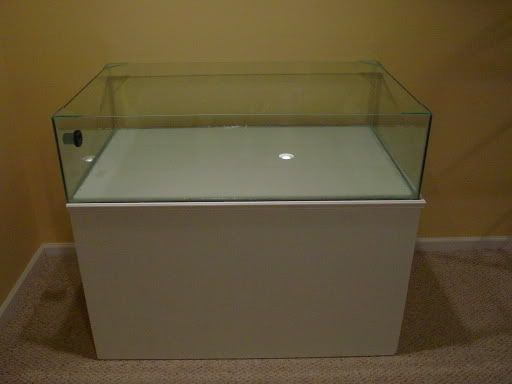 I'm now going to look into lighting....need suggestions and pictures, ....don't have alot of money but need something that will look good hanging over this thing. If I can afford a double 250w MH setup, I'll go that route. Not concerned about heat as this is in an area of the basement that is air conditioned, my main set up has much more lighting and stays at 78, no chiller. Thanks in advanced for the help and also for the previous suggestions. Scott Last edited by ftnirishfan; 02/25/2006 at 11:43 PM. |
|
#24
02/26/2006, 10:36 PM
|
|||
|
|||
|
also, ...about how much live rock is suggested for the sump??
|
|
#25
02/26/2006, 11:05 PM
|
|||
|
|||
|
something like this....??
Anyone have any experience with these? |
|
|


 Linear Mode

