|
|
|
#1
 12/04/2007, 11:20 PM
|
|||
|
|||
|
panaboy95 150 build
I have been building a 150 setup for a little while now. I have a 75 gallon aga mega flow tank right now. I was at fkdentons house and he had a 150 he was wanting to get rid of. so after he twisted my arm we loaded it in my truck. (my wife was happy when I got home)
First thing I did was to move the 75 out of the hole it sat in across the room to a temp setup. The new tank  The old tank in the bar 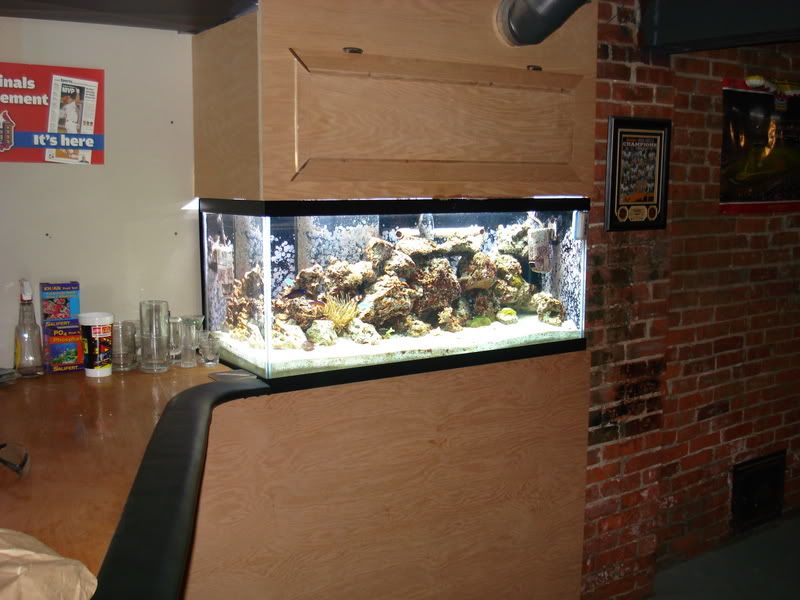 The 75 in the temp spot 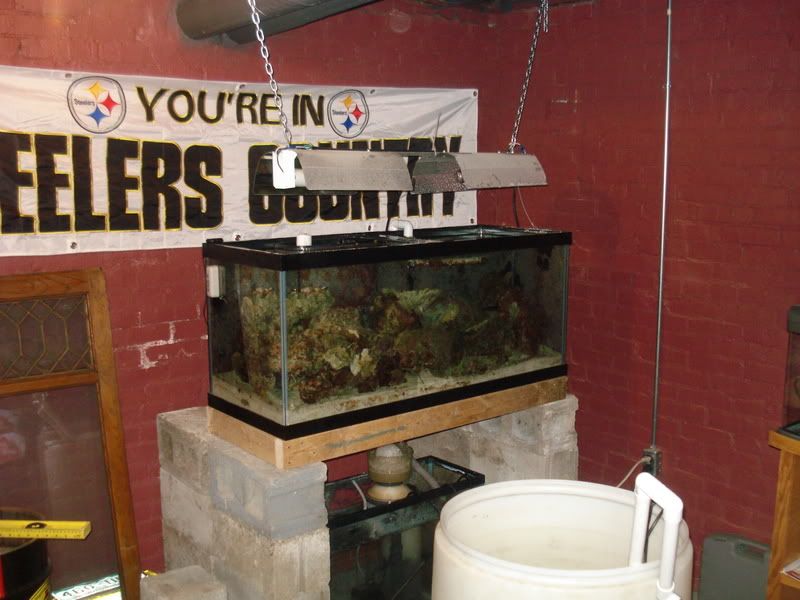 The first thing I had to do was to drill the 150 for an overflow and closed loop. this was a little scary. I had already broke a 55 trying to drill. I drilled six holes. four for a coast to coast overflow and two for a dart closed loop. I set up a little magnetic drill press to help drill the holes straight. it worked very well I could drill with one hand. 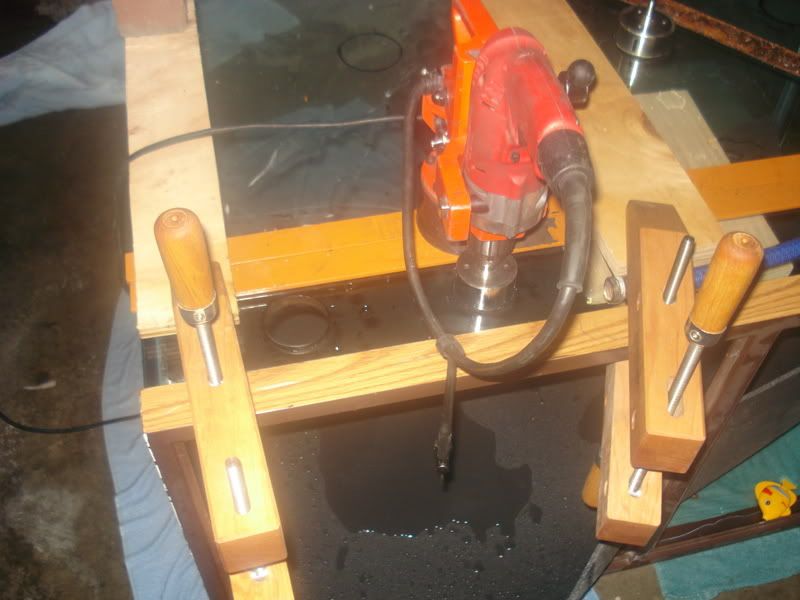 Once the holes were drilled and the stand was built it went on the stand and I could start plumbing 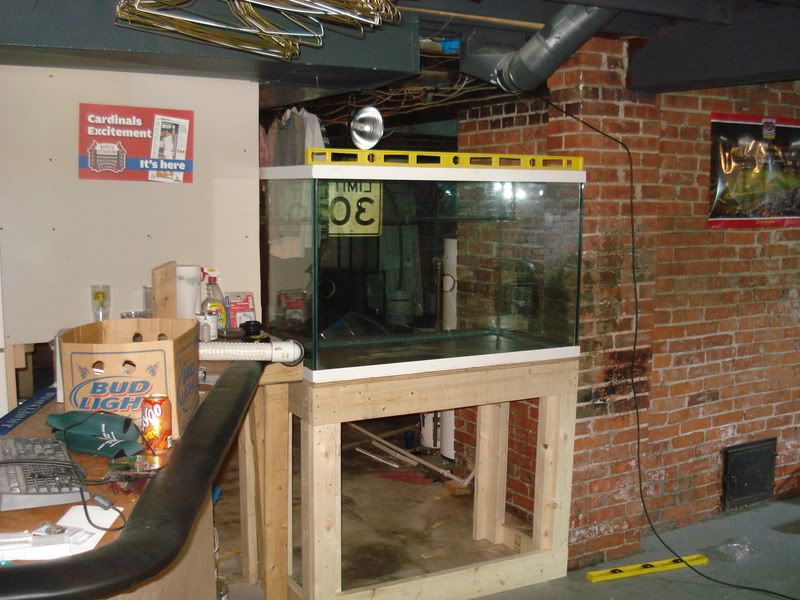 I started plumbing the tank. I wanted a closed loop intake that was anemone and fish friendly. I did not want it just sucking out of a two inch hole. I wanted to spread the suction out. I drilled a bunch of holes in a piece of 2" PVC. (238 9/32 holes to be exact) Then I made a calfo overflow with four 1 1/2 inch bulkheads. It is a little overkill but I would rather have too much pipe than not enough. 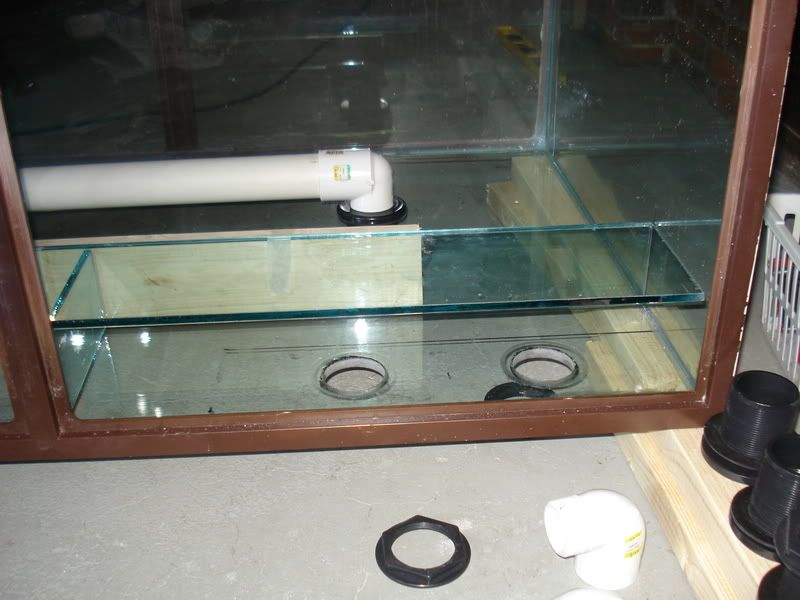  I plumbed the tank with a 100 gallon stock tank for a sump. I have built some bubble traps that have worked well for a guy in St. Louis so I will give it a try but I will just have to wait and see. 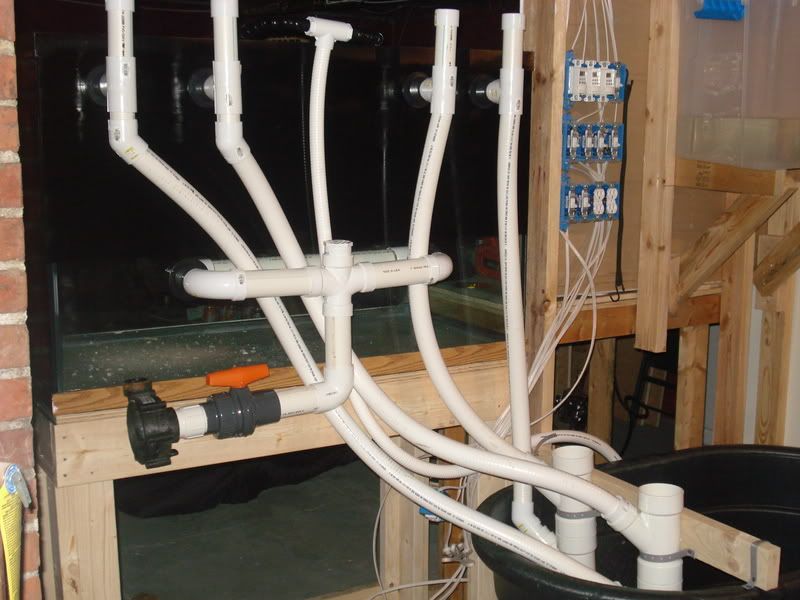 bottom of bubble trap  This brings us to about the present. I am running ro water in the tank right now. I figure it will take a few days to fill. I have about all the plumbing done. I have to run the electrical yet. all the electric is there it just has to be moved from the places it was in the 75 to places for the 150.
__________________
Nathan Morrell "A clear conscious is usually the sign of a bad memory" |
|
#3
12/05/2007, 09:42 PM
|
|||
|
|||
|
Very cool. I have the same tank and haven't been able to decide how to drill it. (been in the garage for 6 months)
Is your overflow made from glass? How many returns will you have from the sump and how many from the closed loop? Mike
__________________
I Feel Happy! I Feel Happy! |
|
#4
12/05/2007, 10:06 PM
|
|||
|
|||
|
the overflow is glass I had the local glass shop cut it (the owner is my next door neibor) I have two 3/4 locline returns from the sump. there are six returns from the closed loop. if I have time tonight I will try to take a pic of it. if I don't play cards all night.
__________________
Nathan Morrell "A clear conscious is usually the sign of a bad memory" |
|
#5
12/05/2007, 11:01 PM
|
|||
|
|||
|
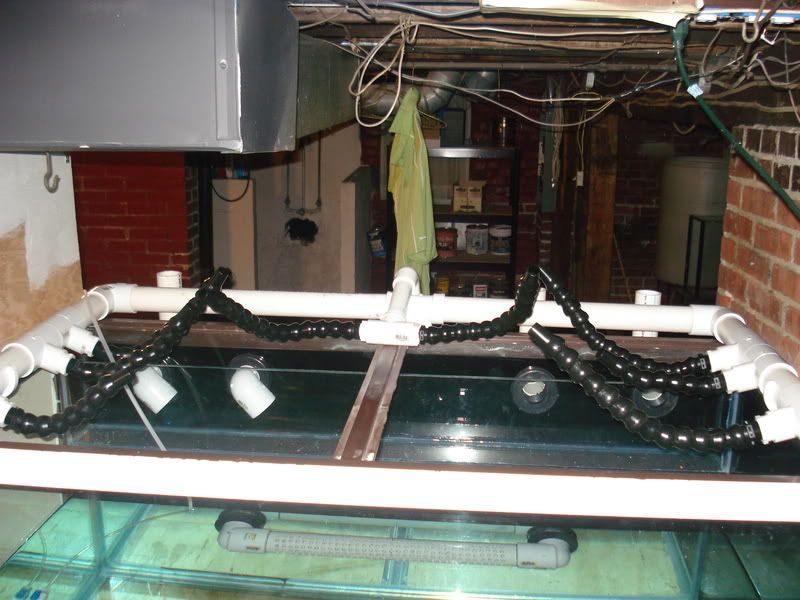
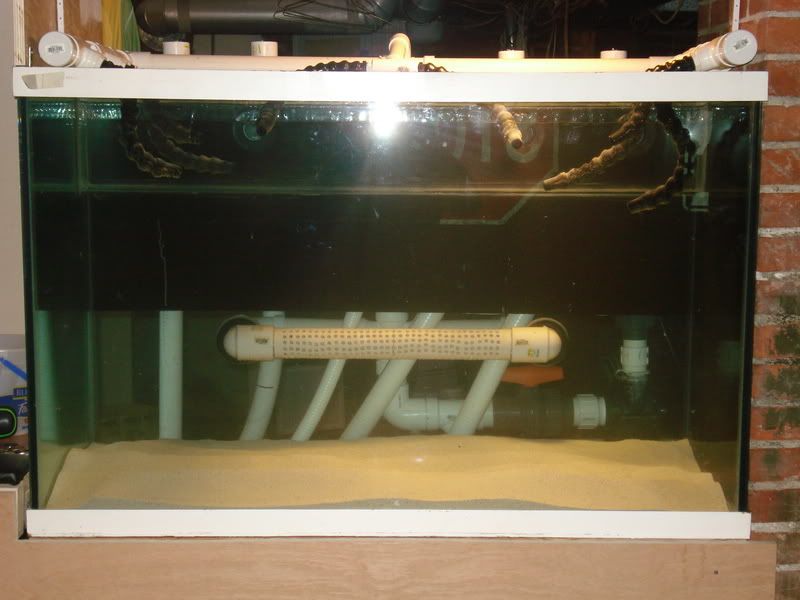
here is a picture of the returns. the two in the middle are the sump returns. the six on the outside are the closed loop. all the locline is pointed up because i am filling the tank and don't want them in the water yet.
__________________
Nathan Morrell "A clear conscious is usually the sign of a bad memory" |
|
#7
12/07/2007, 03:31 PM
|
|||
|
|||
|
With the return manifold, will you be losing pressure by the time the water reaches the end. My understanding of the physics involved is that the manifold needs to be a complete circle to sustain water pressure throughout the returns.
|
|
#8
12/08/2007, 12:50 AM
|
|||
|
|||
|
dcombs I have looked at a lot of closed loop threads and this is what I came up with. Lots of people are running the same thing. I thought about looping it in front but did not want to lean over it. I have yet to test it. I am waiting for a shaft seal from reeflo. We will find out how it works. This is my first closed loop so everything is an experiment.
I did get the tank full though and tested the return pump. so far so good I had a couple of bulkheads leaking but a little tightening was all they needed. I am using an iwaki md70rlt . I bought it used and got a real good deal on it. it works great, but wow it is loud. the pump itself is not too loud but the fan is. I found a mod to take the fan of the back and use a little computer fan to quiet it down. I may try it. I figure I have nothing to lose. if it burns it up I will just have to get another pump. So far everything seems to be working the bubble towers looked like they where working pretty good. But fresh water does not bubble like saltwater does so that will be the true test. I hope to have the closed loop up and running next week. after that I will be mixing the saltwater and putting the sand in. I hope to get everything moved over before Christmas.
__________________
Nathan Morrell "A clear conscious is usually the sign of a bad memory" |
|
#9
12/09/2007, 10:05 PM
|
|||
|
|||
|
Well I have had the tank running for most of the afternoon with fresh water testing the return pump and overflow. I am proud to say I have microbubbles. Wow they suck. I have been messing with it but I can not stop them. I suspect the locline. It has a few drips from the connections. what do you do with these things. I thought of putting a little silicone grease on the connections to seal them better but I don't know any advise would be great.
__________________
Nathan Morrell "A clear conscious is usually the sign of a bad memory" |
|
#10
12/09/2007, 10:34 PM
|
|||
|
|||
|
Run it a bit longer before losing your purse. Then just slowly work through it. You would be suprised the amount of micro bubbles created by a fresh tank of water just degassing with no pumps involved. Any slight issues you have would just be intensified by this. Of course I can`t see your tank to know how bad it is- thus can only offer this bit. I am a fan of silicone grease- I also hate lockline with a passion!
|
|
#11
12/10/2007, 08:23 AM
|
|||
|
|||
|
Are you using a filter sock on your returns? If not get some
 Does your return pump have a waterfall into its chamber, or near it? If so, that is usually the cause. The other area to check is the input side of your return pump. Does your return pump have a waterfall into its chamber, or near it? If so, that is usually the cause. The other area to check is the input side of your return pump.
__________________
-Kurt |
|
#12
12/10/2007, 09:19 AM
|
|||
|
|||
|
The lock-line won't be the cause of the bubbles. If there's an air leak causing them, it'll be before the pump intake, not after. That's when the air will be getting sucked in the line. If Horace's idea doesn't fix it, you make have a small pin hole sized leak prior to the pump intake in the plumbing. It may not be large enough to see a drip, but enough to make the microbubbles go crazy.
|
|
#13
12/10/2007, 09:59 PM
|
|||
|
|||
|
i figured it out. there was a small leak at the union ball valve before the pump. after thinking about it i relized it could only be on the suction side of the pump. thanks for the help.
__________________
Nathan Morrell "A clear conscious is usually the sign of a bad memory" |
|
#14
12/12/2007, 11:03 PM
|
|||
|
|||
|
Well I have the dart online now. It was a nightmare. I cracked the volute. I guess I cracked it putting the fitting in. I did not tighten it up too tight but I guess tight enough. It is rigged up right now till I can get another one. I put a hose clamp around it and gobbled up some silicon on the plastic and it has not been leaking. I am going to get a new one from reeflo. I also mixed the salt in tonight and it is moving saltwater finally. I think I will dump the sand in tomorrow.
The water seems to be moving pretty good. I like the flow with the dart. It still may need some small powerheads in the lower corners. I will just have to see when the rock goes in. It is hard to tell how the water is moving with the tank empty. Here is a pic of the dart and the shelf I put it on it has been working pretty well so far. 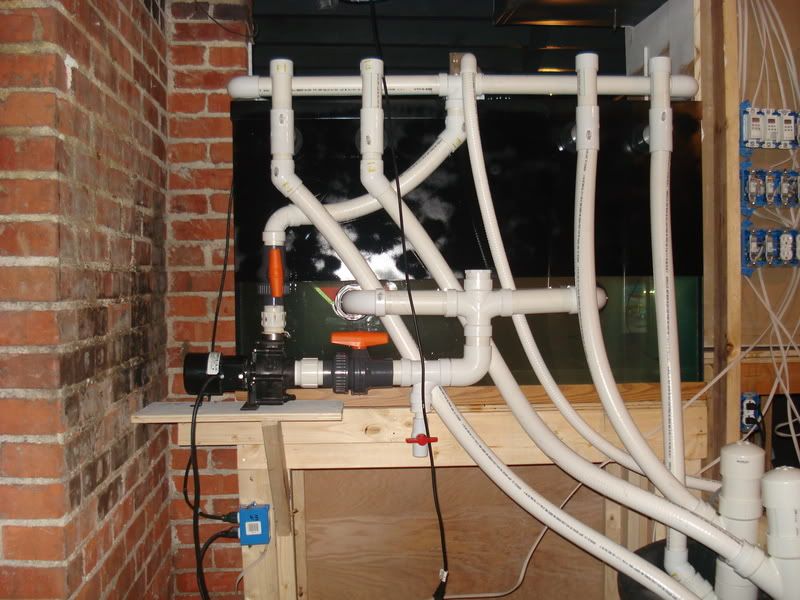
__________________
Nathan Morrell "A clear conscious is usually the sign of a bad memory" |
|
#16
12/15/2007, 10:47 PM
|
|||
|
|||
|
Well the dust has finally settled. the sand is in the salt is in and the temp is right I guess I just need to be getting stuff ready to move.
Any advise on moving, should I do it all at once? I am using al the live rock from the other tank. I have the salinity the same on both tanks to make the transition easier.
__________________
Nathan Morrell "A clear conscious is usually the sign of a bad memory" |
|
#19
12/16/2007, 10:23 PM
|
|||
|
|||
|
Well I got everything moved today. it has been a long day after waking up with six inches of snow on the ground. I started to move things about 3:00 and am just now sitting down to rest. the old tank is empty and is getting moved out of the house this evening.
Everything is doing good so far a lot of the fish are still hiding. I need a little more rock for a better base but it does not look too bad. I think I am going to order some marco rocks after the first of the year. After my pocket book recovers from Christmas. 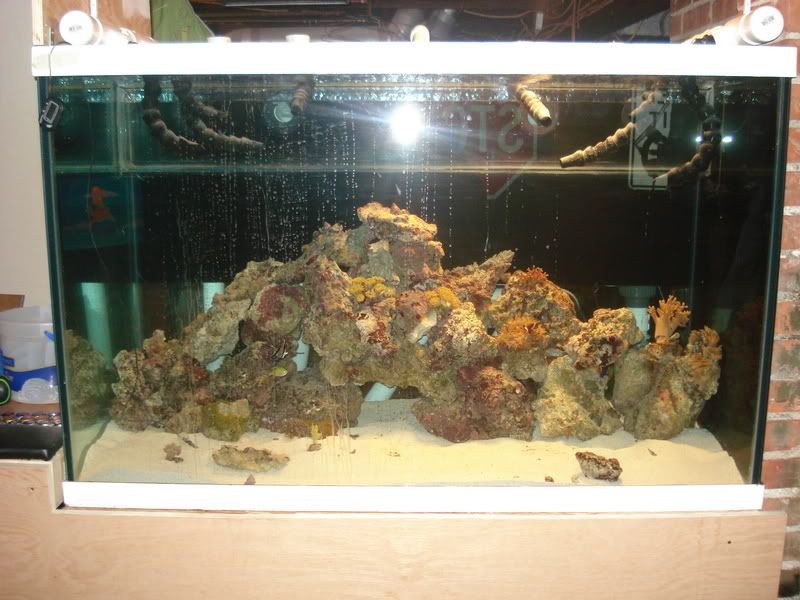
__________________
Nathan Morrell "A clear conscious is usually the sign of a bad memory" |
| Thread Tools | Search this Thread |
| Display Modes | |
|
|


 Linear Mode

