|
|
|
#26
 09/03/2003, 07:36 PM
|
|||
|
|||
|
Addicted Reefer:
As to pumps, circulation is an AmpMaster 3000, closed loop is 2 Iwaki MD-30 (underpowered but may update later) and the skimmer is a Iwaki MD-55. Lighting has been caried over from the previous tank with 2 IC 660s (one was on my sump) powering 4 four foot VHOs and the 2 150W MH. The light box I built has room to expand the MH and I realize this will have to be some time down the road. I'm sure you can imagine the costs involved with this project so I will have to wait on that. greeneyedblackcat: Very nice idea on the angled mirrors. Question, when you move your head while viewing does it give you verdigo seeing both tank and reflection?  bkwudzjeep: I thought of starting the post with "this is what I did today" and then the next day post a picture of what I did that day with unbelievabl progress.  No, this is about 2 months worth of work and I'm still not done. Close, but not done. No, this is about 2 months worth of work and I'm still not done. Close, but not done. 
|
|
#27
09/03/2003, 07:44 PM
|
|||
|
|||
|
Weatherson,
It looks like two more reef tanks when viewing from the front, It's kinda like having three of everything. Keep up the great work, it all looks great!>>>>>>>>>>>>>>>>>>>GEBC |
|
#28
09/03/2003, 07:50 PM
|
|||
|
|||
|
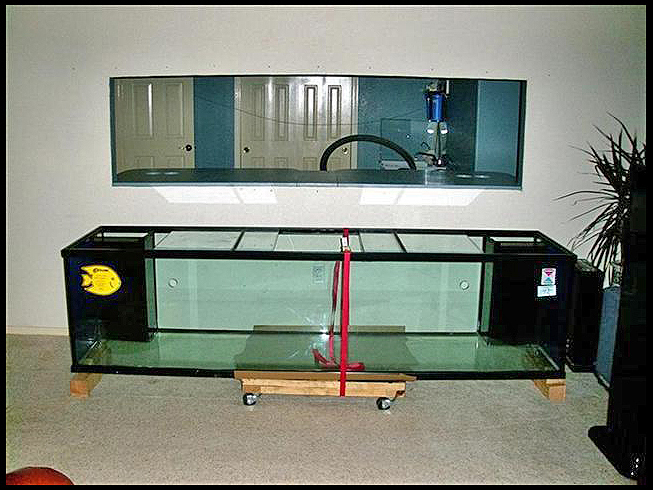
All right then, more photos it is. So it's time to place the tank into "the hole". It had to be put in place through the hole, as there was no way to get it into the fish room (this was planned) due to a hallway. So here's a shot with it in the right position to be inserted. Looking through the opening you can get an idea of the orientation of the room. Sink at right, entrance to the left and a handy closet in the middle. There's a window to the right of the sink you will see in upcoming photos.
Last edited by Skipper; 04/03/2004 at 10:22 PM. |
|
#29
09/03/2003, 07:55 PM
|
|||
|
|||
|
Break out the sawsall, a couple of mirrors would look great!
|
|
#30
09/03/2003, 08:01 PM
|
|||
|
|||
|
So now you are saying to yourself, "that's going to be a tricky situation get that monster through a hole that has all of 1/4" clearance at the top and sides". True.. if not for.... ROBO HOIST!!!
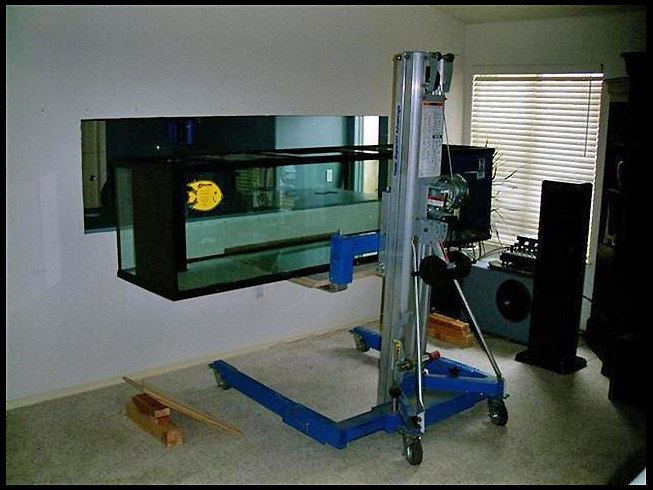 Luckilly for me, my brother works at a local museum and was able to borrow this hoist. I can't begin to express how much easier this incredible tool made my life at that moment.  Basically, he and I alone, placed a small sheet of 3/4" plywood on the forks, blocked the tank up at the ends and rolled the hoist right under the tank in the middle. This hoist has a dual-hand crank much like the peddles on a bicycle. Beauty of it is that it has an internal brake so you can crank it up or down with no need to release anything. Where you stop, it holds it there. Way too cool! Basically, he and I alone, placed a small sheet of 3/4" plywood on the forks, blocked the tank up at the ends and rolled the hoist right under the tank in the middle. This hoist has a dual-hand crank much like the peddles on a bicycle. Beauty of it is that it has an internal brake so you can crank it up or down with no need to release anything. Where you stop, it holds it there. Way too cool!
Last edited by Skipper; 04/03/2004 at 10:22 PM. |
|
#31
09/03/2003, 08:10 PM
|
|||
|
|||
|
All we had to do was hoist it to the proper height, roll the hoist with tank toward the wall until the plywood support lined up with the top of the stand (wall). Then we carefully slid it into the hole on the stand, pulled Robo Hoist out of the way and Presto!, Inwall Tank! OK, there's a little more to do.
Here's another shot of the hoist;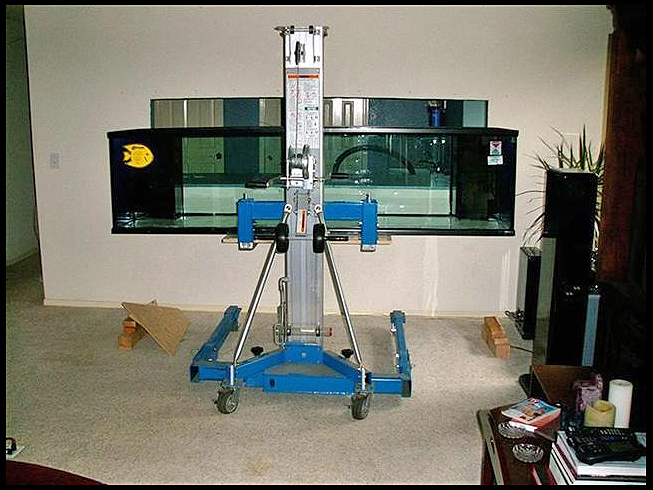
Last edited by Skipper; 04/03/2004 at 10:23 PM. |
|
#32
09/03/2003, 08:24 PM
|
|||
|
|||
|
Here's a couple of pictures of the newly placed tank. To keep things in perspective, keep in mind that this tank is 8' long. Somehow, it looks smaller in the photos. Anyway, you can see the aforementioned window in the fish room. Here in the Central Valley of CA, it gets hot (today was yet another day above 100
 ) so this window, dual pane and all, is getting some insulating tint put on. This should help considering some of the equipment will be inches from it. And yes, those holes in the stand top lined up with the prefilter return and supply bulkheads. ) so this window, dual pane and all, is getting some insulating tint put on. This should help considering some of the equipment will be inches from it. And yes, those holes in the stand top lined up with the prefilter return and supply bulkheads. 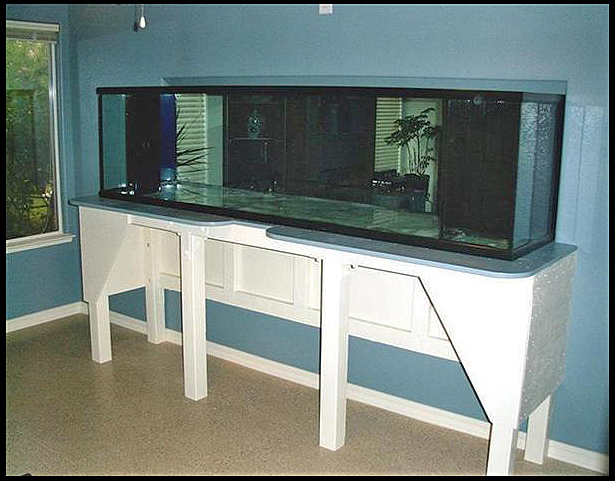 And from the front; 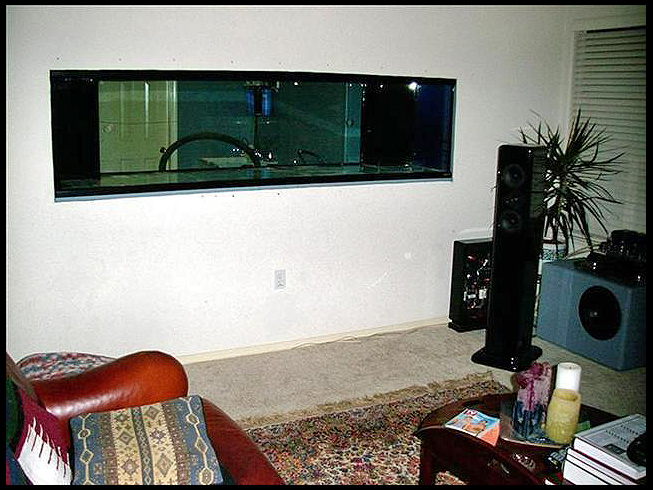
Last edited by Skipper; 04/03/2004 at 10:24 PM. |
|
#34
09/03/2003, 09:22 PM
|
|||
|
|||
|
So now, it was time to put some water in there and see if it stays in there. I placed the sump under the tank and proceeded to plumb it to the tank. As mentioned above, I epoxy painted the floor as opposed to my desired want of tile due to the good possibility that the pressure from the stand legs would break and eventually crush them. The advantage of a bare, painted floor is the sump to floor contact makes for a natural cooling system. I also updated the sump (a 55 gallon acrylic tank) with baffles and reworked the top for the different lighting. I also placed a filter bag where the returns feed the sump. Next was the plumbing for the AmpMaster circulation pump as seen in the next photo.
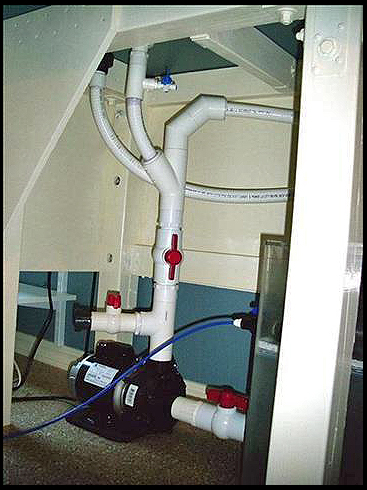 The outlet with valve just above the pump accepts a hose with union to aid in fast water changes. The 1" flex hose used throughout is wonderfull. It removes the need for any 90 degree fittings and promotes better flow. I never used it before but I must say I wish I had. The other T with the small valve is for the 1/4" line that feeds the calcium reactor. Last edited by Skipper; 04/03/2004 at 10:25 PM. |
|
#36
09/03/2003, 11:06 PM
|
|||
|
|||
|
Once the plumbing was set I added the water and ran the closed loop system to mix it for a day. Then I added 8 bags of Southdown play sand to the tank and another bag to the sump. Then came the Southdown sand storm that lasted a good 2 days even with the skimmer up and running in a temporary position. The next photo shows this when it was in action. Also note that the closed loop systems have since been altered from the setup shown. I originally had the inlet closest to the same pumps outlet as one system but have updated that so the inlet of one pump is sent to the farthest side of the tank. I had designed it for the latter but in my late night haste to get it plumbed, took the shortest route.
 You can also see the shelving I put in to the left of the tank for additional equipment. You can also see the shelving I put in to the left of the tank for additional equipment. 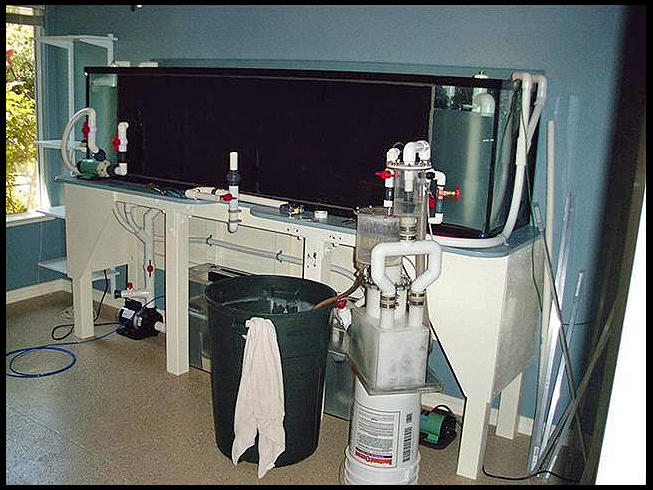
Last edited by Skipper; 04/03/2004 at 10:26 PM. |
|
#37
09/03/2003, 11:42 PM
|
|||
|
|||
|
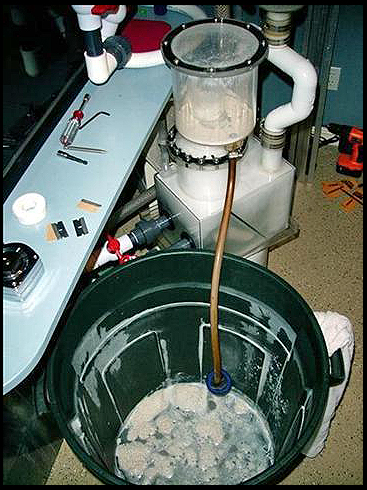
Here's a quick shot of the Southdown play sand scum being removed from the tank by the skimmer. Speaking of the skimmer, this unit I made and it has been through many design changes. From single downdraft with bio balls to dual. Tall stacks, short stacks, and now to the current, single Becket. I plan to make a new one soon of greater size and slightly different design. I've got the idea, now I just need the time. Anyway, here's the photo.
 And here is a shot of the tank front during the storm. Visibility was limited to almost one inch and it took a good 3 to 4 days to finally settle down and the ultra fine particles to be filtered out. Fine tuning of the return and closed loop system outlet nozzles has eliminated the sand valley as seen here. 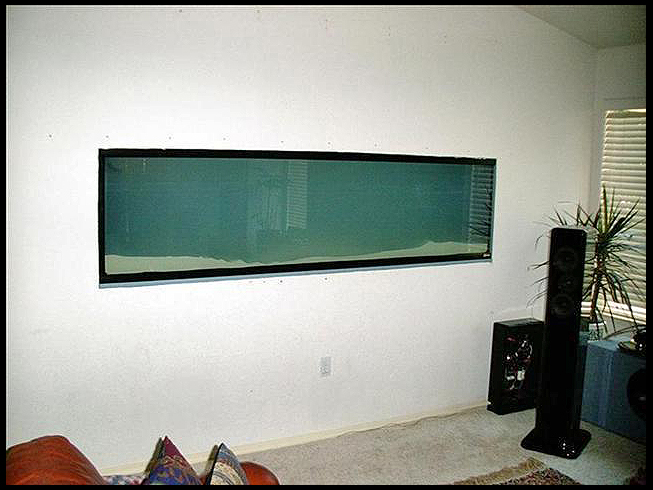
Last edited by Skipper; 04/03/2004 at 10:27 PM. |
|
#39
09/04/2003, 12:00 AM
|
|||
|
|||
|
Now it was time to start on the lightbox that would span the whole tank length made entirely of aluminum. I've had limited experience with riveting but I thought this would be a great way to build this unit. My background is with woodworking so this closely mimiced woodworking construction. Sort of
. So, this box would house 4 rows of VHOs and have to leave room for future Metal Halides expansion as well as four 25 watt incondescent blue moonlight bulbs. The ballasts, all IceCap, would mount to the top of the box along with two power strips, X-10 controlers and all the wiring. Construction consisted of 1" square tubing and assorted L shaped and flat strips. There would also be provisions for two fans, one at each end and a channel to slide four individual sheets of protective acrylic. There are four because one or two would be so long that there would be not enough room between walls to remove them. So aluminum was chosen for light weight, rigidity and it's thermal properties. Here's a photo of the beginning stage, the bare frame.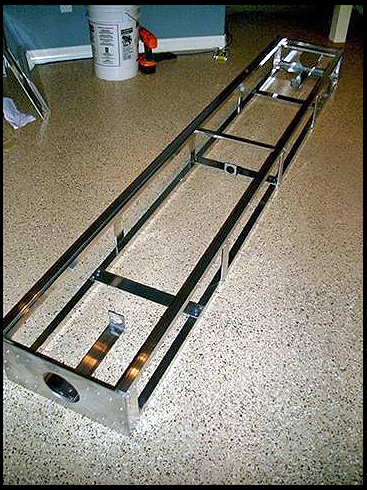 Note that I polished all the internal sides. A very good upper body workout for sure. Last edited by Skipper; 04/03/2004 at 10:27 PM. |
|
#40
09/04/2003, 12:05 AM
|
|||
|
|||
|
Oops, upon rereading the previous post I realized I wasn't clear about the fact that the two 150 watt MH lamps were mounted also. I have an older IC ballast that still keeps on ticking. It's a single electronic ballast that powers both bulbs and of the same size as the 660 VHO units. I believe it's actually an altered 660, but I'm not positive.
|
|
#41
09/04/2003, 12:15 AM
|
|||
|
|||
|
Here's a closeup of one end prior to being polished. Riveting is very easy and extremely strong. Just drill the hole, insert rivet , squeeze parts tightly together and pop the rivet with a rivet gun. As the rivet titens, it also draws the pieces together like a nut and bolt but without the potential of coming loose. Next project.. a full scale reproduction of the Spirit of St. Lewis!
Here's the photo.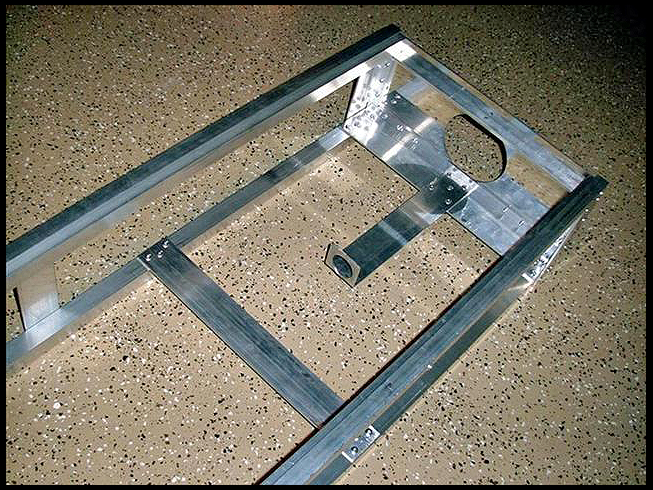
Last edited by Skipper; 04/03/2004 at 10:28 PM. |
|
#42
09/04/2003, 12:27 AM
|
|||
|
|||
|
Next we have a shot of the box with it's "skin" on. I found some fairly heavy gauge polished on one side aluminum sheets at a local metal yard. Cutting it is no different than wood other than a slightly slower feed rate. No special blade needed so the carbide tooth one was just fine. This shot is of the bottom looking in and you might be able to just make out the channel that runs the whole length where the protective sheets slide in. I also designed the box so it was fairly deep (top to bottom) to ensure most all light projected downward. With the light on and about 3" above the tank's top edge, very little light escapes into the room.
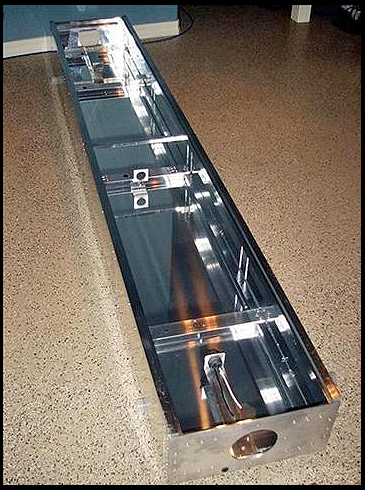 Note that the middle moonlight holder had since been changed to a dual unit for better light coverage. Next is a photo with all the bulbs mounted and protective sheets in place. . 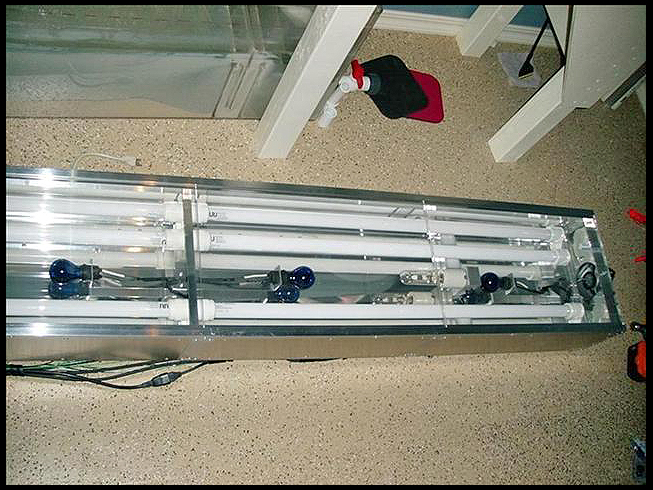
Last edited by Skipper; 04/03/2004 at 10:28 PM. |
|
#44
09/04/2003, 12:39 AM
|
|||
|
|||
|
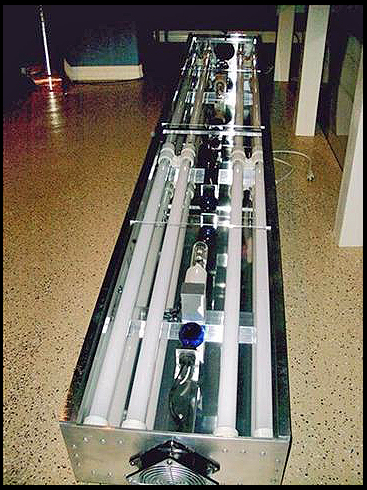
Here's another angle from the end where you can see one of the two fans. I should point out that the whole unit will be suspended from the ceiling with pullies to gain access to the tank. This can be seen in upcoming photos.
 Next is a shot of the top of this unit showing the wiring. Closest is the MH ballast, then one of the two VHO ballasts and the empty location for the second one that was still lighting the 65 gallon until I transfered the rock and livestock. Then you see the two power strips which are also mounted to the box. You can also see the 4 eye bolts at the edge of the top from which the unit will be suspended. 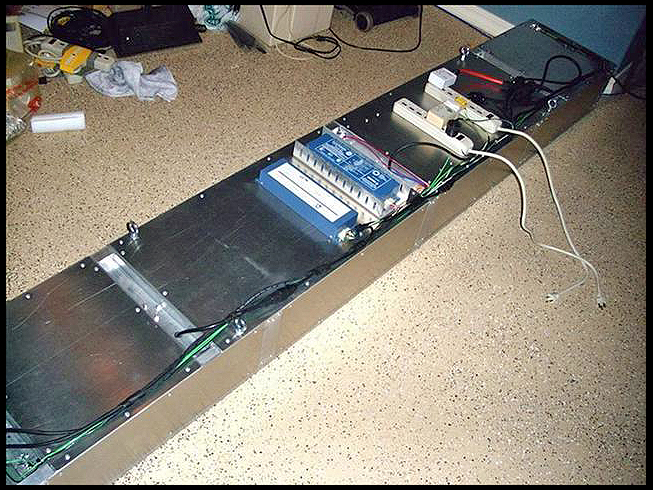
Last edited by Skipper; 04/03/2004 at 10:29 PM. |
|
#45
09/04/2003, 12:46 AM
|
|||
|
|||
|
webpolk;
thanks for the kind words. This project was a long time in the planning so I had that going for me. Mechanical is my middle name so that helps too.  Thanks again. Thanks again.
|
|
#46
09/04/2003, 12:46 AM
|
|||
|
|||
|
WHOOO b-e-a-utiful!
|
|
#47
09/04/2003, 01:41 AM
|
|||
|
|||
|
Now with the lightbox completed except for the second VHO ballast I had light above the tank and allowed me to finally transfer every thing from the 65 gallon. On a really disappointing note, I lost my Sailfin Tang of 8 years the very morning slated for the transfer. I couldn't believe it. I most wanted him to enjoy the new expansive swimming area. The story goes like this.. I needed a temporary container to replace my sump when I moved it to the new tank. I picked up a 40 gallon Rubbermaid tub and cleaned it well. Then I let it soak with water in it to remove any possible chemicals. A couple of days later I removed the water and installed all the needed bulkheads, lights and such. I did the switch and had it up and running on the 65. Unfortunately, about a week after, I noticed the carpet was wet around it. I couldn't for the life of me figure out where it was leaking but it was getting worse. I huridly replaced the Rubbermaid unit with one of my salt mixing tanks (cleaned well). With a large amount of the water on the floor and fresh water replenishing it, my water levels and salinity were now way out of whack. I believe my mistake was to try to get the salinity level back to normal too quickly which set off a chain of events. My carpet anemone freaked and he did a dive into the skimmer pump inlet filter. I never thought it would have been able to squeeze into the tiny slits that are maybe all of an eigth of an inch wide, but he did. Little did he know this was not a good place to be. After inspecting the leaking tub, I found it had feet molded in that crushed under the weight and one cracked at this point. So the morning of the planned move I find a cloudy tank and my sailfin floating. Not a good day at all. Timing couldn't have been worse. But I soldiered on after water and carbon changes and removal of the anemone from the pump. I wasn't pleased with his loss either as he's been with me for years as well with a mated clown pair now anemoneless.
Alright, time to pull it out of this sorrow and get back to the photos. Later that day I did the transfer starting with the corals and once there was more room in the 65, I caught all but the Lawnmower Blenny. He was very cunning so I had to wait until I removed some water and he had less ability to move about. Basically I just placed the corals on the sand bottom of the 240 on one side and the rocks on the other side. Aquascaping would have to come much later and is still on the list of things yet to be done. So here's a shot of the tranfered livestock and some of the rock. Note that I have yet to paint the tank back as I wanted to wait until I finished the aquascaping. One problem with an inwall is that you can't see the front while working within the tank. Last edited by Skipper; 04/03/2004 at 10:30 PM. |
|
#48
09/04/2003, 01:52 AM
|
|||
|
|||
|
Also, the lightiing at the time of the photo above was just the one set of VHOs. I mentioned above that I had only transfered some of the rock. Reason being that only the top surface pieces could I remove. The rest, after eight years, had become one. Very Bhudist but not very helpfull with removal. Here's a not so great photo of what remained.
 I refer to this as "the Chunk 'O Rock". I literally had to use my air chisel gun and three hours at it to break up and remove these remaining pieces. When you looked at it, you couldn't tell where one rock ended and the next began. I had to search with the chisel to find a relatively soft spot to work at to break them free. I wonder if my calcium levels were high enough? Hmmm. So days worth of work and the 65 was empty and cleaned of any remaining remnants of an eight year old reef.
Last edited by Skipper; 04/03/2004 at 10:31 PM. |
|
#50
09/04/2003, 08:28 AM
|
|||
|
|||
|
hey weatherson,
You must have done some intense planning because it is all going together so well. It keeps getting better and better. How long did it take to build the light fixture? Are you running a chiller? How many 20amp circuits did you run into that room? Since you mentioned you want to possible upgrade your pumps are you happy with the flow right now? sorry for the 20 question I do not want to forget anything.
|
|
|


 Linear Mode

