|
|
|
|||||||
|
|
Thread Tools | Search this Thread | Display Modes |
|
#78
 07/05/2006, 09:56 PM
|
|||
|
|||
|
Ok, back to work. Finally got a work area cleaned and organized.
Very important part of the process, give you an excuse to use to avoid using the tools of mass destruction.  It times like this I remember why I became a computer tech.  Ok, after many cuts (and most of that was the wood) I was able to glue the 2 parts of the top together.  Now leave over night to dry. 
__________________
Enquiring minds want to know |
|
#79
07/05/2006, 10:09 PM
|
|||
|
|||
|
Well now that has dried (Pretty quick huh)
 lets get this together. lets get this together.First I attached the hinges to the back part of the top.  Then with a spacer and my clamps again I was able to get the correct space between the 2 top pieces.   I hope the big space will help with heat exhaust.   Now fit the 2 sides for size and everything looks good. Notice the notch in the one side for the power cord.  Everything looks good so on with the glue and clamp. Add a couple of small finishing nails to hold while the glue sets.  Now I have a small lip in the front to cover the light but left the back completely open for better ventilation and so it wouldnt interfere with my HOB sump. Now we really wait until tomorrow to let it dry.  Any thought so far?
__________________
Enquiring minds want to know |
|
#80
07/05/2006, 10:25 PM
|
|||
|
|||
|
One other thing. I am planning on painting the whole hood bright white with a paint call Kilz.
It is an oil based primer and will water proof the hood. I will then paint the top and sides black for looks. Has anybody used Kilz before on a tank?
__________________
Enquiring minds want to know |
|
#83
07/07/2006, 08:48 AM
|
|||
|
|||
|
Ok, everything is dry and ready for a fitting.
Remove clamps and it didnt fall into several small pieces, this is good. (great for me really)  Pulled the 9 W hood off and placed the new one in place. Doesnt look too bad.  And a reminder why I work with computers   Lid swings up and out of the way properly. Stuck the old hood back on top to see what difference the height made on this lots.  Next step, Will attach the lights and run it for a couple of days to make sure the height is good, then I will take and paint it up and see how everything looks. Will keep the pics coming.
__________________
Enquiring minds want to know |
|
#84
08/02/2006, 11:33 PM
|
|||
|
|||
|
Ok, yes it has been a while but kind of got tied up with other things.
So now I finally got the new light installed in the hood.  Now the first shot of the light   Message to self Dont take a picture of a light turned on without a flash if you want to see anything. But you can really see the nice actinic. Better pic of new light on. 
__________________
Enquiring minds want to know |
|
#85
08/02/2006, 11:46 PM
|
|||
|
|||
|
Now it turns out that my little pump wasnt going to work as well as I had hoped and planned so I progressed to the next level of pumpage
 I pulled the pump out and removed the old Emperor and slapped in a nice little Eheim 2213. NOW I am getting the circulation that I want in the tank.  Also you might notice the small cooling fan I have installed.  Pulled a pair of these off an old air conditioner, slap on the dimmer switch and away we go
__________________
Enquiring minds want to know |
|
#86
08/03/2006, 10:28 AM
|
|||
|
|||
|
Looks good, but if that is a 10 gallons and the 9w light is 20 inches, you might be able to fit that retro kit in the 9w casing, it looks identical to my coralife 96 watt light that I bought.
__________________
15 Gallon Tall Reef Equip -Coralife 96watt Pwrquad -Aqua C Remora Livestock -Orange Spotted watchman goby and candy cane pistol 38 gallon reef in the making |
|
#87
08/03/2006, 11:12 AM
|
|||
|
|||
|
It might have fit but sold it off and just put the retro kit right in to the hood. Hood has also been removed and getting a couple of coats of marine paint. Gloss white on the inside and black on the outside.
Corals are under storm condition right now... single 100 W CP bulb hanging on the side.
__________________
Enquiring minds want to know |
|
#88
08/03/2006, 11:18 AM
|
|||
|
|||
|
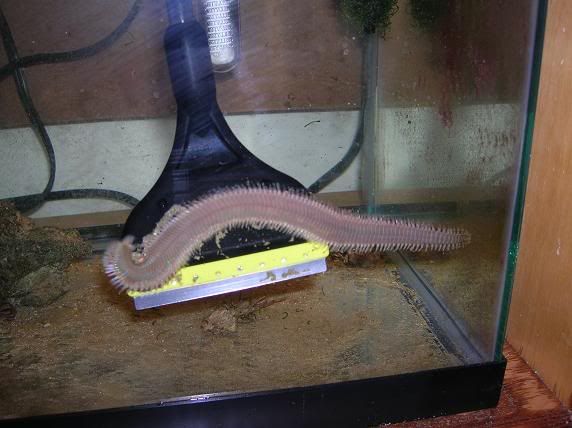
Now here are a couple of pic of the guys
Dusters for house keeping.  My fuzzy mushroom rock.  And closer..  And really close Ok, I was just playing with my macro settings.  More pics later
__________________
Enquiring minds want to know |
|
#89
08/03/2006, 11:56 AM
|
|||
|
|||
|
Awsome duster.
|
|
#90
12/03/2006, 11:23 AM
|
|||
|
|||
|
And 4 months later this is how are looking, with a scooter blenny and a pair of clowns.
 And learning from my mistakes the next tank is about to begin. Once again using a 10 G tank as a base I will attach a second half of a 10 G on the back so my sump will be external. Base will be made of 2X6 with ¼ plywood base and ½ foam as I will be removing the top and bottom plastic rims. Here is a preview done with Google Sketchup... Without top. 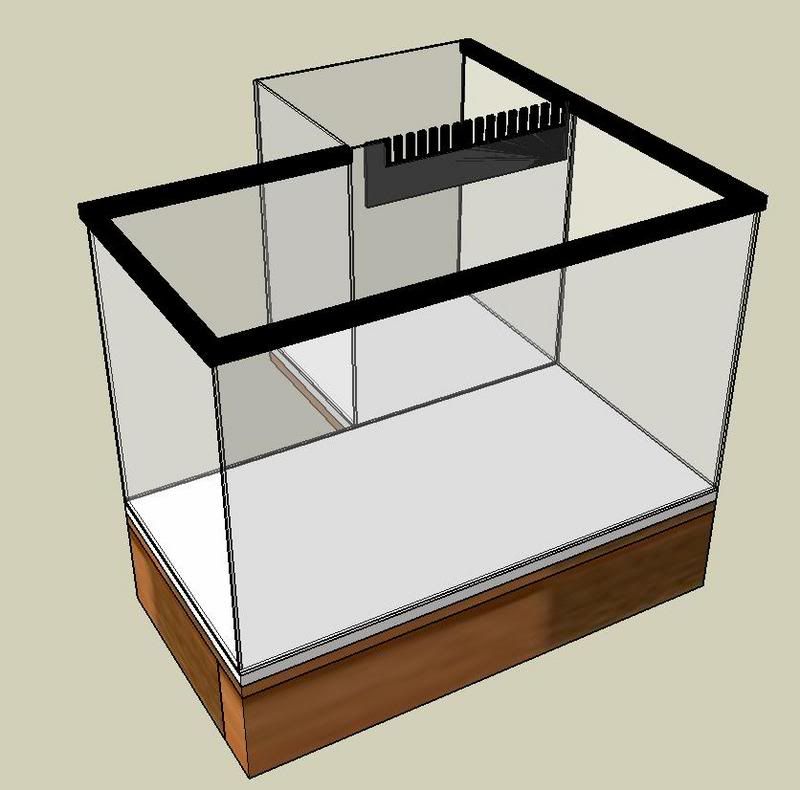 With top. 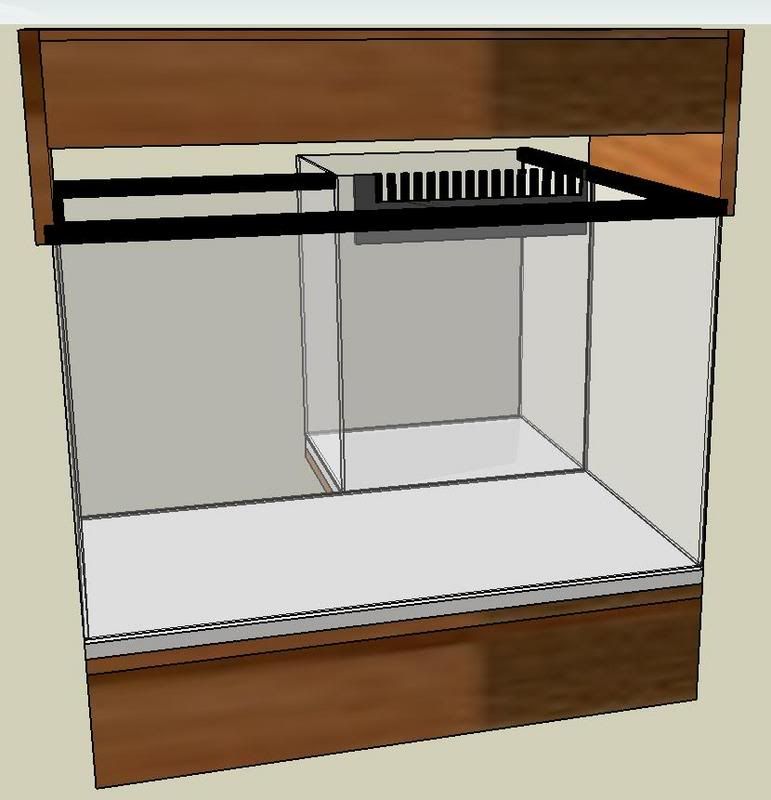 The next building log will be displayed on Canreef for those that want to follow. Dan
__________________
Enquiring minds want to know |
|
#91
12/03/2006, 12:15 PM
|
|||
|
|||
|
nice looking plans for that tank. i plan to do somthing simmilar using a 33 long ...by puting a bafle in the last 25% of the tank...
this tank will be great. good luck! 
__________________
-Alien |
|
#92
12/03/2006, 12:40 PM
|
|||
|
|||
|
I have to know if this works for you. I wanted to try something like this with a 20g high aga, but hadn't worked with cutting glass or building tanks before so I was a little scared to do it. I wasn't even going to fill mine with water. I was going to put my Gecko in it.
Jonathon |
|
#93
12/03/2006, 04:11 PM
|
|||
|
|||
 you will have to get a closer pic of th ehead for a good id i would suspect... how ever it doesnt look like and enicid or a fire worm if that helps... |
|
#94
05/25/2007, 05:59 PM
|
|||
|
|||
|
Well last post for this tank.
 Last seen it was shooting water out the side!?!?! 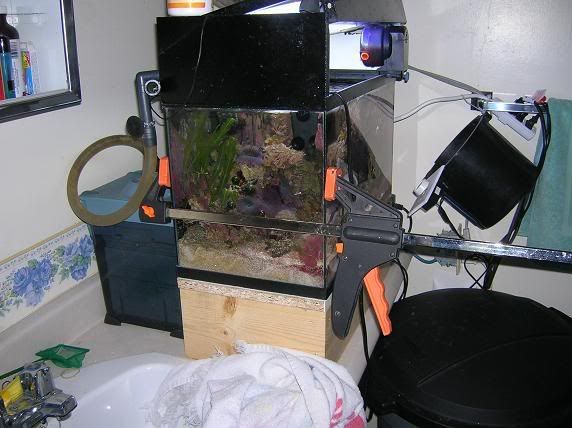 Now on to the new tank.  the the story is here. http://www.canreef.com/vbulletin/showthread.php?t=32372 See you there.
__________________
Enquiring minds want to know |
|
|


 Linear Mode

