|
|
|
#51
 12/26/2007, 10:03 PM
|
|||
|
|||
|
Thanks Marc. I didn't realize the tank requirements for a Blue Hippo. Maybe I'll set one up in a nano tank!
 Actually, the reason I was curious about the padding between the tank and the stand was because of the first few pages of your thread. I do realize, however, that you're tank is bigger than mine (though the comparison stops there  ). ).I didn't think about chopping off the end of the shims and nudging them under. Thanks!
__________________
Dogs - Man's best friend; entropy's greatest catalyst. |
|
#52
12/26/2007, 10:21 PM
|
|||
|
|||
|
The cutting of shims is a trim carpenter's trick I used years ago. I had that job for two years straight. That explains why it took so long for me to do the woodwork on my tank.
I called InterAmerican and explained the debate people were having with my tank setup, and was told to use foam and plywood under my tank. That's all I needed to hear.
__________________
Marc Levenson - member of DFWMAS |
|
#53
12/26/2007, 10:27 PM
|
|||
|
|||
|
lol mark i no these hippos need big tanks to thrive
|
|
#54
12/26/2007, 10:32 PM
|
|||
|
|||
|
I'm going to follow along as well. My Christmas present to myself was a Cherry 90g RR with matching stand and overflow kit for $300. On top of that, it was NEVER used, still has the original stickers on it!
|
|
#55
12/27/2007, 01:17 AM
|
|||
|
|||
|
Hi!!!!!
Wow, your thread is so much fun I LOVE it! I love the photos of you guys and your dogs... they are SOOOOO cute!!! You two are a really cute couple also =) Tagging along for sure!! How do you like your Modern stand? I have that as well on my 75. |
|
#56
12/27/2007, 09:41 AM
|
|||
|
|||
|
Quote:
__________________
Dogs - Man's best friend; entropy's greatest catalyst. |
|
#57
12/27/2007, 09:46 AM
|
|||
|
|||
|
Quote:
I love the stand! It has a solid look to it. I'm in favor of black stands/canopies - I think it lends the eye to the tank itself. Anything that's larger than the stand for my 55g is enough to make me happy! 
__________________
Dogs - Man's best friend; entropy's greatest catalyst. |
|
#58
12/27/2007, 10:05 AM
|
|||
|
|||
|
Quote:
I used paint stripper to get most of the paint off, then attacked the rest with a power sander. Working with paint stripper was a real mess, but it was a great help in getting me almost to the bare wood. I used 60 grit sandpaper, and that got me down to the bare wood quick! I then followed up with 100 grit, then 150 grit. For stain, I applied 3 coats of Minwax Wood stain, 8 hours apart. Finished it up with a couple coats of Olympic Polyurethane Clear Coat 12 hours apart. All said, it took me 5 days, working about 4 hours each day. It really slows down when you start applying the stain and clear coat as you have to wait several hours between coats. I left some detail work black because it would've been a big pain to strip and sand those parts, but it worked great because the furniture we have around the tank had similar black details in them as well. Even the wife had to admit "it looked good"! :-) |
|
#59
12/27/2007, 10:35 AM
|
|||
|
|||
|
Time for some new pics
 Nah, j/k man, great setup you have going. Just remember you are a lucky one, not all of us have great helpers like your wife. She seems really into it, and has a lot of interest. My family just wants a Dory and a pair of clowns in an anemone. Nah, j/k man, great setup you have going. Just remember you are a lucky one, not all of us have great helpers like your wife. She seems really into it, and has a lot of interest. My family just wants a Dory and a pair of clowns in an anemone. Great job with the setup BTW. I have the 90g Oceanic Starfire, awesome tank.
__________________
~~Dave~~ ______________________________________________________________________ "Give a man a fish and you feed him for a day. Teach a man to fish, and feed him for a lifetime." -An old chinese proverb |
|
#60
12/27/2007, 10:52 AM
|
|||
|
|||
|
I am lucky! She gets interested and she knows what she wants. It's fun to see her catch the LFS employees lying to her, expecting her not to know the difference!
__________________
Dogs - Man's best friend; entropy's greatest catalyst. |
|
#61
12/27/2007, 11:17 AM
|
|||
|
|||
|
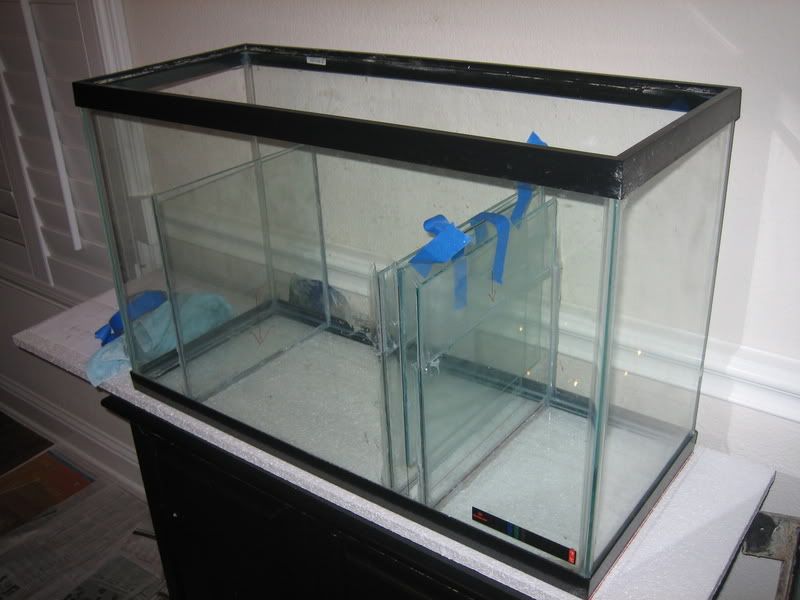
Well, here is my sump setup. Of course, it's DIY, so if there are any suggestions, let me know now - there still isn't any water in it!
I'm using a 29g glass tank and acrylic for the baffles. Yes, I know, silicone merely "grips" the acrylic, but it grips it well enough for my sump application. I've water tested each compartment overnight and they all hold water very well. Also, if there is even the smallest leak in one of the baffles, all the water is still contained in the glass sump. First, I gathered all the tools I'd need for this project: -Tank -Acrylic -Silicone -Dry-erase marker -Jigsaw -Rubbing Alcohol -Drinking Alcohol -Sense of humor   There are some things I'm really good at, and some things I could use a lesson or two on. Silicone is not one of my strong points, as you will see! First, I used the dry-erase marker to plan out how I wanted my compartments. I used the rubbing alcohol to clean the inside of the glass to prepare a nice surface for the silicone.   The first compartment will fit my Octopus NW-150 skimmer, the middle section will have a DSB and 'fuge, and the last section will have my submersed return pump. I measured the inside of the tank and subtracted about 1/4" and cut the baffles down to size.   I knew that I wanted my last load-bearing baffle to be leak-proof, so I did this one first so I could apply silicone on both sides of the acrylic.  Take a close look at my silicone work - I'm more of a function kind of guy...  Four baffles later and voila! It's not my prettiest work, but it'll do the job!  If anyone has any suggestions, please let me know!
__________________
Dogs - Man's best friend; entropy's greatest catalyst. |
|
#62
12/27/2007, 11:36 AM
|
|||
|
|||
|
Hey jcpatella, how easy was it to cut the acrylic with the jigsaw and was it straight? (Just wondering

|
|
#63
12/27/2007, 11:50 AM
|
|||
|
|||
|
I bought one of those "class/acrylic" cutters. Ideally, you're supposed to be able to score and crack the acrylic instead of cutting it. That sucked, so I decided to use the jigsaw. It's pretty easy to cut through. It's the straight part that poses a bit of a problem.
I tried to cut a little outside of my line, so any deviations could be sanded down (using a dremel tool). If the blade goes too slow, it won't cut it, but if it goes to fast, it will melt the cut back together! Overall, it was pretty easy.
__________________
Dogs - Man's best friend; entropy's greatest catalyst. |
|
#64
12/27/2007, 11:51 AM
|
|||
|
|||
|
Looks good, dont worry about using the acrylic as baffles. I have been doing it for years with no trouble. It must be nice to have your wife so into the hobby. I have had relationships fall apart cause of it. Keep the updates coming.
|
|
#66
12/27/2007, 11:55 AM
|
|||
|
|||
|
Your sump setup looks very similar to the one I built just last week. I also started with a 29 gallon tank. Below is a pic of my sump right after I siliconed the baffles in.
 I was trying to maximize the volume in the return section (middle section) and since my skimmer section (section on the right) was tied to the skimmer footprint, I had to limit my refugium area at 5 inches long. I did make the refugium a tall one, and used a 13" baffle. Shortly after filling, I realized the center baffle in my bubble trap wasn't tall enough, so I've since siliconed another 2 inch piece above it. Works much better now. Another thing I learned shortly after getting it going, there's a fair amount of microbubbles that still make their way to the return section. If I were to do it again, I'd probably add a fourth baffle, or at least spread the baffles out a little bit more. I did mine on 1" centers, so they're effectively only 0.75" apart (I used 0.25" glass for my baffles). I have some pictures of the plumbing setup, but they're still in my camera, and my 13 yr old daughter has my camera with her on a road trip to San Antonio right now. I'll post them when she gets back, if you're interested. The way it's running right now, I lose about 3/4" to 1" of water (about 3/4 gallon, according to my calculations) to evaporation each day from my return section. Next project - a manual top-off setup. There's enough room in the cabinet right next to the sump for one of those 5 gallon jugs. I plan to put a freshwater jug in every week or so with the smallest powerhead I can find, with tubing dumping water into my return section. Then I can just flip a switch each time I want to top-off. |
|
#67
12/27/2007, 11:56 AM
|
|||
|
|||
|
Quote:
__________________
Dogs - Man's best friend; entropy's greatest catalyst. |
|
#68
12/27/2007, 12:04 PM
|
|||
|
|||
|
Quote:
__________________
Dogs - Man's best friend; entropy's greatest catalyst. |
|
#69
12/27/2007, 12:05 PM
|
|||
|
|||
|
Well it looks prety good
I might just copy yours when i get a chance j/k.
|
|
#70
12/27/2007, 12:10 PM
|
|||
|
|||
|
qfrisco - A simple sump like yours is what I was going after. I'm trying not to let the specifics of this setup get out of hand. I want the sump, plumbing, electrical, etc. to be simple enough that my wife will remain interested and can help with the maintenance without having to ask, "What's this doodad for?"
I finished my plumbing last night - I'll post some pictures when I get home tonight. It's terribly simple (like everything else), but feel free to post your pictures when you get them back. Plumbing can always be redone!
__________________
Dogs - Man's best friend; entropy's greatest catalyst. |
|
#71
12/27/2007, 12:13 PM
|
|||
|
|||
|
Quote:
I do realize that term is relative, as there is really nothing in this hobby that is simple! 
__________________
Dogs - Man's best friend; entropy's greatest catalyst. |
|
#72
12/27/2007, 12:25 PM
|
|||
|
|||
|
It was just funny because as soon as i looked at yours, i realized that it looked very similar to the way i did it and turns out they are very alike... And my mentality when i was building my sump was to keep it simple as well.
--- The only problem i had was that the silicone did not stick to the acrylic in some areas and was letting water get through. So i eventually got tired of it and used glass baffles instead. Cost more but so much better. But i am the only one of my friends who had this problem with the acrylic so i guess it is possible. - keep it up jcpatella!!
|
|
#73
12/27/2007, 03:06 PM
|
|||
|
|||
|
nice sump, kinda looks like how i did mine, except for the last baffle, i didnt do a over under baffle. Just one baffle and eggcrate above it to hole the chaeto in. I like it like that because i can put the water level above the baffle where the eggcrate is and it doesnt produce any microbubbles. With just the baffle, the water would fall over that last baffle pretty quickly and produce a lot of bubble from the return pump. And without that 2nd baffle there, and using eggcrate instead, you could have more space for the fuge, even if its only an inch or more. Just some suggestions.
Also, is the third baffle in the over under over set, lower than the other 2???
__________________
Leo Click on my red house to see my 90g RR tank :) Tons of pictures, tons... Click!!! |
|
#74
12/27/2007, 03:23 PM
|
|||
|
|||
|
Quote:
Yes, that third baffle is a little shorter than the first. I want the water a certain level for the skimmer, but I don't want the fuge too high. The sump is only 29g, so I wanted to make sure there will be enough room to hold the excess water from the display when I turn off the return pump.
__________________
Dogs - Man's best friend; entropy's greatest catalyst. |
|
#75
12/27/2007, 03:43 PM
|
|||
|
|||
|
Quote:
__________________
Leo Click on my red house to see my 90g RR tank :) Tons of pictures, tons... Click!!! |
|
|


 Linear Mode

