|
|
|
#1
 09/25/2007, 06:57 AM
|
|||
|
|||
|
Great, cheap, and functional DIY eductors!
Hi guys!
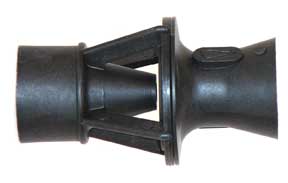
Eductors are a very neat tool for our reefs. They enable a pump to circulate a small amount of water at a high pressure, and turn this pressure into velocity. This fast moving water stream creates a low pressure area, which draws much more water through the nozzle. Often they operate at a ratio between 4:1 to 15:1 depending on the pressures used. Due to these nozzles being designed around aquarium pump usage, the orifice is larger than a high pressure system would use, and this lowers the ratio, but reduces head pressure against the pump. This enables a wider range of pumps to be used than normal eductors. These are some pictures of the eductors that I used in my home reef tank. They cost me around $25 each (just for the nozzle, not including the loc-line), and they are only available in 2 sizes, both of which to large for small tanks and too small for giant tanks.  So, after looking at some other DIY eductor designs, I decided that my design would need to meet a few requirements. First, the materials cost must be under $1. Second, it must be compact. Third, it must be able to be scaled up or down to work with any flow needs from nano to 1000 gallon monster. Fourth, must require no special tools and only take a few minutes to build. And most importantly, it must actually be functional! Many designs that I've seen will not be functional, and/or will be worse than no nozzle at all. So, here we go. The only materials are 3/4" sch40 PVC and 1" sch20 PVC. I bought a couple of 10ft sticks at home depot for about $4 for both 10' sticks. This makes the cost per eductor about $0.15 each. Tools are a hacksaw, a burns-o-matic torch, a screwdriver handle, and an old lightbulb. Gloves will also be nice  To make the convergence nozzle, heat a 1" section of the 3/4" PVC pipe, pull to stretch it as far as possible without tearing it. If you are wanting to make very small orifices for higher pressure pumps, you can snug a zip-tie down on it while it's still hot.  To make the outer nozzle, I cut off a couple inch piece of the 1" PVC, heated it softly with the torch, jammed a screw driver handle in 1 end, and forced a light bulb in the other. After a little practice, this gave me just the shape I was looking for.   So, here we have some finished pieces for examples.  I tried a couple of designs for a part to hold the secondary apature. This was what I settled on because it was very quick, easy, required no additional materials, and blocks very little flow.  Here are bunch of finished nozzles. Notice that I'm making lots of different shapes and designs to try out what works best.  Here is how I made the holders. The pics explain it pretty well. Very simple to make. 
|
|
#2
09/25/2007, 06:58 AM
|
|||
|
|||
  Here I'm laying out pieces to make many different designs of eductor.  A little glue, and poof! All done!     
|
|
#3
09/25/2007, 07:04 AM
|
|||
|
|||
|
Comming up with the construction method, experimenting with the design, and building 10 of these took me roughly 2 hours. The total project cost was $4, and I used only about 1/3 of the materials.
If anyone has the ability and time to actually quantify the flow rate differences from the different orifice sizes and bell shapes, I will mail all 10 of these away for free if you will post your findings for all to see here on the forum. Best Wishes, -Luke |
|
#4
09/25/2007, 07:05 AM
|
|||
|
|||
|
Very interesting! A little black paint and they will look almost like some commercial units. Are you going to post some shots of them in the tank (or at least a test tank)?
__________________
Vice President Omaha Marine Society Coral Tees Frag Plug Designer (Click my Red House) |
|
#5
09/25/2007, 07:08 AM
|
|||
|
|||
|
What would be the best way to test? I would imagine if you took an airline hose and introduced air in to the current to show the current that you could visually test the flow between with and with out the educators.
__________________
Vice President Omaha Marine Society Coral Tees Frag Plug Designer (Click my Red House) |
|
#8
09/25/2007, 12:28 PM
|
|||
|
|||
|
Very cool cant wait to see pics on these in action looks like the only tools you need are a torch (19.99) and a hack saw (4.99-19.99) the rest are things you can find around the house.
What kinda glue did you use? Last edited by andbigdaddy2; 09/25/2007 at 01:16 PM. |
|
#9
09/25/2007, 01:09 PM
|
|||
|
|||
|
genius.... now I gotta go look at locline fittings to see what I can come up with to attach these to 3/4" locline.
__________________
90gal display 40gal propagation/refugium tank 30gal sump |
|
#12
09/25/2007, 08:37 PM
|
|||
|
|||
|
Also,
If you slip (no glue) the flare onto the nozzle section, you could remove it and hit the nozzle with the belt sander to open it up more if the flow reastriction was too great. Never thought of the zip tie idea- nice.
__________________
"Not cheap, but silent and absofrickenlutely no bubbles" "Be sure and wear a speedo lest tangs nest in your britches" |
|
#13
09/26/2007, 12:48 AM
|
|||
|
|||
|
Ah... the smell of burning PVC. I think I will have to try this one out since I've always wanted to own a torch, but didn't have a good reason. Shhweet.
__________________
May everyone be happy, May everyone be free from misery, May no one ever be separated from their happiness, May everyone have equanimity, free from hatred and attachment. |
|
#14
09/26/2007, 09:12 AM
|
|||
|
|||
|
I love the idea but what kind of paint can you hit these with that will make them look a little better in the aquarium?
|
|
#16
09/26/2007, 10:18 AM
|
|||
|
|||
|
Quote:
__________________
_________________ Ted |
|
#17
09/26/2007, 04:01 PM
|
|||
|
|||
|
Thank you for the kind words!
In reguards to testing flow, I've been thinking about what the best method would be. I was first thinking the classic pour an icecube tray full of plaster. Weigh each plaster block and locate them in a couple places in the tank for X amount of time. Then remove, weigh them again, change nozzels and repeat. Which ever nozzle design has the lightest blocks after X time could be the winning design. However, I realized the functionality of the eductor is going to depend so much on the pressure feeding it, that this test would only produce results for 1 type of pump, and the direction the nozzles are could be a huge player in the results if things couldn't be kept even. So, I'm thinking the best way to do this would be a circle or square raceway tank. The cube method located somewhere on the back side of the raceway should be really consistant and accurate. Or conventional prop design flow meters would be simple to use this way as well. Of course these only will yeild qualitative results, but for reefkeeping purposes, this is perfectly adquate. Best Wishes, -Luke |
|
#18
09/26/2007, 04:47 PM
|
|||
|
|||
|
Luke,
You could use the plastic bag method. Get a trash bag and a timer. Stick the bag over the eductor and time how long it takes to inflate the bag. This would have to be done in an empty tank obviously, or a smaller bag and a quick trigger finger on the stopwatch.
__________________
"Not cheap, but silent and absofrickenlutely no bubbles" "Be sure and wear a speedo lest tangs nest in your britches" |
|
#19
09/26/2007, 06:53 PM
|
|||
|
|||
|
Well, I finally stuck one on a nozzle in my tank today. Seems to work pretty much exactly the same as the professional eductors that I have. When you put your fingers near the back area, you can certianly feel it sucking. I took a pinch of dried oyster eggs underwater next to the nozzle and released them near the side of it. It drew the oyster eggs right through the area where it should, and blasted them across the tank.
I think the cool application for these would be for the nano guys. They could make very small versions to use on the return pumps. It would reduce the overflow flowrate and noises while make a large increase in water movement without the addition of larger pumps in heat sensitive enviroments. Best Wishes! |
|
#20
09/27/2007, 11:52 AM
|
|||
|
|||
|
Any pics of them in action?
|
|
#21
09/27/2007, 12:07 PM
|
|||
|
|||
|
Very cool. I do not use eductors, but if I did I would defiantly do this.
__________________
Giovanni _____________________ For my "Aquasurf your Vortech WWD, the DIY" thread, Click the little red house up top. . |
|
#23
09/27/2007, 05:00 PM
|
|||
|
|||
|
ctreefer- Perhaps the most clever thing about making your own eductor is making the orifice size to suit your pump. If you have a low pressure pump, you can make a larger orifice to suit the pressure ability of your pump. The downside is of course a lower flow multiplier ratio. A large orifice design may only result in a 2:1 flow boosting ratio, but reguardless, you doubled your flow for a couple of dollars without increaseing heat or power consumption.
Also, if you wish to increase the head pressure ability on a pump, you can use epoxy putty to reduce the diameter of the inlet area, and bring the surface as close to the impeller as possible. Starting with a pump that features realitively tight fitting impeller housings would be a bonus as well. While you are working with the houseing, radius the outlet passage, and you may compensate for the flow lost from increaseing the head abilitys. Just another 20mins with some frag mounting putty and a dremel sort of mod, but you may be suprized at what you can do for the pump. Best Wishes |
|
#24
09/27/2007, 05:09 PM
|
|||
|
|||
|
I've had a generous offer from rogergolf66 who says he has both the time and ability to test the performance of the different nozzle designs. I will be sending them out to him today.
I looking forwards to seeing his results shared with the board. This way we will get some solid ideas on what shapes and orifice sizes perform best. |
|
|


 Linear Mode

