|
|
|
#1
 03/23/2006, 04:50 PM
|
|||
|
|||
|
The Ultimate DIY Rocks!
This is going to be in a journal style, so bare with me. I'll give you background first.
Of course, like many reefers, I was strapped for cash starting up this hobby. 300 lbs of live rock for my up and coming 125g was just too expensive. So, I did a little research and stumbled on the many versions of DIY Rock. From crushed coral to crushed oyster shell to PVC shavings to noodles. I've pretty much read it all. So, I went with a decision just to try it to see how it worked. I went through several batches. First Batch Well, since my first batch was a test run, I decided to just use crushed oyster shell and cement. Crushed Oyster Shell at Atwoods was about $8 for 40 lbs. Portland Cement Type One was $10 for about 90 lbs. I mixed it to a rather thick consistency of about 4 parts Crushed Oyster Shell to 1 part Portland Cement. I then would grab a small clump and toss it on a cookie sheet. I would take a second clump and toss it on the first. I then repeated the process until I found the size and shape I wanted. There were also some that I hand shaped to make little crevices, caves, and indentions. It didn't work out well, but that is why it was a test batch. I then took them and baked them in the oven at 250*F because I didn't want to wait for it to dry for 24 hours. It took a few hours to bake. I then plopped some of them in the back of the toilet and others in buckets and tubs. I let them cure until the pH was a steady 8.2-8.3 and took them out. Here is my conclusion to the first batch of rocks Pros: Easy to make. Very cheap. Moderately easy to form. Unique outward appearance. Solid strength Cons: Thick. Heavy. Very dense. Rough and sharp. Able to cut and scrape. Here is a Cost breakdown: 40lb bag of Crushed Oyster Shell - $8 90lb Bag of Portland Cement - $10 Total: About $0.21/lb Here are some pictures of the first batch of rocks. Free Form Rocks 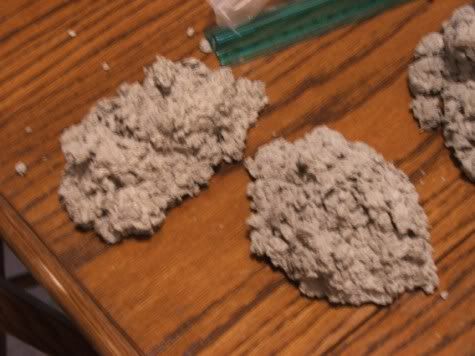 Two Rocks with Flat Ends Put Together 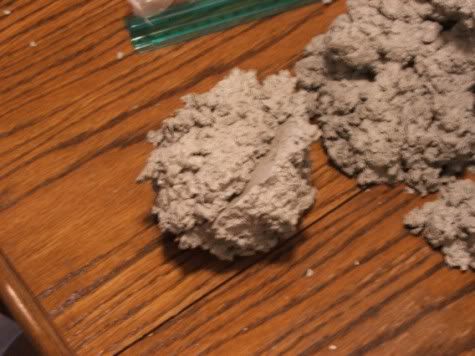 All the Rocks 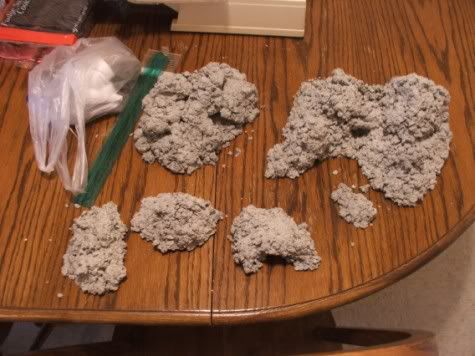 Rocks Put Together 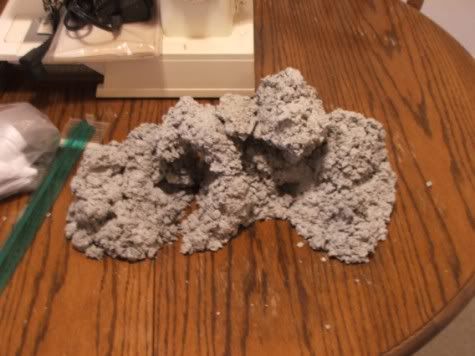 ....To be continued.....
__________________
Travis Stevens Last edited by griss; 08/29/2006 at 11:55 AM. |
|
#2
03/23/2006, 05:04 PM
|
|||
|
|||
|
Second Batch
After the amazing ease and success of the first batch. I decided to really get into it. I used a various mixture of various noodles of various sizes, Crushed Oyster Shell, Aragonite Sand, and Portland Cement. It was about 1 part Aragonite sand, 1 part Mixed Noodles, 2 parts Crushed Oyster Shell, and 1 part Portland Cement. My thought process was that this was going to be the batch to go into my tank. So, I wanted all the abilities that aragonite offers and the porousness and shapes pasta noodles were going to provide. I added all sorts of noodles. Jumbo shells, large shells, regular shells, broken spaghetti, manicotti shells, large elbow, and regular elbows. Everything went according to plan and looked great at first. But as it was curing in our extra bathtub, the noodles began to soak up water as expected. What was unexpected was the expansion of the noodles. It broke the rocks! This was disappointing, but it made a lot of shapes and plenty of rubble for frags. My conclusion on the second batch Pros: Amazing shapes. Slightly porous. The broken pieces made great rubble. Slightly lighter and less dense. Smoother texture with Aragonite sand. Provides buffering ability. Cons: Rather heavy. Not as strong. Noodles took a long time to dissolve. Lots of water used to cure and dissolve noodles. Cost Break Down 40lbs of Crushed Oyster Shell - $8 90lbs of Portland Cement Type One - $10 10lbs of Noodles - $10 40lbs of Aragonite Sand - $30 Total: About $2.06/lb Not many pictures of this batch Table Full of Second Batch Rocks  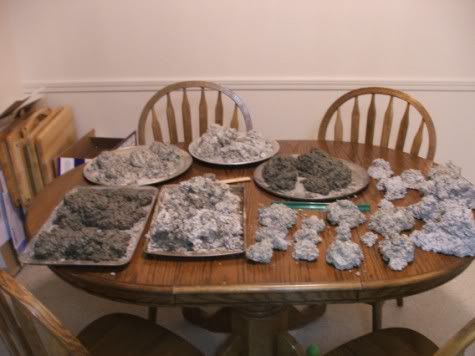 ...To Be Continued...
__________________
Travis Stevens Last edited by griss; 08/29/2006 at 11:56 AM. |
|
#3
03/23/2006, 05:18 PM
|
|||
|
|||
|
I look forward to seeing how your rock experiements work out. Like you, I have a large tank and no money so I need to make my rock but cannot think of a way to both lighten the rocks and make them as porous as possible. It is to bad standard wax pieces is a no no. It would be easy to take shavings of wax, mix it with the cement and oyster shell, and after the rocks are solid, cook the wax out. I have heard of mixing paper pulp in the cement. I wonder how well that works and what the ramifications might be.
__________________
I spend more time with my corals than I do my children. What's wrong with this picture? |
|
#4
03/23/2006, 05:21 PM
|
|||
|
|||
|
Third Batch
Well, after what I would consider a failure on the second batch, I really enjoyed the thought of something dissolving to leave it porous. My goal was to try to make the closest thing to real rock as I could. So, I sat down with a pencil and paper and began brainstorming. After a few days, I came up with something very simple that was in my face and my tank the whole time. Salt! Rock salt to be precise. It is the perfect size and readily and quickly dissolves in water. Now, would enough water soak through a dried rock to dissolve it on the inside? Would it dissolve too quickly when I mix water in the rock mixture? Was rock salt toxic to a marine tank? If so, how toxic? A little research yielded that a little rock salt in the home aquarium is perfectly safe. Well, the chemical questions are out of the way, but what about the physical ones? Only one way to find out. Just do it. So, I did. And I came out with the ultimate rock! Extremely light and porous. With 4 parts Rock Salt and 1 part Portland Cement Type One, it is a nice playdough like mixture. Conclusion Pros: Extremely light. Extremely porous. Quite smooth. Rather easy to shape. Cons: A little more fragile. Residule salt is left inside the rock. Cost Break Down 5lbs of Rock Salt - $2 90lbs of Portland Cement Type One - $10 Total: $0.51/lb Here is the Ultimate Rock!!! These are picture of part of a rock I broke in half. The Outside of the Rock 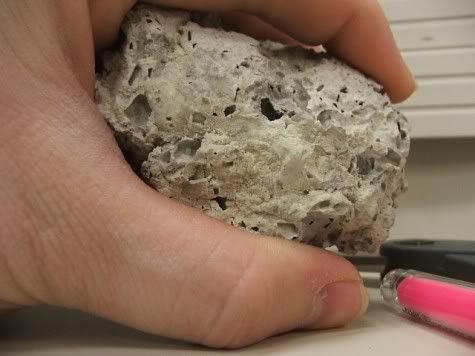 The Inside of the Rock 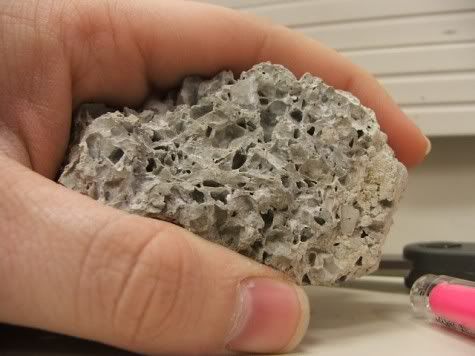 The Rock to Show Size of Pores 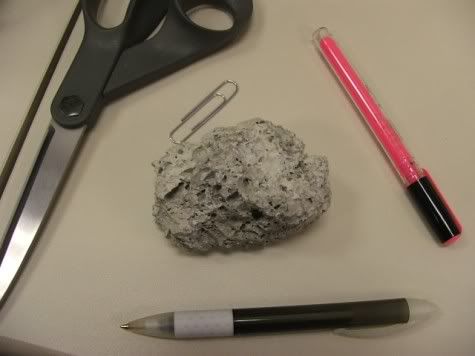 ....To Be Continued....
__________________
Travis Stevens Last edited by griss; 08/29/2006 at 11:57 AM. |
|
#5
03/23/2006, 05:27 PM
|
|||
|
|||
|
That's really cool. I'm assuming that the rock salt would be detectable with a refractometer. You could monitor the level of salt in the "curing" water to see what happens.
|
|
#6
03/23/2006, 05:31 PM
|
|||
|
|||
|
The Ultimate Rock at Work
Well, of course, I had to use the rock I made. So, here you go. Unfortunately, we had to sell the 125g tank. So, this is all out of my 29g I started out with about 3 or 4 pieces of actually Fiji Live Rock so that I could seed the new rock to make it "live". 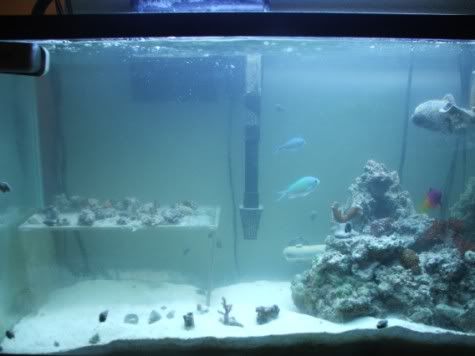 Then I added the first batch of rock. 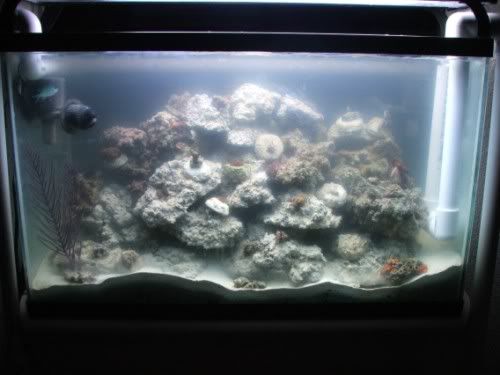 Then I added some of the second batch. 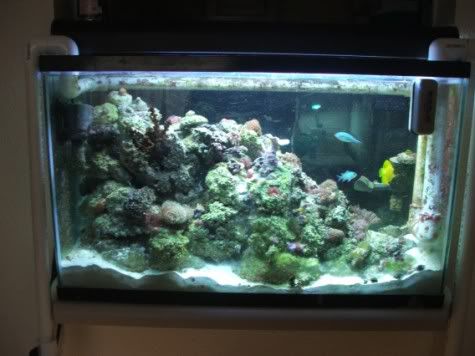 Finally, I added the third batch. 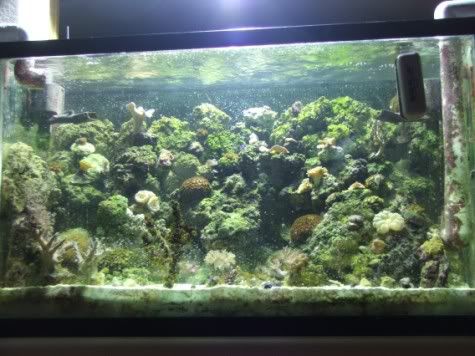 Here it is one year later. The first batch with flat bottoms is on the bottom of the rock work and against the glass. 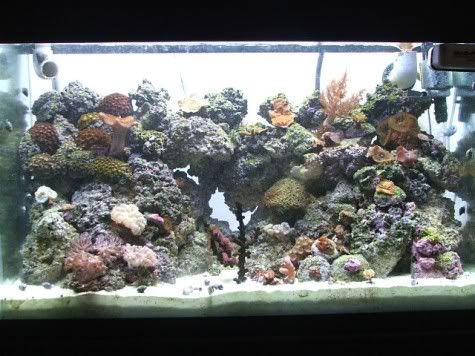 ...To be Continued...
__________________
Travis Stevens Last edited by griss; 08/29/2006 at 11:59 AM. |
|
#7
03/23/2006, 05:33 PM
|
|||
|
|||
|
Quote:
__________________
Travis Stevens |
|
#8
03/23/2006, 05:40 PM
|
|||
|
|||
|
Future Goals
There's not really much I can do. The life on this rock is amazing. The animals can't tell the differene any more. I do want to make a fourth batch with Aragonite sand in it so it will be as close to natural rock as possible by providing amazing porosity and buffering ability of Calcium Carbonate. Another goal of mine is to find ways to actually make it look more like specific types of rock. Such as Tonga Branch, Fiji, Marshal Island, and Tonga Plate. I'm even thinking of finding a way to make mould. This way, all I would have to do is pour a mixture in, let it dry, and pop out a perfectly formed Tonga branch. Another goal is to take a large, finished piece and take something like a masonry drill, hammer, chisels, etc to make caves and crevices. Well, that is my Ultimate Rock! I hope you really enjoy it and are able to use it in your own aquarium. Maybe this is the future to aquacultured rock  Thanks for your time Thanks for your time 
__________________
Travis Stevens |
|
#9
03/23/2006, 07:23 PM
|
|||
|
|||
|
Wow! Wow! Wow!
I have to make some..... Thank you for experimenting!
__________________
Icarus, what are you doing up there! Ave imperator! Morituri te salutant! |
|
#12
03/24/2006, 12:04 AM
|
|||
|
|||
|
ttt
__________________
The more I see,The more I want. The more I want,The more I spend. The more I spend,The broker I get. The broker I get,The less I can spend. The less I can spend,The more I want VISCIOUS CYCLE!! |
|
#13
03/24/2006, 12:57 AM
|
|||
|
|||
|
Travis,
Great Job If I may ask what curing process did you use? I have 180 gallon tank that I'm not looking forward to buy rock I just may make some of my own now.
__________________
I may be new but Hey I'm loving what I'm learning. Working on 180 gallon Reef Tank |
|
#14
03/24/2006, 01:50 AM
|
|||
|
|||
|
I havent gone to the lengths you have (in regards to trying mixtures) but I have to applaud you for the dedication. We've been through a few different mixes. The first one was about 1:2:1 cement, sand, salt respectively. Those came out... well, decent looking but very very very dense. I mixed it like that because during the mixing process I thought to myself - there is NO way I'd be able to add more sand and still have it work. It just wont happen.
Second batch, more like 1:4:3 cement, sand, salt respectively. They didnt harden as quickly in my sand molds, but they did over the course of two weeks (might have been sooner, I didnt check it for 2 weeks). Cured in the toilet inside of 3 weeks. By the way - I never thought to break one open to see how it looked, I'm going to have to do that later today. I'm very impressed with how your ultimate rock came out. Overall, how many lbs of rock did you make? I'm just curious because I've made a total of probably close to 200lbs and STILL have at least 1/2 of my supplies to make more (I used sand in mine, but I used "limestone sand" from a landscaping company - $9 for 450.0lbs, great for adding into the rock, and molding the rocks in). AWESOME work! |
|
#15
03/24/2006, 02:49 AM
|
|||
|
|||
|
So do you bake them first then cure them for PH level? So I take it you cure them for ph level in fresh water? I am pretty dumbfounded impressed with this DIY project. Speechless I tell ya. Looks like its time for a new era of IRON CHEFS to rise. hehe
__________________
If you don't open your mouth to talk... No one would tell you to shut up. |
|
#16
03/24/2006, 09:20 AM
|
|||
|
|||
|
Great stuff man! Thanks!
I think I might have to add some rock-salt to the next batch of arragocrete I use to make frag plugs. Where did you get the Rock Salt? Can I just grab some of the driveway-melter stuff that's going to be on clearance at my local HD pretty soon?  (hmm.. I wonder if Dow Flake or one of the other Calcium Chloride options Randy tested would be an option, as well?) - Mac |
|
#17
03/24/2006, 09:28 AM
|
|||
|
|||
|
If you want to shape your rock into whatever shapes your desire, you can smear the rock mixture around small diameter PVC pipes to get something like Tonga rock-like branches. Plus, if you drill PVC pipes beforehand, you can connect the PVC-rock via zip ties. You can use whatever materials you want to make the frames, as long as they are relatively saltwater-safe. Plastics, acrylic, etc. The possibilities are endless!
Newty
__________________
I am Canadian and I live in an igloo |
|
#18
03/24/2006, 10:05 AM
|
|||
|
|||
|
Thank you all for the compliments!
 Just for clarification. All my stuff was moulded by hand. On the Third Batch, I made it the same way I did the first by just dropping little amounts on top of each other, but I let it dry in the open for about an hour until it was a little more solid, and then I picked it up and rounded the bottom. Then I baked it. For future reference, baked rock doesn't smell very good and I'm not sure if the fumes are harmful Just for clarification. All my stuff was moulded by hand. On the Third Batch, I made it the same way I did the first by just dropping little amounts on top of each other, but I let it dry in the open for about an hour until it was a little more solid, and then I picked it up and rounded the bottom. Then I baked it. For future reference, baked rock doesn't smell very good and I'm not sure if the fumes are harmful  I'm alive, so I'm either lucky or it's safe. I'm alive, so I'm either lucky or it's safe. beanoil - 4:1 Salt to Cement. I'm not sure how much sand I'm going to use though. It might be a mixture of 3:1:1 of Salt for porousness, Aragonite for 50% natural buffering, and Cement to glue it all together. Ddddrgnfly - Thanks for the bump. I'm proud to be worthy of a bump. nmorse72 - I just tossed it in the bathtub in our second bathroom. I did water changes as often as every other day. I also added some in the back of the toilets. tekknoschtev - Did the Sand and Cement stick together well? Thanks for sharing your experiences. Da85CBears - Your assumptions are correct. Baked it to dry it and cured it in freshwater until the pH leveled out. I have a feeling though that my competitor chef would win against my salty rocks. ReeferMac - I got the rock salt right by Mrs. Wage's Pickling Lime at WalMart. It's meant to be used for ice cream machines. I would stay away from driveway melt stuff though. They could contain more than just rock salt. It's funny though. We are on the same track in our minds. Since I accomplished my first goal of porousness for biological filtration, I turned to looking for a way to provide the buffering that aragonite sand offers. I have a feeling that just using aragonite sand in the mixture will be the best bet. But I have tossed in my mind about using baked baking soda and pelletized Calcium Chloride. But, that might dissolve too quickly and wreak havoc on your system! newty - Thanks for the advice. I'm trying to stay away from making inner structures because it's just that: solid. It would be difficult to make it free form. On the other hand, I'll try my hand at forming it in aragonite sand on the next batch since it will stick to the outside. I'm going to try to free sculpt a few pieces of Tonga branch and such and make something like a plaster mould later. But the zip tying is a very good idea and I recommend it for anyone looking to make a wonderful design. I'm working on doing something similar for my wife's seahorse tank. You can follow it here as well. http://archive.reefcentral.com/forum...hreadid=682002
__________________
Travis Stevens |
|
#19
03/24/2006, 11:09 AM
|
|||
|
|||
|
Hi,
I've been lurking here for a bit. Don't have a tank yet, but trying to do my research to put one togther. I couldn't help but reply to your post because I came across some rock making info in the course of my searching. Quote:
The main index is here: http://www.garf.org/howtodoinformation.htm#Aragocrete Specifically on your mold and caves comment: http://www.garf.org/news6p1.html#mold Basically, get some sort of container, fill it with sand, dig out your mold, pour in the mix. A question of my own. If I were to make my own rock, it sound like you can "seed" it by having live rock present? Does this take a long time? or does it happen pretty quickly? |
|
#20
03/24/2006, 11:23 AM
|
|||
|
|||
|
georgec - I have read those before. The basic mix of GARF's aragrocrete is Crushed Coral, Cement, and Sand. Their method of using sand as a mould to pour in the mixture is a nice idea and I had read it before I even made my first batch. But I didn't like how I couldn't free form it and turn it 360 degrees. I also didn't like the fact that the sand gets stuck to the rock after it dries. Plus, to me, it just looks fake. That's why I would like to make a model sculpture, make a cast mould, and then just fill it in. I thought about just taking real base rock and making the mould over that, but I would need to find a way that the mould wouldn't stick to the rock itself when drying. Either way, thank you for posting those links. I'm sure there are people here that haven't seen it
Yes, all you have to do is add real live rock to a tank of DIY Rock and/or base rock, and it will eventually become "live". My rock took about three to four months for the outward appearance to match the real thing. I have no way of testing how live it is on the inside, but I can tell you this. There are many bristleworms and amphipods that do come out of crevices that I have never seen before. In fact, one night I found a chiton crawling out of some of the DIY Rock. I've never even seen chitons in my tank. Of course, it must have always been on the live rock in the first place. I have heard that it can take up to a year for base rock to obtain a significant amount of biological filtration. I would suspect the same amount of time out of any DIY Rock.
__________________
Travis Stevens |
|
#21
03/24/2006, 12:00 PM
|
|||
|
|||
|
Looks great, Travis!
I wouldn't sweat the aragonite addition. Your rock (or sand for that matter) isn't going to contribute to your buffering capacity to any functional extent. The pH isn't (shouldn't be) low enough to dissolve it much. Definitely not enough to do much buffering. I've had the same live rock for 6 years and it hasn't shrunk at all. I may have to try this out myself...
__________________
I'll shut up now... |
|
#22
03/24/2006, 12:11 PM
|
|||
|
|||
|
I guess you're right, G-money. If you are being responsible in your reefkeeping and testing regularly, you should be able to pinpoint any problems before it gets to the point where the Calcium Carbonate will dissolve. Plus, isn't Portland Cement crushed limestone? Wouldn't this have a buffering agent if the pH dropped low enough anyways? I guess Randy Holmes-Farley would hav to say for sure

__________________
Travis Stevens |
|
#24
03/24/2006, 12:32 PM
|
|||
|
|||
|
Yes sir. Just 4:1 Salt to Cement. I have made about 60lbs of rock in all out of the three batches, and I still have a good 30-40lbs of cement left. Plus with a ratio of 4:1, one bag of cement will make ~90lbs+ of rock. But you would need 320lbs of Rock Salt
If you think about it, you can imagine how light this stuff is by basically thinking how big a mound of rocks the size of a mound of 320lbs of rock salt would be. That's pretty big! Now, it's only going to weight no less than 90lbs! Maybe about 100-120lbs because of residual salt. But you can fix that by just leaving it to cure a few more weeks after it is done with it's pH.
__________________
Travis Stevens |
|
#25
03/24/2006, 01:55 PM
|
|||
|
|||
|
I am sorry, I love the thread but baking the rocks is a bad idea. Concrete does not cure by drying, it gets hard by a proccess called hydration. It is actually using the water as fuel in the chemical reaction to get hard. The strongest concrete is cured in water. Backing the mix is only making it weaker. If you are looking to speed up the cure time, you want to use an accelerator in the concrete, not bake it.
Other than that, good work man.
__________________
If I knew keeping fish would be so hard, I would of had kids by now. |
|
|


 Linear Mode

