|
|
|
#26
 11/25/2007, 04:19 PM
|
|||
|
|||
|
The middle chamber in the back is full of live rock rubble and chaeto. I only had the HOB filter early on to add a little extra help while the tank cycled a bit longer...but it's not needed now. I do about 1/2 gallon (approx 2 liters) water change each week and I dose it with Kent Tech CB.
It was easy to build, but I did make a few errors that I had to correct...1. when the acrylic shop cut the overflow they were way to large...I had to get a thin piece of acrylic cut to cover most of the overflow...you can't see it when you look at the tank, so it was an easy fix 2. I didn't brace the tank...you can see early on there is no brace...there is now to help prevent the front from bowing too much....that was a pain in the a** to do when the tank was already up and running. |
|
#28
11/25/2007, 04:41 PM
|
|||
|
|||
|
The LFS didn't cut it...I went directly to a local plastics shop. They do a great job, and you can't beat the laser cuts that they do. The acrylic was $40 I believe, then I put 2 maxi-jet 400's...you can get them online for about $13. The loc-line fittings were about $15 at the LFS. I also have a small heater in the back chamber that was $13.
|
|
#31
11/26/2007, 11:14 AM
|
|||
|
|||
|
I braced it by having 1" wide strips of acrylic glued to the top rim of the tank on the front and sides. Since the tank of was already full and bowing the front I used two pieces of lumber and a vise to square everything up to glue the braces.
|
|
#32
11/26/2007, 12:16 PM
|
|||
|
|||
|
do you think if i used 1/2" acrylic i could completly avoid having to use a brace or would that not be very cost effective. have you got some pictures of the brace to see how you did it aswell pictures help lol. do youhave any updates on the tank coral wise etc, i showed my teacher the tank today he thinks its great
|
|
#33
11/26/2007, 01:40 PM
|
|||
|
|||
|
1/2" might be a bit much. I would stick with a 1/4" and brace it when you build it. I can take a pic of the brace when I get home today. It's quite simple, but certainly should have been done before I filled it with water.
|
|
#34
11/30/2007, 12:11 AM
|
|||
|
|||
|
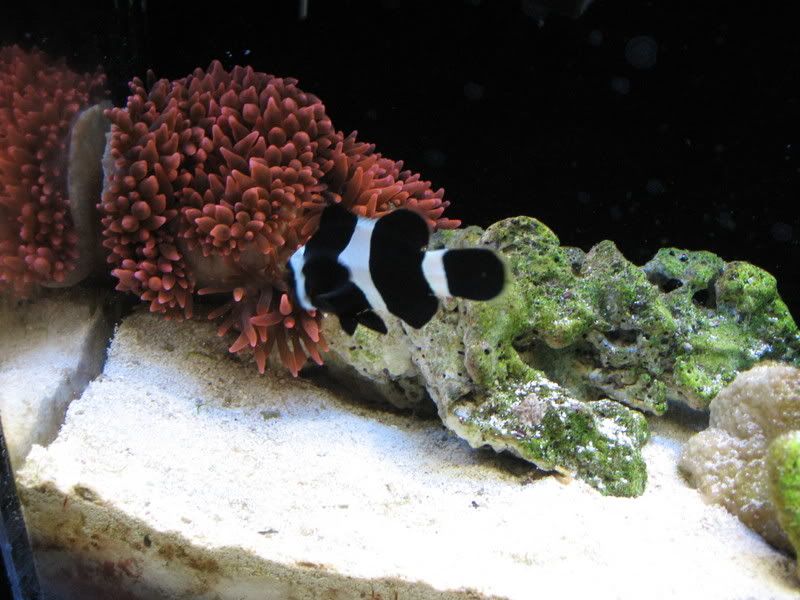
Here is a pic that shows the bracing I put on after the tank was already set up. I've also included a pic of my B&W clown with his two new buddies...I got the RBTA and it split into two the night I put it in my tank.
|
|
#38
12/02/2007, 12:48 PM
|
|||
|
|||
|
scaast.....if I wanted to do the same with a ten gallon tank how would i go about measuring how far i want the false back away from the back of the tank....and what about how many teeth for the overflow....I am not sure how everyone gets the measurements to make overflows and what not....thanks
|
|
#39
12/02/2007, 02:09 PM
|
|||
|
|||
|
In my experience...I just decided based on how large I wanted the entrire tank to be...I don't think there's an exact science to it...if there is...I got lucky with my guess. I determined mine would be 3 inches from the back just so I would have enough room for the return pumps without sacrificing too much room in the display. The number of teeth was just simply how many they could fit across the middle chamber...the deptch of the teeth is what is critical...originally mine were cut too deep...I covered them with an additional piece of thin acrylic...easy fix. I'll tell you one thing that may help you...my tank is the exact same width as a 10 gallon tank...20". I did that on purpose so the light that I had on my old 10 gallon would fit on this tank. If you decide to make a similar tank do yourself a favor and drill "u" shaped holes for the returns rather than a circular ones...this will allow you to slide the return pumps back into the chambers much more easy after maint.
|
|
#40
12/04/2007, 11:09 PM
|
|||
|
|||
|
scaast....If i used a ten gallon I bought from the store then would I have to brace the tank....still has the black plastic on the top for support....How deep should I cut the teeth....is it just how low you want your water....I am also going with maxi jets as i plan on doing only softies and mushrooms.....and not to argue but how would the u shaped returns be easier than circle ones....one last question.... what size of returns are you using....i hopefully will be getting my acrylic done this weekend so hopefully i can get some pics up....thanks for your advice.....
|
|
#42
12/05/2007, 10:12 AM
|
|||
|
|||
|
Fava...1. No...the 10 gallon with the black rim is fine by itself. 2. Yes...it has to do with the water level you would like. 3. about the returns...when I drilled the holes for the bulkheads I didn't anticipate how tight the fit would be in the returns to get my hands in there to get the tubing connected to the pump and bulkhead...BUT...if I would have used a U-shaped hole I could have assembled the pump and bulkhead and then just slid it into the hole and tightened the bulkhead. I hope that makes sense.
|
|
#43
12/05/2007, 11:21 PM
|
|||
|
|||
|
yeah it does makes some sense scaast.....could you explain the plumbing are you just using pvc pipe or what....since mine will be a ten gallon should i go with alittle larger maxi jet....i wish i could just really say hey give me the measurements i need that way i can just go get it and not have to think.....lol thanks for your help hopefully this weekend i will be buying some stuff and getting it going.....
|
|
#44
12/05/2007, 11:30 PM
|
|||
|
|||
|
scaast....since I am using a ten gallon I think I am just going to stay with the same pumps as you are.....just confused on the plumbing....you just have the pumps with pvc going to the bulkhead or what....just need some info on your plumbing set up.....thanks......ps could you just tell me all your measurements so i dont have to think of them myself ha ha
|
|
#46
12/06/2007, 12:58 AM
|
|||
|
|||
|
Fava...I sketched up a side view of the plumbing and how it's connected. VERY basic setup. It's connected using 1/2" ID clear vinyl tubing. I got the 90 degree elbow in the sprinkler/irrigation dept at home depot. Hope this helps. Which measurements are you confused on?

|
|
#47
12/06/2007, 11:02 PM
|
|||
|
|||
|
I am just really confused about everything. I am going to just due step by step......Do you think I should just buy the same type of maxi jets or go one step higher since mine is going to be a ten gallon.....can you just slip everything into place or do you have to do any gluing to the plumbing....what size of bulkhead should I buy and locline....thanks again for your help
|
|
#48
12/07/2007, 10:46 AM
|
|||
|
|||
|
Fava...none of the plumbing is glued. The 90 degree elbow is threaded...screws right in. All of the locline is 1/2"...same with the bulkhead. I would upsize the maxi for a 10 gallon. I'll try to help you through the process...just let me know what questions you have and I will do my best to help.
|
|
|


 Linear Mode

