|
|
|
#76
 04/19/2007, 08:43 AM
|
|||
|
|||
|
Quote:
Just glue, but with biscuits. It's not coming apart. I'll probably be sanding glue off for a week, too. I may have been a little overzealous.
__________________
You don't win friends with salad. The red house. Click it!! |
|
#77
04/21/2007, 04:45 PM
|
|||
|
|||
|
Panel door time. Here is how the bits cut the oak.
 And how they fit together.  And the finished joint.  So we used these pits on the canopy panels.  And all the stand doors.  Next we cut the plywood panels to fit in the doors and canopy, and then we glue it together. And we decided to screw the oak to the pine from the back and not use any glue. Hopefully this will work out for the best! More to come later in the week.
__________________
You don't win friends with salad. The red house. Click it!! |
|
#78
04/21/2007, 08:30 PM
|
|||
|
|||
|
it's really looking good. I have always wondered how the joints on the panel doors look before they're put together. I'll be doing that on my next stand.
|
|
#79
04/22/2007, 09:17 AM
|
|||
|
|||
|
I think the bit set is refered to as "rail and stile" or "instile and rail," something like that. The only problem we have is that the slot for the panel is 1/4", but of course plywood is only 3/16" thick. I think we're going to shim the plywood to hold it on the front of the door. It should work out well.
__________________
You don't win friends with salad. The red house. Click it!! |
|
#80
04/22/2007, 04:15 PM
|
|||
|
|||
|
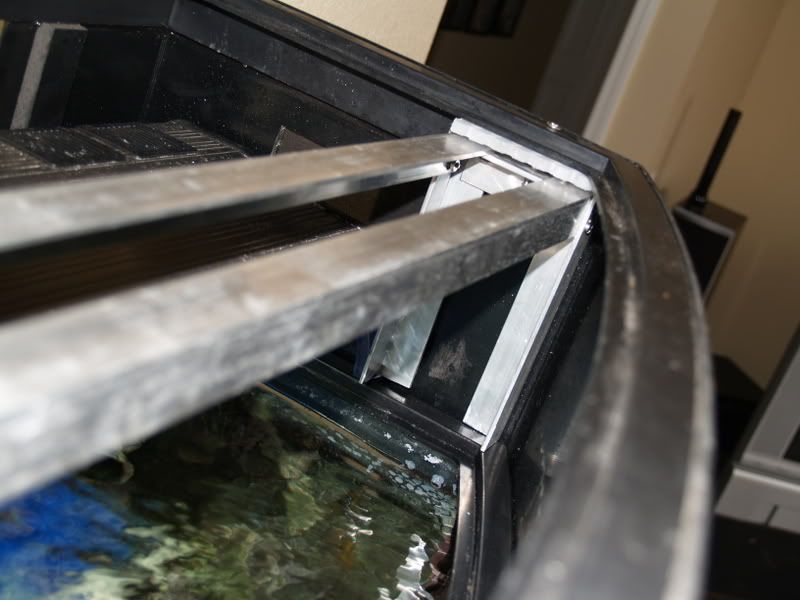
Alright, here is my attempt at an aluminum light rack. It's not perfectly square, but it's close, and it's wide enough to ensure that the lights will be right at the correct distance.
 Here is the basic idea for lights in the canopy. The thought is that both the front and entire top will be hinged to allow for a)quick feeding and b) major maintenance without removing the hood. The two grey strips represent the piano hinges I bought (also aluminum), and the blue rectangle is how the light rack fits in place. The canopy is more or less open top, which is why there is a good amount of white space.  Here is the rack on the tank, but the bulbs will be about 5" off the water once it's bolted to the canopy.  And here is one of the two fans I have for the canopy. These are dead silent and push about 200 cfm, which I'm hoping will be adequate for cooling the tank (I really dont want to use the chiller). I've another one for the sump if necessary.  Anyways, I would love and tips for using this light rack. It's made of Al angle iron and rivetted with stainless rivets. I don't think there's much more of a trick to it, but it's the first I've built and I'm a little worried about rusting or corrosion. I think it's sturdy enough to hold the lights, but it will pivot when I need to get something out or into the tank. Thanks for suggestions!
__________________
You don't win friends with salad. The red house. Click it!! |
|
#81
04/22/2007, 05:08 PM
|
|||
|
|||
|
my only concern is that you do have a lot of surface area of Al right at the water level. It should be fine, but you may want to turn it upside down so that just the legs rest on the rim of the tank. This will give you less surface area for corrosion and you won't have as much water contact from splashing etc. Can you (are you) going to mount the aluminum to the wood canopy?
Also, how are you going to be hanging the lights? |
|
#82
04/22/2007, 05:14 PM
|
|||
|
|||
|
Yeah, the aluminum will be suspended about 7" off the water surface... it's not going to sit on the tank like it is in that picture. I am going to bolt it to the top of the canopy.
The standoffs/endcaps of the lights will be screwed into the front/back piece of aluminum and hang down from the light rack. They are about 2 1/2" tall. Were you thinking that the rack would sit on the tank?
__________________
You don't win friends with salad. The red house. Click it!! |
|
#83
04/22/2007, 10:51 PM
|
|||
|
|||
|
yeah - I was thinking it would be like you had it in the picture (and similiar to mine below)...
|
|
#84
04/23/2007, 08:45 AM
|
|||
|
|||
|
Nope, not the case. Tell me (as I really don't remember anything from my materials classes), how did you construct your frame? As mentioned, I used aluminum with stainless rivets, but I recall that mixing metals may actually increase corrosion potential.
__________________
You don't win friends with salad. The red house. Click it!! |
|
#85
04/23/2007, 09:22 AM
|
|||
|
|||
|
I used little stainless bolts.
You are right about anion-cation interaction (like putting a steel fitting on a copper water line...) causing corrosion.....but i doubt that's really an issue for us. If it starts to corrode, then i'll just replace the rack. I don't expect that to happen. |
|
#87
04/24/2007, 08:51 PM
|
|||
|
|||
|
Looks good! What's left?
|
|
#88
04/24/2007, 09:03 PM
|
|||
|
|||
|
Not too much. I've got to glue these doors together, right now they're all just fitted. Still have to mount the oak to the pine, and we are thinking of doing a floating dado. More to come on that in a couple weeks, I suspect. I have to glue a few more pieces to the canopy. And then finishing, which I'm a little terrified about. I'm terrible at finishing wood with anything other than paint. I've got a buddy who used to be a professional painter, and has some experience with this kind of stuff, so I'm going to get him involved. Hopefully it works out.
__________________
You don't win friends with salad. The red house. Click it!! |
|
#89
04/24/2007, 10:16 PM
|
|||
|
|||
|
crvz, things are looking great man! I haven't been to your thread (or any other for that matter) in a while and you're really making progress. Very nice work!
I've got the same material for my light rack. I'm anxious to see how yours turns out. |
|
#90
04/30/2007, 05:16 PM
|
|||
|
|||
|
New fish! Picked this little dude up on Friday, an Acanthurus pyroferus. I like tangs, and I imagine I'll have too many in the near future. Don't tell anyone.

__________________
You don't win friends with salad. The red house. Click it!! |
|
#93
05/04/2007, 11:18 AM
|
|||
|
|||
|
Lights, wired and hot. Thanks for all the training, Peter, couldnt have done it without you.
   I had to crop this picture, as I only had one ballast to test the 8 bulbs.  Bulbs, from top to bottom UVL Super Actinic ATI Blue Plus GE 3000k ATI Blue Plus UVL AquaSun ATI AquaBlue ATI Blue Plus UVL Super Actinic
__________________
You don't win friends with salad. The red house. Click it!! |
|
#94
05/07/2007, 09:20 AM
|
|||
|
|||
|
lights look great! What else did you accomplish this weekend?
|
|
#95
05/07/2007, 10:28 AM
|
|||
|
|||
|
I sanded 2 doors and that's about it. Tomorrow I hope to finish gluing the canopy, then it can be sanded. Once it's complete, I should be able to bring it to my house for final prep and then painting/staining (that's important because it means I can work on it more than just a couple hours a week). The stand may take another couple weeks, but really we've only got to get the oak attached to the pine, so hopefully that won't be too complicated. Another couple weeks, though, and everything should be ready for staining and painting.
__________________
You don't win friends with salad. The red house. Click it!! |
|
#96
05/08/2007, 08:55 PM
|
|||
|
|||
|
More pictures!
Finished gluing the canopy for starters.  This piece will go on the top of the canopy and hinge to open at the back. The front will also have a hinge to allow access for when I don't want to open the entire canopy.  And then here is another image of the canopy frame, but with the front somewhat laying in place.  And then some shots of how we are attaching the oak to the pine. Not real sure what to call it, but I've hear "floating dado", so that's what I'll stick with. Click the red house if you want a little more of a walk through in it. The benefit of this is that it will allow the oak to swell (whereas if it were straight glued, it could crack). Cut slots in oak  Cut slots in pine  Glue wood in the pine.  Screw oak onto pine 
__________________
You don't win friends with salad. The red house. Click it!! |
|
#97
05/16/2007, 08:41 AM
|
|||
|
|||
|
I got good news and I got idiot news. First, the good news. The canopy is completely built! I just have to paint and stain it now.
 I don't have the piano hinges in place, hence the clamps, but it fits together perfectly.  On the tank, it fits well. Again, no hinge, so the front is a little low...  Here you can see how much space there is. A friend's canopy was built almost to the exact dimension of the tank, and when she put it in place it shrunk (from having been outside) and cracked the tank. I took a lesson away from that and left plenty of space.  And now the idiot part, I built the doors 4" too wide.  You can see the hinge won't quite work with this door (by about 2").  Oops! I was thinking of notching the oak back in order to place the hinges in the right spot to make this work, but I think I'll just rebuild them. We'll see, it will be a week or so until I have to make a decision.
__________________
You don't win friends with salad. The red house. Click it!! |
|
#98
05/17/2007, 09:25 AM
|
|||
|
|||
|
....no, it looks fine to me
 It's a good thing those idiot mistakes never happen to me..... |
|
#99
05/17/2007, 10:02 AM
|
|||
|
|||
|
Quote:
__________________
You don't win friends with salad. The red house. Click it!! |
|
#100
05/18/2007, 10:53 PM
|
|||
|
|||
|
Well, I got the rest of the canopy finished, now it's ready for painting and staining. I should start that this week sometime.
   It's a little shaky when it's all up as in the last picture, so I need to find a good way to prop it up when it's open. I'll figure something out.
__________________
You don't win friends with salad. The red house. Click it!! |
| Thread Tools | Search this Thread |
| Display Modes | |
|
|


 Linear Mode

