|
|
|
|||||||
|
|
Thread Tools | Search this Thread | Display Modes |
|
#26
 11/16/2005, 07:28 PM
|
|||
|
|||
|
SRVDVM - thanks for your comments and, sure, I'd be happy to discuss the auto-topoff system, even if it's a little out of order. If "SRV" is a reference to Stevie Ray Vaughn, I'd do anything for you.
The auto-topoff system is a Tunze Osmolator with the Tunze Calcium Dispenser. The photos I'm going to show are with the infrared sensor and alarm float valve located in the sump. For the purposes of this thread, I don't have a sump yet, but oh well. The brains of the auto-topoff unit is this controller that I mounted on the inside left door. 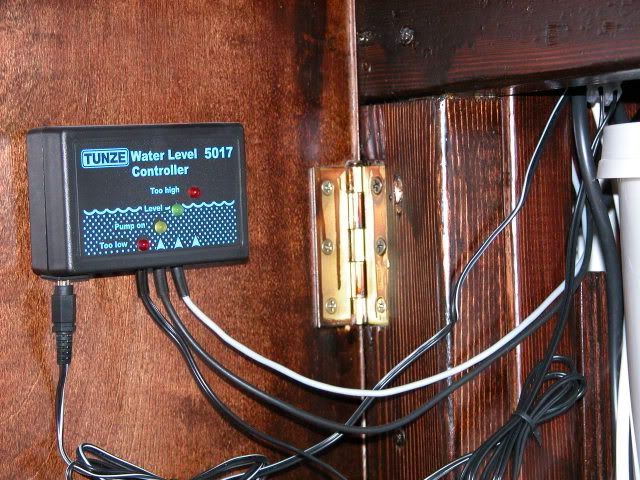 This provides feedback from an infrared sensor that's installed in my sump (previously it was just taped onto the back of my main tank by its cord). As the water evaporates from the system, RO/DI water from a 7.1 gallon storage container is pumped into the tank. This water first passes through a small kalk reactor that sits in the storage container, so my tank is frequently topped off with kalkwasser in small portions. The unit is extremely safe in that if it remains on for some reason, it automatically shuts off after running for 10 consecutive minutes. Additionally, there is a separate probe that's on a float valve, and if the water level in the sump rises above where I set the float probe, an alarm goes off (it's loud, too!). Here's a close-up of the infrared sensor and float-triggered alarm probe installed in my sump (beside the heaters). The infrared sensor is the black and grey one at the left of the image located with its tip at the top of the water line. The float-triggered alarm probe is located higher up (for obvious reasons). 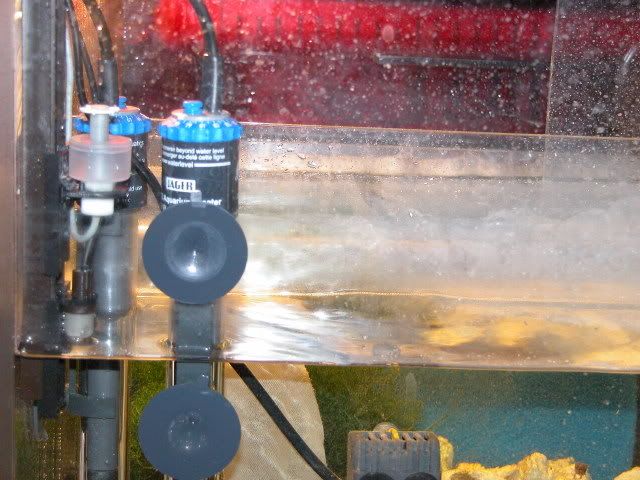 These were mounted in such a way that when I turn off the return pump from my sump and the sump level rises due to siphoning (I'll explain later if you don't know what I mean), the alarm is still at a higher level and won't go off. That way, I don't have to keep unplugging it and plugging it back in. Hope that makes sense. Here's a picture of the container that stores the RO/DI water for top-off. 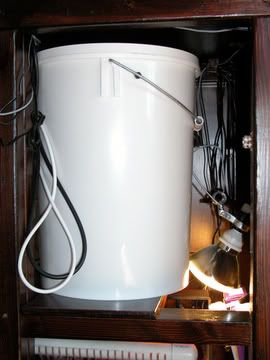 I went with the Tunze storage container, but you can use whatever you want. I picked this one because it holds more water than the standard 5 gallon bucket, and knowing it's exact dimensions, I knew how much space I needed on the top shelf of my cabinet.
__________________
The Dude abides |
|
#27
11/17/2005, 11:15 AM
|
|||
|
|||
|
I should also mention that the kalkwasser returns to my display tank at a region of high flow, in order to distribute the kalkwasser well and not harm any corals that will eventially be mounted beneath the tubing. Currently it's emptying just over the end of one of my Locline outlets from the closed loop.
__________________
The Dude abides |
|
#28
11/17/2005, 10:03 PM
|
|||
|
|||
|
For my next update, I'll spend a little time on how my tank never really "cycled." I say a little time because I've just discovered my first plague ... a relatively small (as far as I can tell) outbreak of flatworms
 . .I had been testing daily for nitrate and ammonia, and never saw a spike. I figured that by adding live rock there would be sufficient die-off of organisms from the rock that I would see a cycle, but I never did. My ammonia levels were always <0.25 mg/L by the Salifert test kit, and my nitrates were never more than 2.5 mg/L. I guess my live rock was truly fully cured afterall. I therefore tested out the theory that I had enough beneficial bacteria in the system. I took about 1/3 of a piece of raw shrimp (1.5 cubic centimeter sized) and fastened it to a piece of LR using a rubberband. This was placed into the tank and although, despite testing daily, I never saw an ammonia spike, my nitrate did increase to 7.5 two days after the shrimp was added. This was fun for me, since I began seeing pods (mostly amphipods) and worms (mostly bristleworms) emerge from the aquascape to feast on the shrimp. I removed what was left of the shrimp carcass and ... holy mackerel that sucker stunk  ! I couldn't get the smell off of my hands for a full day (note to self: next time wear gloves). Over the next week to 10 days my nitrate level decreased to 2.5, and I figured I was ready for something else to look at besides rocks, pods and worms. That being said, you wouldn't believe how many hours I stood at the side of my tank with a flashlight checking out all of the interesting things that came along with my LR. I highly recommend you take advantage of this opportunity if you're setting up a new system. Here's a tip - use a red lense over the flashlight or, if you want to go super cheap, put some red celophane (sp?) over the flashlight bulb; the critters won't flee! ! I couldn't get the smell off of my hands for a full day (note to self: next time wear gloves). Over the next week to 10 days my nitrate level decreased to 2.5, and I figured I was ready for something else to look at besides rocks, pods and worms. That being said, you wouldn't believe how many hours I stood at the side of my tank with a flashlight checking out all of the interesting things that came along with my LR. I highly recommend you take advantage of this opportunity if you're setting up a new system. Here's a tip - use a red lense over the flashlight or, if you want to go super cheap, put some red celophane (sp?) over the flashlight bulb; the critters won't flee!That's all I have time for right now - gotta go siphon out some flatworms before treating the tank with Flatworm Exit. Next I'll update the thread on my temperature problems, then introduce you to my first coral.
__________________
The Dude abides |
|
#29
11/17/2005, 11:06 PM
|
|||
|
|||
|
My tank did pretty much the same thing, cycle-wise. I put in pre-cured live rock, only out of the water for about an hour or so. I had an ammonia reading of about 0.25 the next day, then everything went to zero. After I added some fish the nitrates have climbed a bit, but never ammonia or nitrites.
I'm currently in Monterey, CA. I just had to jump on the hotel wifi system to check RC! I just spent the whole day at the Monterey Bay aquarium. A totally awesome place. |
|
#30
11/17/2005, 11:48 PM
|
|||
|
|||
|
Nice tank
|
|
#31
11/18/2005, 12:44 AM
|
|||
|
|||
|
bcoons - That's definitately one of the benefits of purchasing cured LR. Sure it costs more, but there's no cycle to wait out and you can avoid that horrible smell that accompanies the die-off. I've been to the Monterey Bay aquarium myself and you're right, it's quite a sight to behold.
rhan101277 - Welcome to RC and glad you like my tank. Here's some more ... editorial comment - someone's got to show me how to do that "Welcome to Reef Central" banner My next challenge was temperature control. My goal was a temperature of 80, and I decided to tolerate a range of 79-81. In September, it was extremely hot here in Texas, in fact it was the hottest September on record in TX. My temperature range was from 81.1 to 82.9, and this was a little too hot for my taste. The primary sources of heat were my MH light, the Mag12 closed loop pump, and the ambient room temperature. By this time I had increased my light photoperiod to 10 hours/day. This originated at 4 hours/day, and I increased it by an hour every 2 days. Since I didn't want to decrease my photoperiod, and I didn't want to cool my living room any further, I chose to use a 6" fan for evaporative cooling. This was clipped onto my closed loop plumbing and not only does it cool by evaporation, it also blows some of the heat from the light away from the tank. In 1/2 day the tank temp decreased to 78.6. Fortunately the fan has a high and a low setting, so I just dropped it down a notch. This situation was not yet ideal, as the tank became quite cool at night (with the MH off). I then got a timer for the fan and set it in such a way that the fan blows continually during the "lights on" period, and at night it cycles on and off about every 2-3 hours. This has provided me with greatly improved temperature stability, right about in the range I was shooting for. I forgot to mention it before but my MH light is, of course, on a timer as well. This photo of my powerstrip shows the fan cord (torquoise blue) plugged into the fan timer. The timer has multiple ON/OFF toggle switches, and that's better seen in the second pic below. 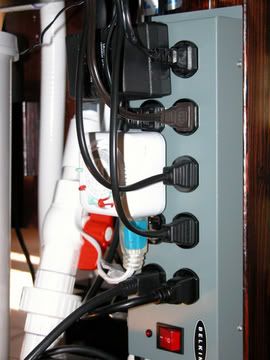 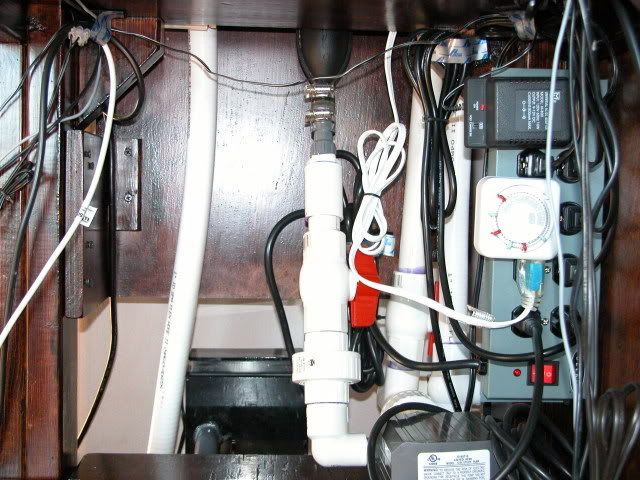 This second image also shows my Mag12 pump, some of the closed loop plumbing (the center two PVC segments) and SCWD, and you can also see where one of the "legs" of my light rack is screwed into the cabinet frame (look at the left side). My topoff reservoir sits on this shelf as well, just to the left of the Mag12. The astute observer will also notice the top of my Remora protein skimmer and the spa flex plumbing (the two on the ends). These items are incorporated into the sump/fuge, which I'll go into later. As far as temperature control goes, I'd like to upgrade my current system. It's pretty good, but for instance, we just experienced a cold front with temps as low as 28 degrees. My system as it stands now, even with two 50W heaters, could not compensate for the sudden colder temperature in my house, and I had to turn off the fan manually because the tank got down to 76.5 degrees  . I will leave the fan off entirely during "lights off" and I'll have to remember to reset my fan timer once it warms up again. Another problem with my current situation is that I'm evaporating more than 10 gallons of water per week. That's a lot for a 30 gal tank, IMO. The final problem is that the fan is not all that visually appealing. Ideally I would have mounted a fan over my sump instead, but when I show you the images of my sump you'll see why this is not a good option. I'm thinking of getting an Aquacontroller Jr. or a Ranco temperature controller for more precise thermal control. Anyone have any thoughts, suggestions or ideas? . I will leave the fan off entirely during "lights off" and I'll have to remember to reset my fan timer once it warms up again. Another problem with my current situation is that I'm evaporating more than 10 gallons of water per week. That's a lot for a 30 gal tank, IMO. The final problem is that the fan is not all that visually appealing. Ideally I would have mounted a fan over my sump instead, but when I show you the images of my sump you'll see why this is not a good option. I'm thinking of getting an Aquacontroller Jr. or a Ranco temperature controller for more precise thermal control. Anyone have any thoughts, suggestions or ideas?
__________________
The Dude abides |
|
#32
11/18/2005, 01:09 AM
|
|||
|
|||
|
first coral
Almost one month to the day after adding my live rock, my parameters were as follows:
T 78.6-80.4 S.G. 1.025 pH ~8.2 Ca 420 kH/alk 9.92/3.54 NH3 <0.25 NO3 ~2.5 I did a 25% water change then went out to my LFS to buy my first coral  . I had done a lot of research (and got a recommendation from my mentor, John) and determined that a frogspawn (Euphyllia divisa) would be a good starter LPS for me. It's pretty hardy, does well in the light and flow conditions of my tank, and it can either be fed meaty foods or live on light alone via it's symbiotic microorganisms. . I had done a lot of research (and got a recommendation from my mentor, John) and determined that a frogspawn (Euphyllia divisa) would be a good starter LPS for me. It's pretty hardy, does well in the light and flow conditions of my tank, and it can either be fed meaty foods or live on light alone via it's symbiotic microorganisms. Here's what I brought home. Well, not exactly. After a few weeks I wasn't happy with the color and traded it in for this one. It's got nice green polyps with purple knob-like tips. 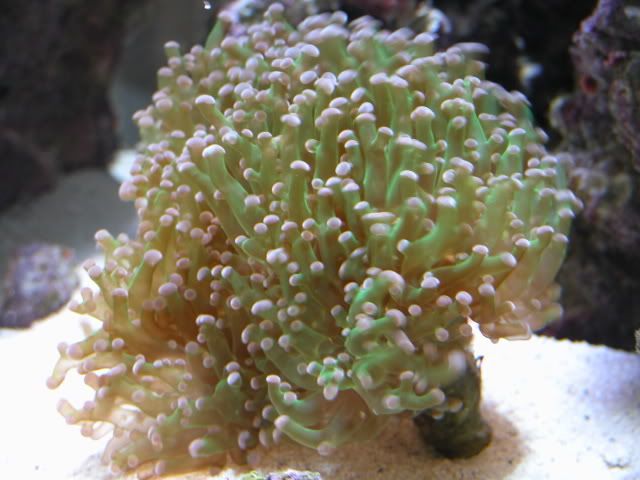 Initially I fed it frozen mysis shrimp delivered from a turkey baster, but now it eats a varied diet that I'll spell out in a later post. In the meantime, and hopefully to generate some interest in this here thread, here are some more pics of Mr. Froggy. 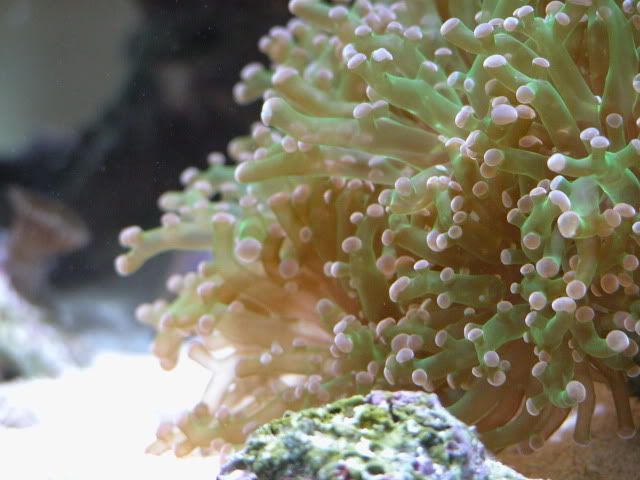 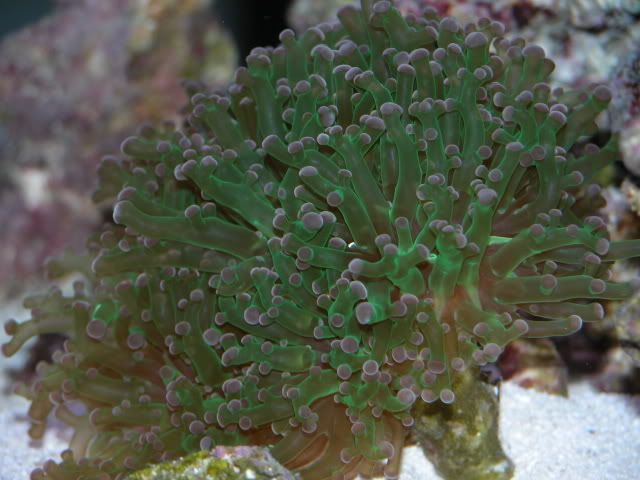 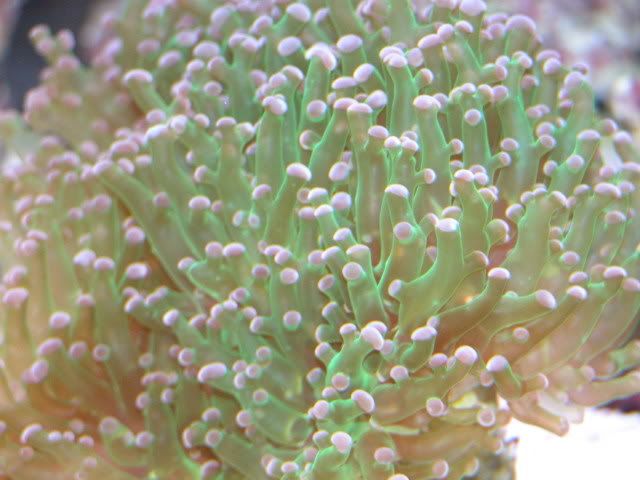 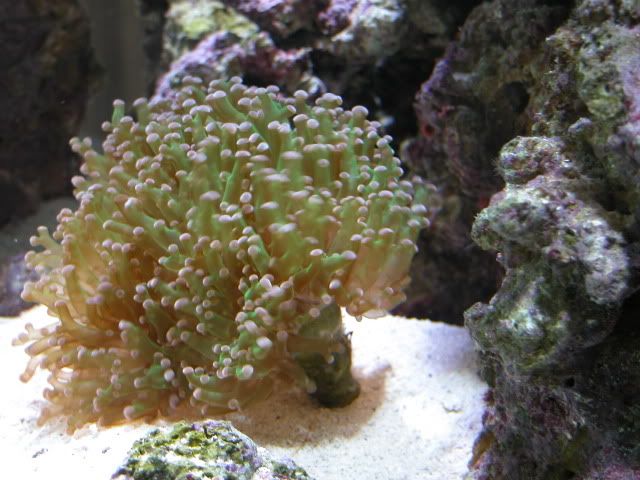
__________________
The Dude abides |
|
#33
11/18/2005, 09:24 PM
|
|||
|
|||
|
Show pics of your new frag

|
|
#34
11/18/2005, 10:16 PM
|
|||
|
|||
|
I would, but that would be waaaaaaaaay out of order
 . I can't let people think I have any SPS in the tank when I haven't even talked about my algae blooms, my clean-up crew, my sump/fuge setup, my softies and zoos, my quarantine tank (and why I got it), etc. etc. That would be irresponsible of me. So much still to document. Oh yeah, and the biggest reason of all ... . I can't let people think I have any SPS in the tank when I haven't even talked about my algae blooms, my clean-up crew, my sump/fuge setup, my softies and zoos, my quarantine tank (and why I got it), etc. etc. That would be irresponsible of me. So much still to document. Oh yeah, and the biggest reason of all ... I haven't taken any pics of it yet 
__________________
The Dude abides |
|
#35
11/21/2005, 01:13 PM
|
|||
|
|||
|
For my next update, I'll discuss my cleanup crew. Within one week of running my lights, I began seeing signs of algae growth on my live rock. It was quite heavy, particularly the brown algae (diatoms, I think). The coralline algae was, at this point, no longer visible and was totally covered in brown
 . There was also a little bubble algae, some green hair algae, as well as several (in the 10's to 20's) aptasia anenomes emerging from the LR. . There was also a little bubble algae, some green hair algae, as well as several (in the 10's to 20's) aptasia anenomes emerging from the LR.I ordered my cleanup crew from Reeftopia (www.reeftopia.com). They were very helpful on the phone, and my crew came in excellent condition with instructions on acclimation. Here's what I got: 1 emerald mithrax crab (eats bubble algae and other macroalgae) 3 peppermint shrimp (for aptasia control) 1 fighting conch (conch make sand clean  ) )12 golden astrea snails (clean rocks and glass) 24 cerith snails (good sand, glass and rock cleaners) 12 nassarius polygonatus snails (great sand cleaners) 24 small blue-leg hermit crabs (eat up all the rest) The moment the emerald crab hit the tank, he started working, two-fisting (clawing) mouthfulls of algae. It was a blast watching him go to town. He also ate the bubble algae, as advertised.  The peppermint shrimp went into hiding for a little while. I'd see them out at night, and after only 2 days there was not a single aptasia in my tank (the little pigs!)  . Good shrimp! It was nice to see them do what they were hired for. . Good shrimp! It was nice to see them do what they were hired for.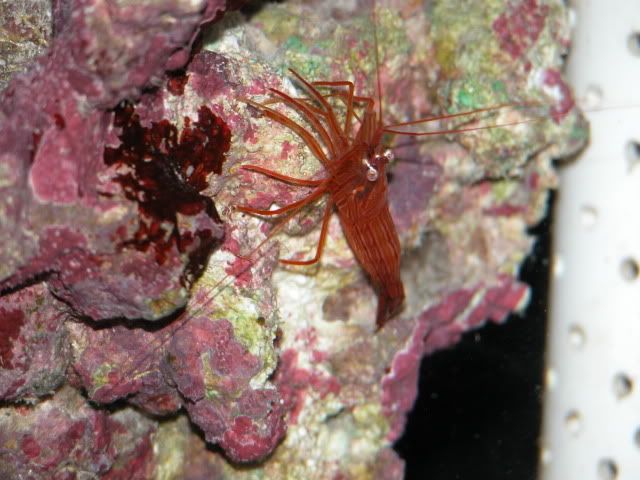 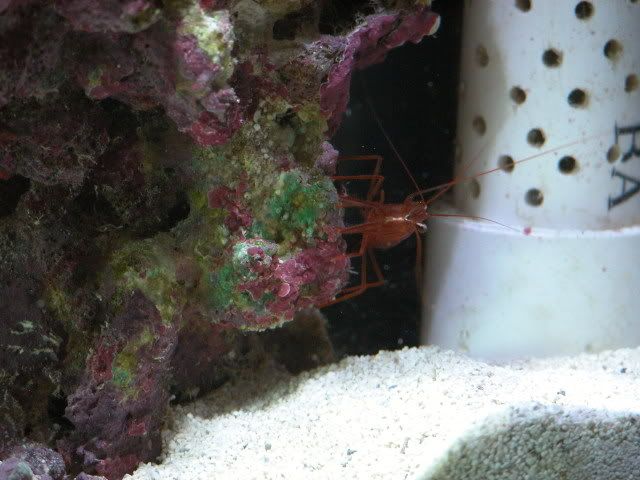 At this point, the shrimp are much more gregarious. In fact, whenever I put my hand in the tank to add a specimen or rearrange something, they climb right onto my hand. I'm told that this is a rarity (?) and that I have cool peps. The nassarius snails are a lot of fun to watch. I can see their tentacles sticking out of the sand, and as soon as a piece of food hits the water, they emerge to the top and scurry for their helping. After about one week my tank was void of all nuisance algae and the coralline algae of the LR was again shining through. Oh yeah, I also ordered 3 polyps of orange Ricordea florida from Reeftopia. They were supposed to have come mounted on a piece of LR, but instead they were free-floating with some small oyster shells attached to their feet. When I put them in my tank, they blew all over the place, but fortunately I was able to retrieve 2 of them. I have no idea where the third went. I placed the two polyps on a piece of LR from my tank, and enclosed this in a fine mesh bag (actually a jello-strainer bag) so they could receive light and water flow, but still be in continuity with the rock. I rubber-banded the bag closed over the polyps and let this sit for a week in the tank before opening the bag. When I did so, one of the polyps released and vanished into the aquascape, and the other remained firmly attached to the LR. Unfortunately I haven't been able to get a good pic of this ricordea, but it's bright orange very pretty. Since Reeftopia was supposed to have sent the polyps attached to some rock, they gave me a refund for the 2 polyps I lost. Good customer service, I think. I'm hoping that some day, when I take my aquascape down and transfer it into my monster tank, the polyps will show up, healthy and all.
__________________
The Dude abides |
|
#36
11/21/2005, 02:29 PM
|
|||
|
|||
|
Little known fact about peppermint shrimp:
They are indeed in the cleaner shrimp family and can and will clean your fish and hands of parasites. The swaying motion displayed by peppermints and skunk cleaners alike is the tell tale sign to see if they are indeed cleaners. This swaying motion tells fish what they are and keeps them from being eaten. This has been your Random Science Fact of the day. |
|
#37
11/21/2005, 05:01 PM
|
|||
|
|||
|
Thanks, John, for the contribution. Thought I was all alone here on this thread (I'm hearing crickets out there).
 I did find a photo of the orange Ricordea florida polyp. Please excuse the out of focusness of this image; it's just to indicate the color. 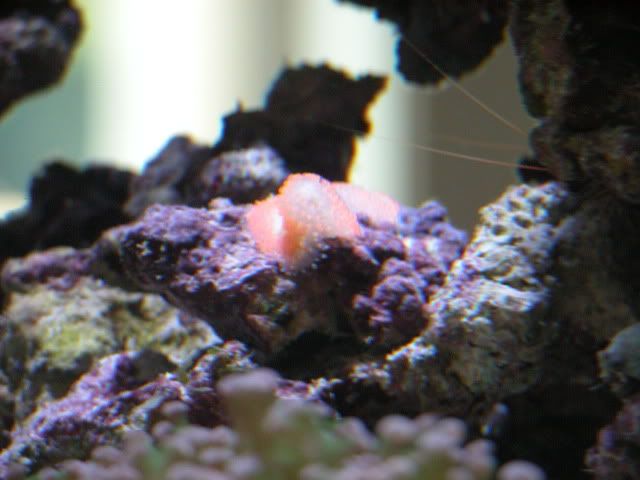 By this time, my sump arrived  . As I mentioned, it was custom built to my exact specifications at Trigger Systems in nearby Dallas (www.triggersys.com). They did a great job. The sump's dimensions are 17" x 19" x 13". This, of course, allowed me to move my heater and protein skimmer out of the display tank. I also placed an additional 50W heater in the sump. The flow pattern is as follows: . As I mentioned, it was custom built to my exact specifications at Trigger Systems in nearby Dallas (www.triggersys.com). They did a great job. The sump's dimensions are 17" x 19" x 13". This, of course, allowed me to move my heater and protein skimmer out of the display tank. I also placed an additional 50W heater in the sump. The flow pattern is as follows:Raw water drains via the HOB overflow and through a spray bar on the left side of the sump. 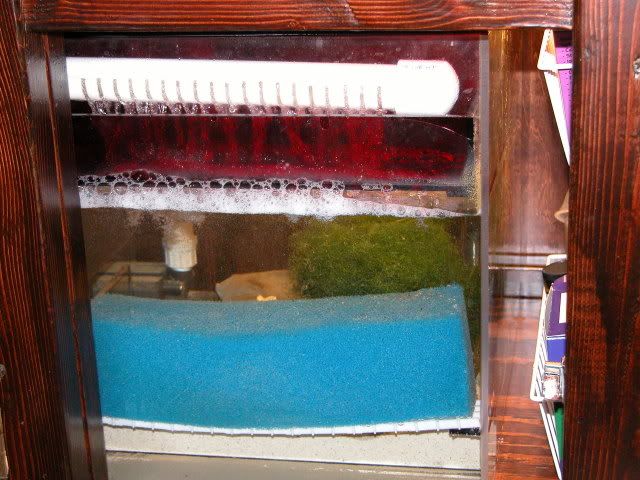 This water passes through an acrylic drawer with holes in the bottom, and I can place filter media, carbon, or whatever, in this drawer, as necessary (right now it's empty). Water then passes through the large blue filter sponge to evacuate any detritus or sediment. It then flows into the skimmer chamber where it is filtered by my Remora HOB skimmer, which protrudes off of the back of the sump. Here's an image of the back right of the cabinet, and you can see the Remora pretty well. Notice how the sump projects out beyond the back of my cabinet. This was intentional, since the skimmer is taller than the bottom shelf of the cabinet. Also, in order to empty the collection cup, I simply remove it from behind the cabinet. This also makes skimmer maintenance relatively easy. The white spa flex plumbing you see is the drainage from the HOB overflow into the rear of the sump.  Here's a view of the rear skimmer compartment, looking from the front. 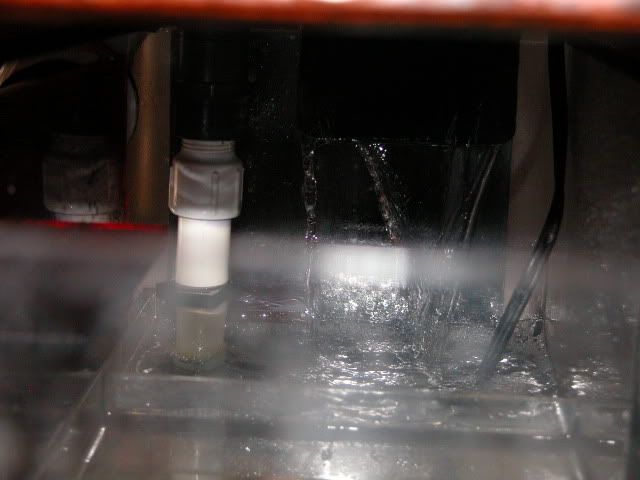 Here's the foam that my skimmer produces. 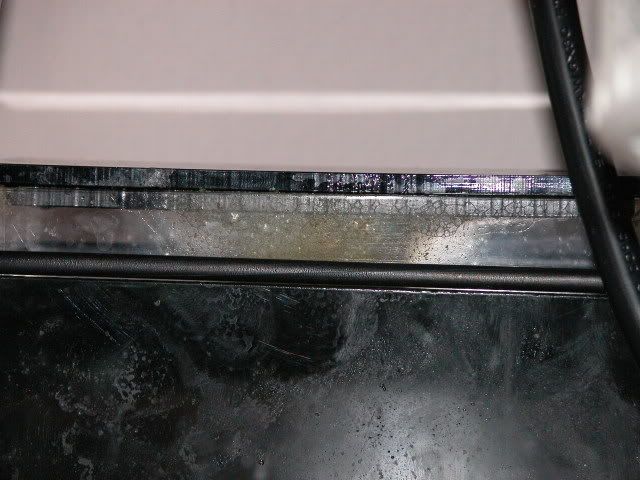 Water then passes into the refugium compartment through a slit that's cut into the wall between the skimmer compartment and the refugium compartment. This ensures that some water recirculates in the skimmer compartment, hopefully increasing the efficiency of the skimmer. It also removes most of the bubbles that enter the sump. Here you can see the front view of the sump/fuge. On the left is the return chamber from the display tank. In the rear (barely shown) is the skimmer compartment, and front/center is the refugium with the substrate, LR and macroalgae. I'll explain the rest later. 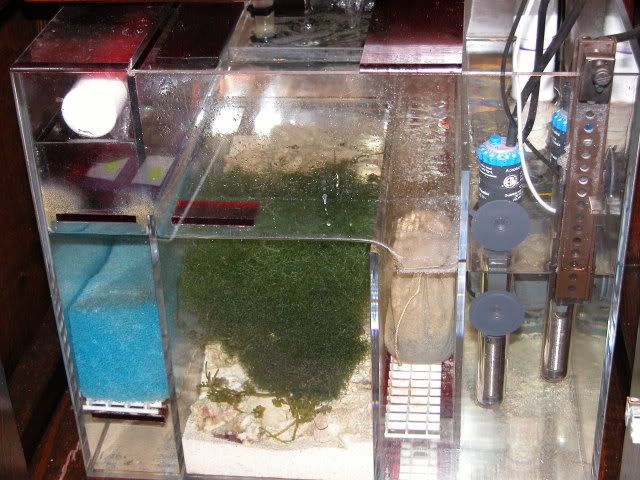 Into the refugium, I added 1.5 - 2" of CaribSea Aragamax Select sand (~5 lb) and some LR from John's sump. I beat the crap out of the rocks with a hammer to make it into rubble, thereby increasing its surface area. I also put in a ball of Chaetomorpha macroalgae, along with some grape Caulerpa. The refugium is lit with the 75W 2700K version of melev's refugium bulb (see p.1 of this thread for details), and the bulb burns 24/7. This brings up my next challenge (MISTAKE), and I'll explain this before completing the tour of my sump/fuge. Since the cabinet shelf was built all the way to the front of the cabinet, and the sump is nearly as tall as the bottom shelf will accomodate, there was no place to hang a light for my refugium macroalgae. There was also no way to access the rest of the sump without removing the top shelf, and that wasn't going to happen often! I had planned on cutting a hole in the shelf and placing the refugium bulb directly over the hole, but it turns out I need the shelf space for my topoff container. I decided to cut off the front third of the entire shelf, which not only provides a place to suspend the light over the fuge, but it also provides at least one hand's worth of access into the remainder of the sump - something that I previously lacked entirely! Here's a view from the front. Notice that I simply hung the fuge light fixture from the handle of my auto-topoff container. 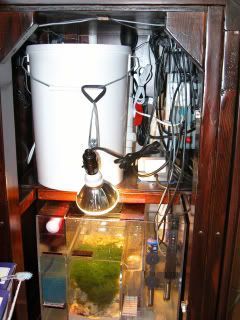 After the refugium compartment, water spills over a baffle and into a small compartment that contains an eggcrate floor. Here I can place frags, filter media, whatever I want. Right now this is where I'm running carbon that I've placed into a filter media bag. From here the water flows beneath another baffle and into the return chamber.
__________________
The Dude abides |
|
#38
11/21/2005, 05:21 PM
|
|||
|
|||
|
In the return chamber I have my two 50W Jager heaters, my auto-topoff sensor and alarm, and my Mag5 return pump. At 5 feet of head height, this pump moves about 250 gal/hr, which is about 6-8x/hr tank volume turnover. Water returns to the rear of the tank, behind the aquascape, via a 1" OmniFlex nozzle, into which I drilled an antisiphon hole (this is KEY to prevent flooding of my sump!!).
Here's a view of the return side of my sump. Notice the small powerhead in the return chamber as well. I put this in there because the water at the top of the return chamber appeared to be somewhat stagnant, so I put this in there just to keep things moving. 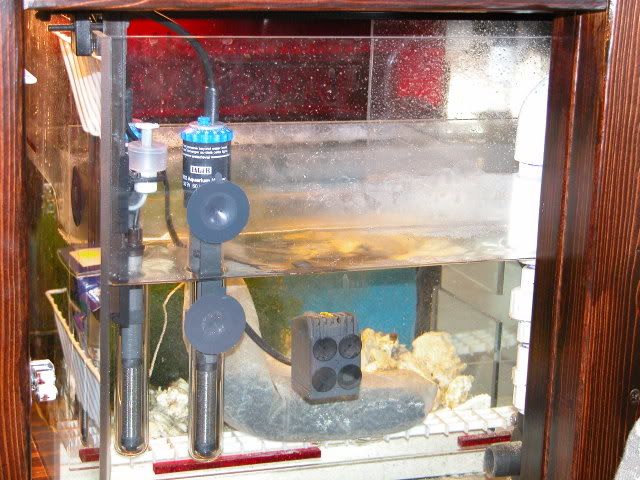 This next image shows the right side (return side) of the sump/fuge, along with the top shelf items so you can get an appreciation of how things are layed out. Three-door cabinet access is a must in this setup! 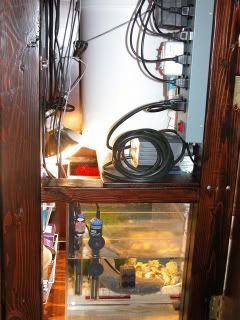 If you're looking really carefully, you can also notice the reflection of some white shelves containing test kits and other dry goods. I mounted these on the inside of the front and side doors for storage. No wasted space! Here's a pic of the top right shelf of my cabinet. 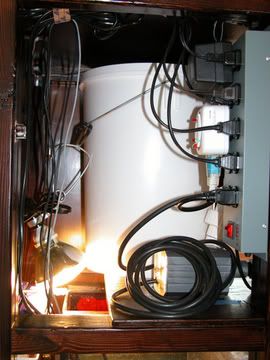 The pump is the Mag12 CL pump with its cord coiled nearby. Notice that the other cords that plug into the powerstrip pass upward to the roof of the cabinet. I did this to keep the wires out of my way when removing the topoff container for refilling. The wires are suspended from the "ceiling" using industrial strength velcro, shown here. 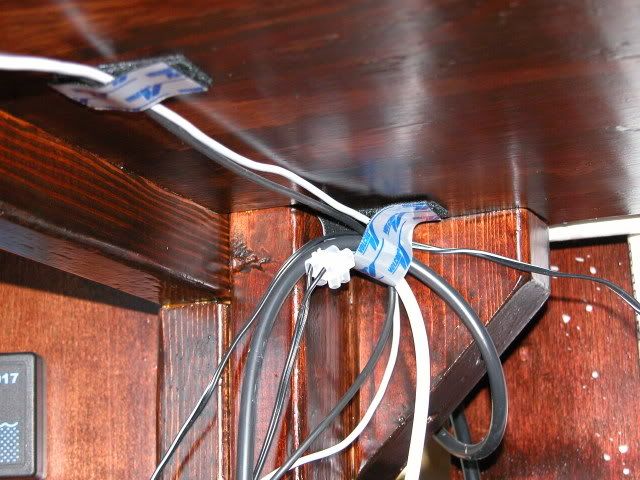 Well that's it for now. I've got a day job, you know
__________________
The Dude abides |
|
#39
11/22/2005, 12:37 PM
|
|||
|
|||
|
Dudester,
This is the most complete "starting up" thread I've come across in my time here in RC. These threads answer so many questions for people like me who are still researching and trying to figure out the 800 different factors that go into a stable, healthy, and accessible reef system. Thanks for spending the time documenting your thought processes so thoroughly. Don't feel like it's just you here. There's probably lots of lurkers following this thread! Keep up the great job. |
|
#40
11/22/2005, 01:47 PM
|
|||
|
|||
|
I scares me to see the light so close to if not touching a plastic bucket full of water... or is it just the way I'm seeing it?
FWIW... I'm reading along! T |
|
#41
11/22/2005, 02:36 PM
|
|||
|
|||
|
techreef and Liquid Hobby - Aww shucks, you guys are the best
 . I'm glad to see this is not just for my own benefit. . I'm glad to see this is not just for my own benefit.Excellent comment about the light being close to the plastic bucket ... you're seeing it correctly. This was a real concern of mine, as well. However, in actuality, this particular bulb puts off very little heat. I am able to rest my hand directly on the bulb for several seconds without ANY discomfort whatsoever. The bulb is actually a couple centimeters away from the bucket; there is no direct contact. When I remove the light fixture and feel the plastic container, there is absolutely no detectable heat there. Even if I err and rest the bulb directly on the bucket for a day, I don't think this would have any consequence.
__________________
The Dude abides |
|
#42
11/22/2005, 05:31 PM
|
|||
|
|||
|
One month after aquascaping my tank, I bought some Ricordea polyps, green with purple edges. I love these.
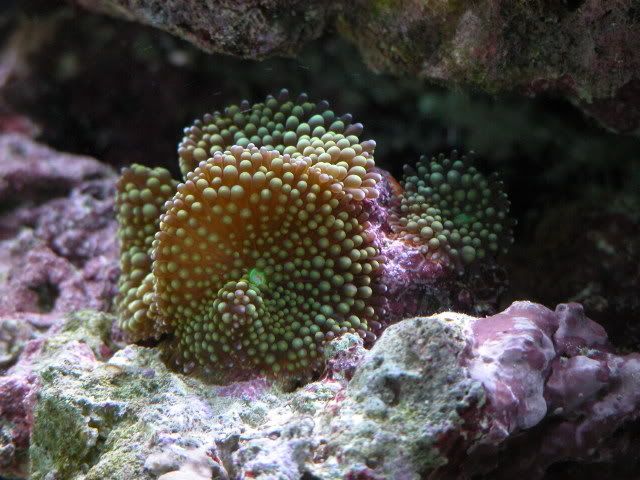 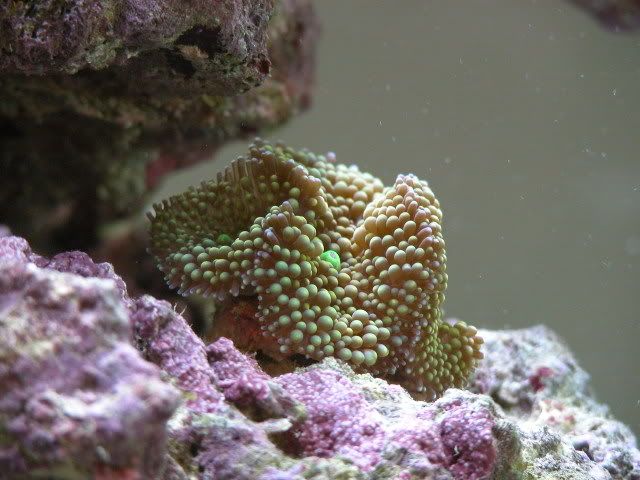 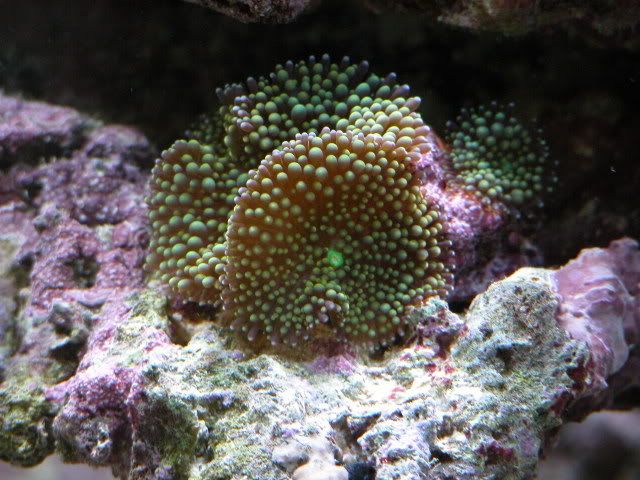 I initially fed them rotifers (LiquidLife Coral Plankton) and mysis shrimp, but now they get what everything else in the tank gets. John, if you're still out there, could you post the recipe for our blended swill? (unless it's proprietary, of course) Since everything seemed to be working well in my tank, and my parameters were stable, I felt ready to acquire a few more corals. This, and my main man John was willing to frag a couple of his LPS for me, since these would be good (not too challenging) to start out with. Here's the Acanthastrea Lordhowensis frag he gave me. It's actually two 1/4 polyps. I glued these to a small piece of LR and placed this right on my sand bed under moderate flow and direct light. 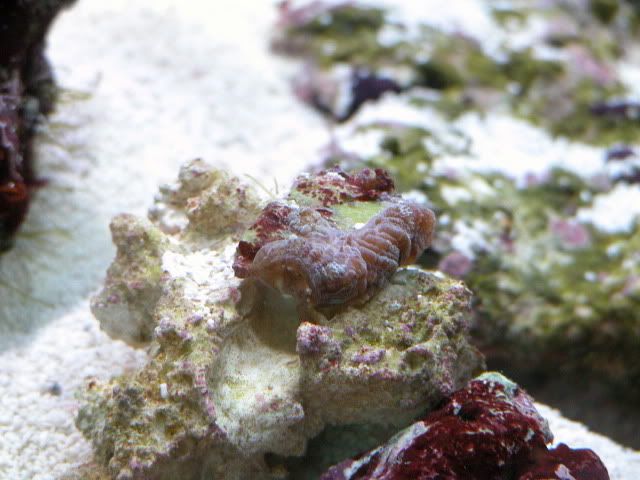 They've done very well there, and in the 6 weeks they've been in my tank, a new and complete polyp has grown. I'll take a pic of this new growth and update the thread. John also gave me a rock full of green zoanthids, and a couple of orange zoos with green mouths. This rock was just sitting in his sump (considered scrap for an experienced reefer, I guess  ). ).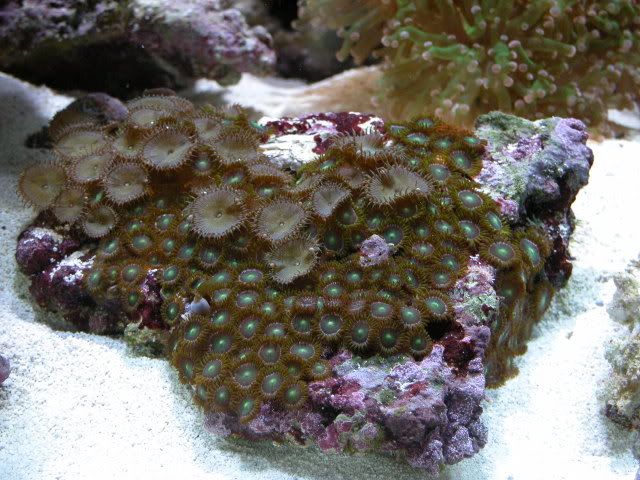 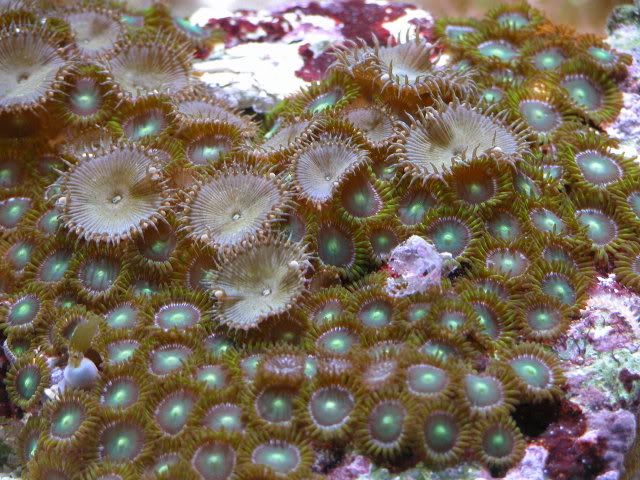 I'm not sure what those larger zoo-looking things are, and I'm not a big fan of them either (not too pretty, IMO). I'd like to get rid of them, so if anyone knows what they are and/or how to eradicate (read "kill") them, please let me know.
__________________
The Dude abides |
|
#43
11/22/2005, 05:33 PM
|
|||
|
|||
|
I also got some pink zoos. I put half on my substrate and the other half I super glued onto my aquascape.
 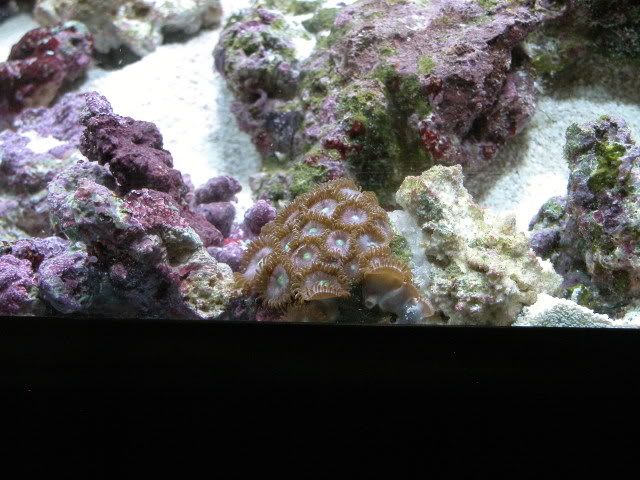 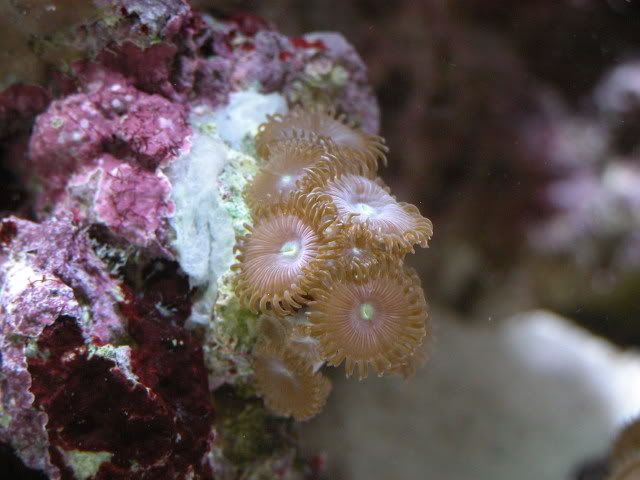 I was reluctant to glue them onto my aquascape since I've read that they can really take off and spread out, potentially crowding out other corals. I only glued a small patch of them down and it's at the front of my tank, so it should be easy to get to if I need to do any "pruning" (read "killing"). The next frag John gave me was a full polyp of Blastomussa wellsei (the dude really hooked me up, didn't he?). This frag was the shiznit, the shizzle ... it was beautiful! I write in past tense since this was the recipient of my next bonehead mistake. A week after introducing it into my tank, I moved the zoo rock around and accidentally placed it right on top of my blasto frag. . The frag didn't appreciate this and lost all of its tissue the following day  I've kept its skeleton in my tank as a constant reminder of my stupidity, and I hope that some day I will be worthy of another frag of this beautiful LPS coral (you gettin' this, John?). I've kept its skeleton in my tank as a constant reminder of my stupidity, and I hope that some day I will be worthy of another frag of this beautiful LPS coral (you gettin' this, John?).We're now at about 6 weeks after aquascaping. My new charges appeared healthy, and I was beginning to see the growth of coralline algae - a few spots on my CL return plumbing, as well as on the back glass of the tank. It deserves mention that I did seed my refugium sandbed with a cup of live sand from my display. That's it for now. My next installment will center around the rise, and fall, of the blackray shrimp goby.
__________________
The Dude abides |
|
#44
11/22/2005, 08:14 PM
|
|||
|
|||
|
The goby installment is going to have to wait ... I feel like posting some pics.
Here's what the tank looked like at this stage of the game, with all of the above livestock included. These are full tank shots from different perspectives. Here's a view from the front 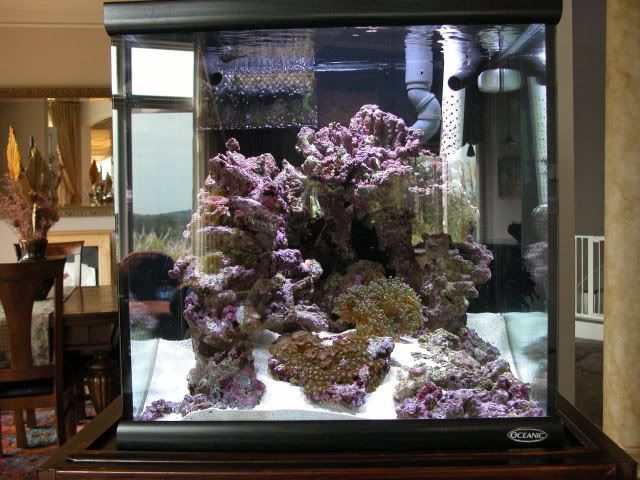 Too many reflections, I know ... I'll work on the photography. For those who don't know, the doohicky at the top left of the tank is the HOB overflow. Here's the right side 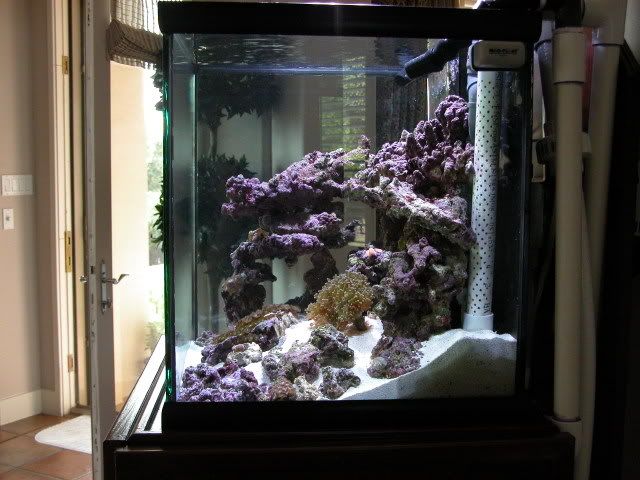 right side, zoomed in a little 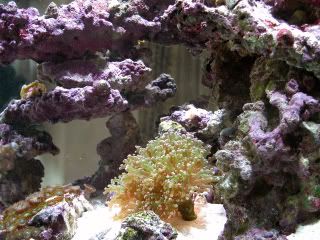 And lastly, the whole shebang from the right side. 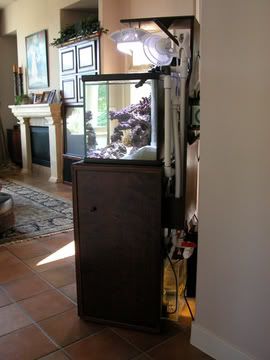 For those of you on pins and needles about the goby, well that'll be next.
__________________
The Dude abides |
|
#45
11/22/2005, 08:38 PM
|
|||
|
|||
|
the larger zoo-looking things i believe are Palythoas. You should be able to just scrape those guys off with a razor blade or something. I was given a frag of a dull blue/green palythoa when i first started my tank and they had started taking over my tank. I just took my toothbrush and razor blade to control 'em off certain rocks I didn't want them on.
__________________
this post has been a paid public service announcement brought to you in part by: dEREK |
|
#46
11/22/2005, 09:54 PM
|
|||
|
|||
|
Quote:
I think I'll run down to Austin tomorrow and hit the fish stores. Bruce |
|
#47
11/23/2005, 09:26 AM
|
|||
|
|||
|
dfiddy - Thanks, I think I'll give that razorblade & toothbrush technique a try. Hmm, palythoa, I'll have to do a search on them now. This rock is at the bottom of my tank, so I guess I'll have to remove the rock entirely and perform the "extraction" in a separate vessel of water. I think this will be necessary because, as you know, when the zoos are removed from the water, they appear as an indistinct gelatinous blob, and it's hard to tell what's what. I don't want to sacrifice many of the more desirable zoanthids. Also, I'd be concerned that if I scrape them off in my display tank, they might take hold somewhere else.
bcoons - Welcome back! I'm sure your visit to the Monterey aquarium was inspiring, to say the least. Make sure you stop in at AA when you come to Austin and look John up.
__________________
The Dude abides |
|
#48
11/23/2005, 04:36 PM
|
|||
|
|||
|
Awesome Pics!!! it really is true that a picture says more than a thousand words...its really unbelievable how much work and connections are involved in your tank-- I just put in my LR on Sat. and am starting my first reef tank-- doing the nitrogen cycle thing right now, and am intrigued by the sump you've installed...
that might be my next step- as for now, I'm waiting for the end of the cycle so I can add interesting corals, not unlike yours, and a few colorful fish Happy Thanksgiving everyone!!! and great thread 
|
|
#50
11/23/2005, 06:03 PM
|
|||
|
|||
|
maloga3 - Good luck with your first reef tank. I think you've done well by joining RC. You will find that people on this site are not only extremely knowledgable, but also incredibly helpful and genuinely concerned about the health of your tank inhabitants. I'm very happy with the sump in that:
my system volume has been increased by more than 30% (improved stability) the heaters and topoff control devices are hidden (improved aesthetics) I have a place for macroalgae (improved nutrient export, pod propagation) to grow safe haven for pods to multipy(a constant foodsource for my tank). The only downside I can see so far is that the noise level with the sump has increased 2-3 fold. I've tweaked the overflow as much as I know how, and I can't seem to make it any quieter. melev - Of course I'm ready for suggestions. Even though this thread has been written essentially in chronological order, there's no reason why we can't readdress something from the past. If there's a problem I'd like to correct or improve upon it immediately. Glad to have you aboard!
__________________
The Dude abides |
|
|


 Linear Mode

