|
|
|
#277
 08/19/2005, 06:00 AM
|
|||
|
|||
|
If I was good with graphics, my website would be so much better. I really need some plumbing graphics drawn up some day, to visually answer questions that come my way frequently.
__________________
Marc Levenson - member of DFWMAS |
|
#278
08/19/2005, 08:20 AM
|
|||
|
|||
|
I might be able to help. I dont have a graphics program but I'm a whiz with powerpoint grahphics and MS paint - check out the drawings in the beginning of this thread.
Anyway, if you want to send me a hand sketch I could easily put something together. Either way, I wont be putting on my cover until the tank's all done so I can wait!
__________________
Bryan |
|
#279
08/21/2005, 12:39 PM
|
|||
|
|||
|
UPDATE! TANK IS IN!
Major update over the weekend...
After arrogantly thinking the tank would be easy to get off the ground and onto the stand b/c it was much easier to move in the house a few weeks ago, I "hired" just one person to come by Thurs nite to help me do it. Not gonna work. We quickly decided the two of us werent getting this thing off the groun d-- much more difficult than sliding it out of the back of my brothers truck a few weeks ago. The problem is picking this thing up directly off of the ground. Anyway, we decided to wait until we had a few more people. On friday night, after sever drinks, we had the guts to try it with one more person, and two ladies standing by for back up. It worked! My wife snapped pictures and, in the middle of it, dropped the camera to help at the very end. THIS THING IS A MONSTER!  Assessing the situation 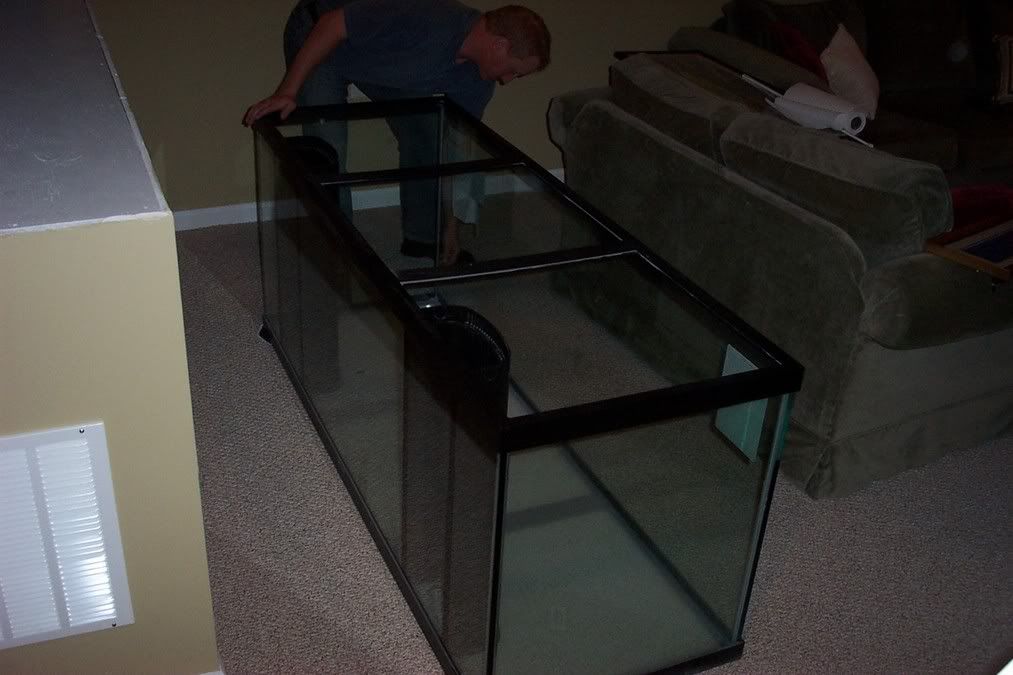 In position, ready....  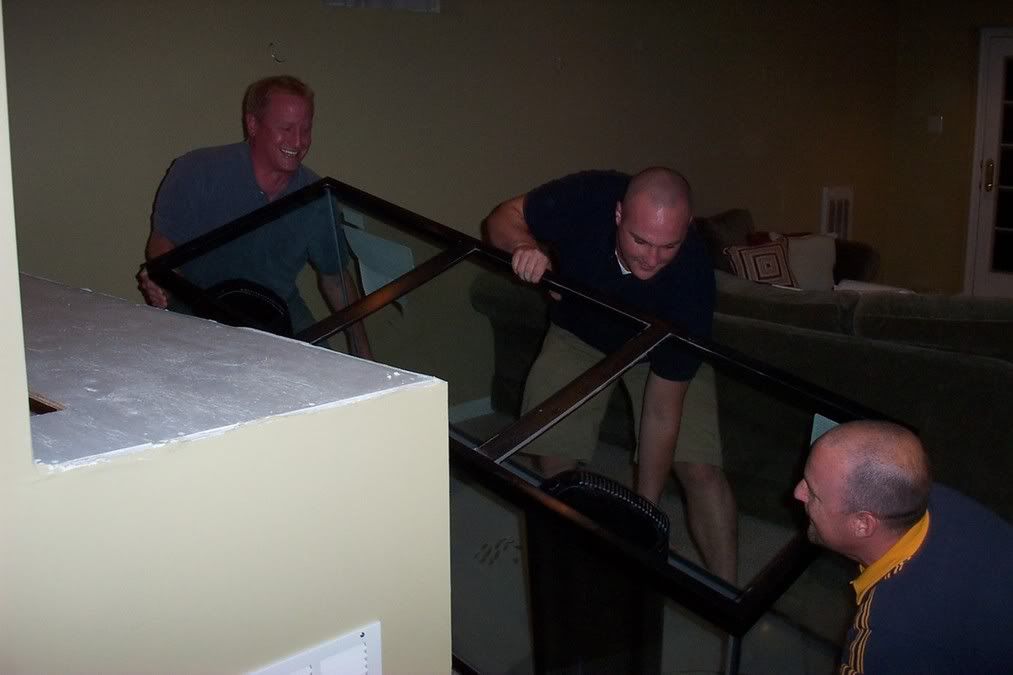 (I immediately fell directly backwards into the wall on the first attempt. I switched positions with my larger brother). UP....UP..... 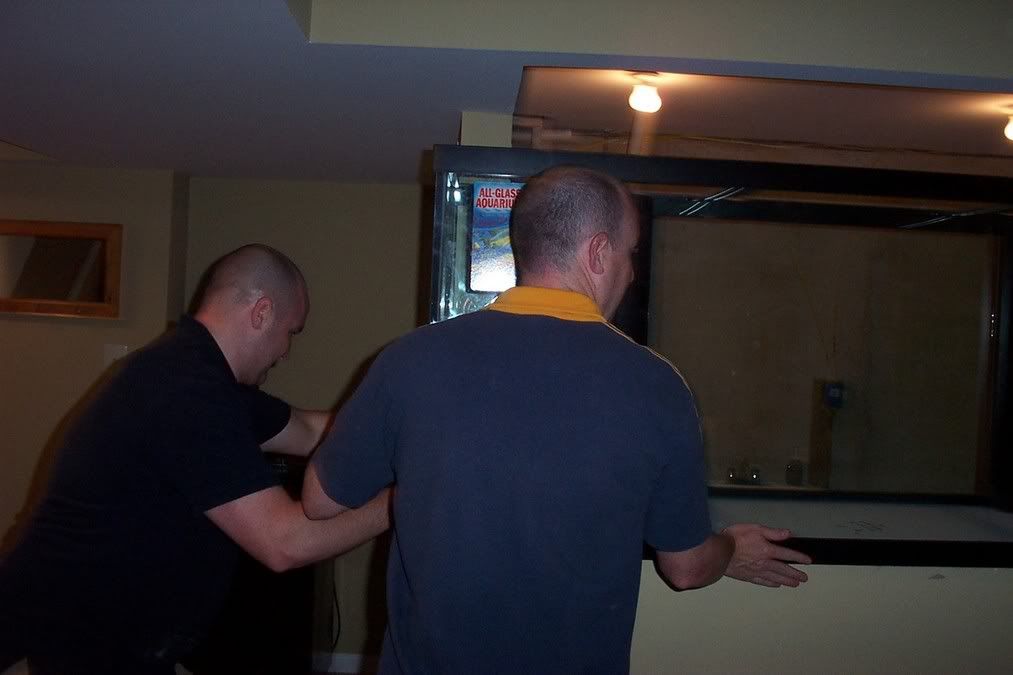 Dont drop.... 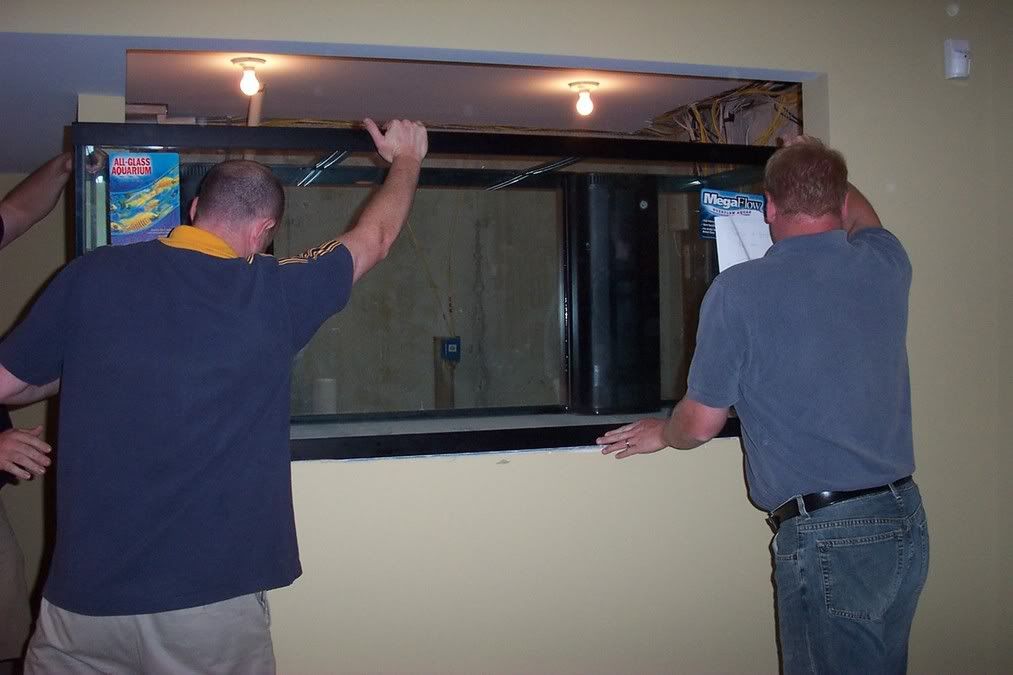 Ahhhhhh. 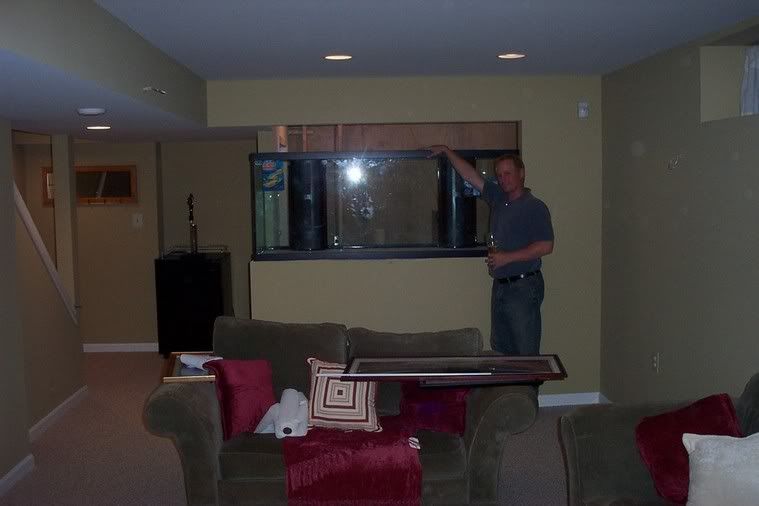 The gentleman left standing is the one person who was there on btoh moves. He deservingly stands proud. From the back 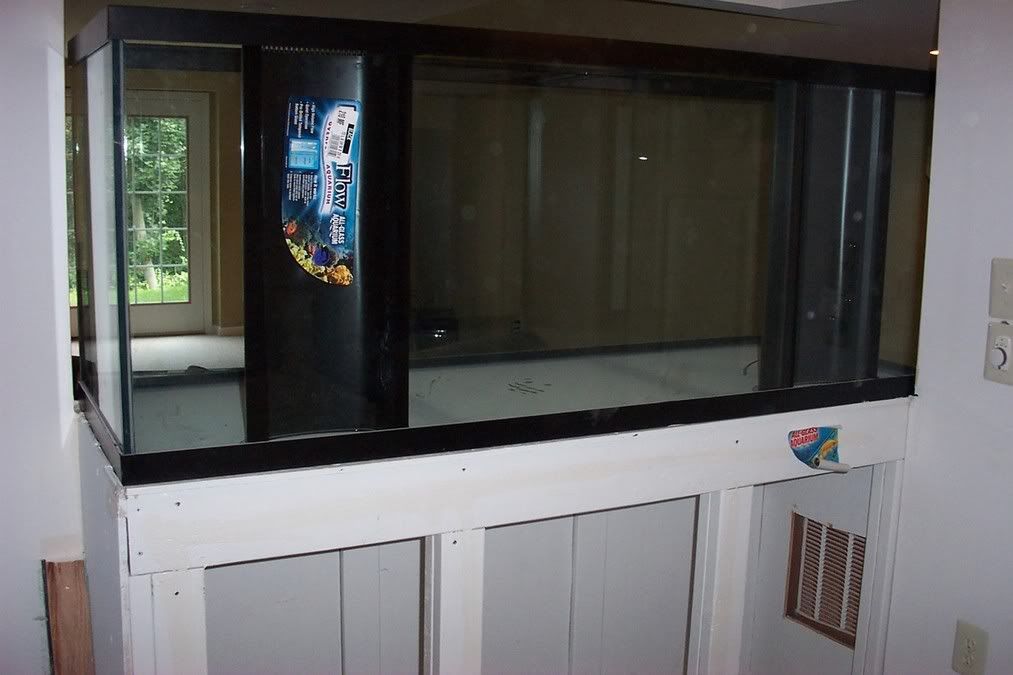 Well, another milestone passed. Its so exciting to see it up and have a better idea what its going to look like! More updates coming soon.
__________________
Bryan |
|
#280
08/21/2005, 01:07 PM
|
|||
|
|||
|
Bryan,
Looking great! That tank is a perfect size for the wall; I think it's going to look really great being viewable from the left side as well.. Definitely a centerpiece in the room! Tyler |
|
#286
08/22/2005, 09:06 AM
|
|||
|
|||
|
Thanks everyone!
tgunn - thanks, it really does stand out more than I thought. melev - "Got any audio clips of the grunting?" - ha! i have the sore back, will that work? Stevenx2, Markk96 - thanks  RBU1 - "It LOOKS GREAT. I am thinkking about doing the same thing in my basement. Do you work for FREE???????? I am sure I could use your Help. BILL" - Thanks so much! Well, my consultation services  are always free here on RC. But I didnt do alot of the handy work. Wish I could do that! Let me know whenever you have ques! are always free here on RC. But I didnt do alot of the handy work. Wish I could do that! Let me know whenever you have ques!Knyght- I thought you would all love the pics! Thanks for everyone's comments. I feel like this is really going to start rolling now. Besides working on freeing up more of the budget, I am going to next put together a checklist of things that need to be done. I'm thinking I'm several weeks away from having saltwater in this baby. But not too long from doing my first wet test. We shall see! Thanks all
__________________
Bryan |
|
#287
08/22/2005, 09:44 AM
|
|||
|
|||
|
Wait a sec, it's page 12 and 4 months later and you only just got the tank on the stand?
 Just kidding ya but I've been subscribed since the beginning and it's been great to follow the progress. As we are digging the footings of our house tomorrow I think I can finally start my own build thread in October.
__________________
Laurence Flynn 340g In-Wall Envision Tank and 150g Sump (fuge and grow-out). |
|
#288
08/22/2005, 10:53 AM
|
|||
|
|||
|
Come on Nextdog, throw me a bone I know youre just kidding. Yea, its taken this long. But so far I can blame most on the contractors! haha. Now its on me to get this moving. .,.. Although I still have to find more $$$ to buy a couple of key items. Thanks! Good luck with yours!
__________________
Bryan |
|
#290
08/22/2005, 01:07 PM
|
|||
|
|||
|
Hey Mark, actually go back one page (11) and you'll see a funky diagram and som discussion in the posts above it. Not really sure but an idea by Melev is leading it up. i want it 1) lo-tech 2) light and easy to remove and 3) hidden from sight as much as possible.
is that too much to ask? check out page 11 and let me know what you think about the idea.
__________________
Bryan |
|
#291
09/01/2005, 04:41 PM
|
|||
|
|||
|
Its been a week and a half -- wish I had more to update
 Since the basement was finished and tank put on stand, I've been burried with other work the past two weeks. Something called "Fantasy Football", in case youre curious (another addiction of mine  ) )Now that thats done, I hope to be able to devote more time. The problem is that the next steps are all BIG ones, I've realized. The end goal is to have my existing livestock, who've been patiently waiting here....  into their new home here.....  So, to help me figure out exactly which one to tackle, I put together this "little" list. Its basically a brian dump of all the little and large details that have been bouncing around in my head lately. Not a final list, but hopefully you can all help me add to it as I go! TO DO: Finish shimming · Use jigsaw to cut custom pieces of 2x4 · Need tape measure · Orâ¦.use quick-crete to mold custom pieces of shim Build Shelves · Sump/QT shelves · Back wall shelves Seal - floor · Rubber baseboard for floor · Silcone sealant in wall and stand gaps Seal â walls and ceiling · Finish walls at ends and around electrical boxes · Paint room with satin finish · Seal any gaps in ceiling · Seal vent area Cook Rock · Move water and lr to 20 gallon holding tank (need to have shelves built first) · Add heater #1, powerhead #1, light and eggcrate cover · Once temp is up, move livestock to 20 gallon · Setup large 55gallon 50% full with SW, heated, powerhead #2 · Fill up 3-15 gallon buckets 50% with SW · Go through process of swishing rocks through 3 buckets, then place in 55g · Cover with powerhead #2 and heater. · Check back in a week · Do weekly 10% (2 gallon) water changes in holding tank Build Sump · Design first and confirm · Clean out 75g · Find glass cutter · Order glass · Purchase silicone and gun Plumbing · Bulkheads â measure: what diameters? · What types of bulkheads? · Design and confirm · Get spaflex · Build overflows and returns (Dursos) · Implement and do a wet run test with hose water (test for copper first!!!) · Fix leaks, test again · Drain and wipe dry Ready to Fill! · Fill with RODI · Start filtration · Put in Tunzes and adjust flow · Heat · Add salt · Circulate Live Rick and Aquscaping · While rock is cooking, order base rock · Cook base rock · Build foundation for rock â PVC, eggcrate, etc · When rock is done cooking: · Insert LR and aquascape · When aquascaping is complete: · Begin Cycle! · Add shrimp and start routine testing! · Add thin layer of southdown · Turn off pumps · Let skimmer run While cycling · Purchase lights · Assemble parts · Assemble pulley system and ballast placement · Assemble front wall cover for tank · Build trim around tank Cycle Complete! Add livestock from 20g holding tank · Add royal gramma first · Add tangs and clown · Wait to add inverts and cleaner crew (need enough to feed them!) GOAL REACHED! Let me know what I've missed
__________________
Bryan |
|
#293
09/01/2005, 04:55 PM
|
|||
|
|||
|
Seal - floor
· Rubber baseboard for floor · Silcone sealant in wall and stand gaps Seal â walls and ceiling · Finish walls at ends and around electrical boxes · Paint room with satin finish · Seal any gaps in ceiling · Seal vent area I didn't do any of these do you think that is a bad thing?
__________________
Lonnie WWLD ------------------------------------------------ Friends don't let friends buy PC lighting. |
|
#294
09/01/2005, 10:05 PM
|
|||
|
|||
|
Melev -
 Where would I fit THAT in? Where would I fit THAT in?Lonnie - "I didn't do any of these do you think that is a bad thing?" - No way. Dont let my overkills, obsessive lists worry you. Mainly, I have those items b/c I'm very concerned about 1) water spills ruining our new basement or 2) evaporation causing mold in the basement. Mold in a house makes a health hazard and a difficult home to sell! Specifically, my intentions were: Seal - floor · Rubber baseboard for floor - I've seen a couple peopple do this already. Durso's tank maybe? I want to prevent large spills from hitting the carpet in the adjacent room. · Silcone sealant in wall and stand gaps - this is to keep evaporation in the room and from getting inside the walls which are wood framed. again, overkill maybe. Seal â walls and ceiling · Finish walls at ends and around electrical boxes - this is one specifically to my setup. As you can see from pics all of my electrical boxes are in the same room as the tank room. I will def need to seal them off. At the same time, as above, seal off where the drywallers left gaps. · Paint room with satin finish [b] - all thats on there is primer. Would like to paint it with a satin type finish like in a bathroom.[\b] · Seal any gaps in ceiling - overkill, but again want to keep evap from inside ceiling joists. thats the first place home inspectors look for mold. · Seal vent area - this is the vent I cut through my tank room to pull air from outside (I know, it will also allow evap to get back out. oh well). Anyway, there's a gap there in my stand so I want to hit that too.. HTH
__________________
Bryan |
|
#295
09/08/2005, 08:31 AM
|
|||
|
|||
|
Sump Plan Update
Hi all, I've updated my plumbing and sump plans and am just about ready to go. Any feedback would be appreciated!
I've done the graphics in stages so you can see the progression, with one "alternate" plan at the end: [b]1) Here's a design of the various tanks: Display, 75g sump, 18g fuge, and 15g holding tank: 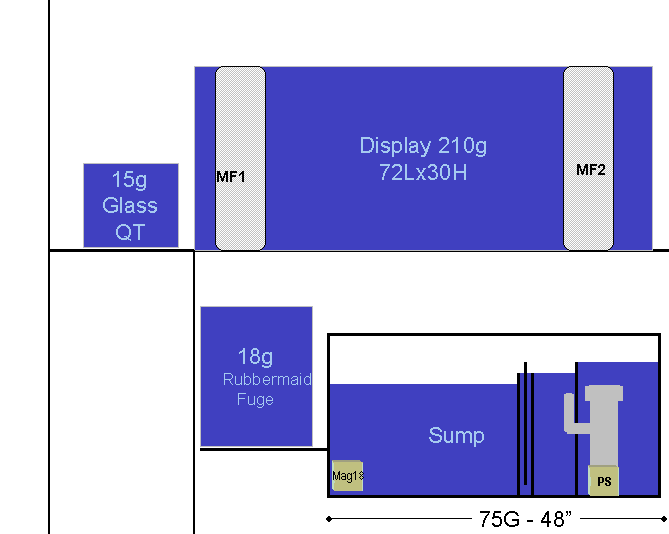 2) Next, the plumbing with the flow "OUT" of the tank: 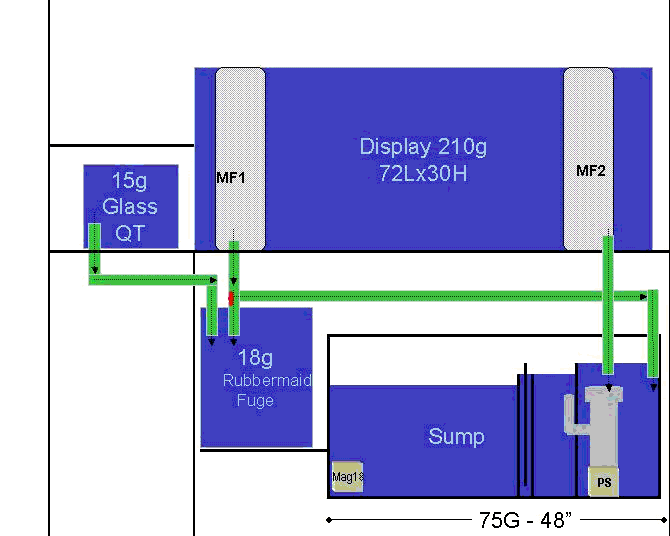 3) Finally, the return plumbing included: 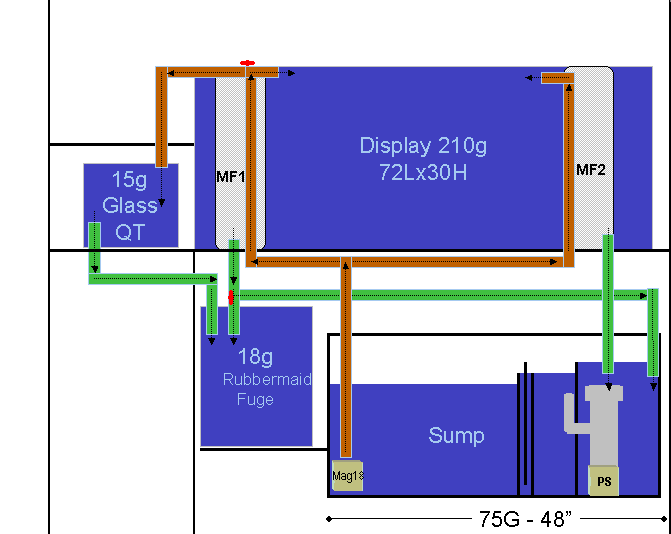 Let me know if you think I missed anything. **Also, an alternative plan. The above has my (2) return lines form the Sump up through the drilled holes in the display. I was thinking, in an effort to reduce head, to come up with this alternative design (note the return from the mag 18): 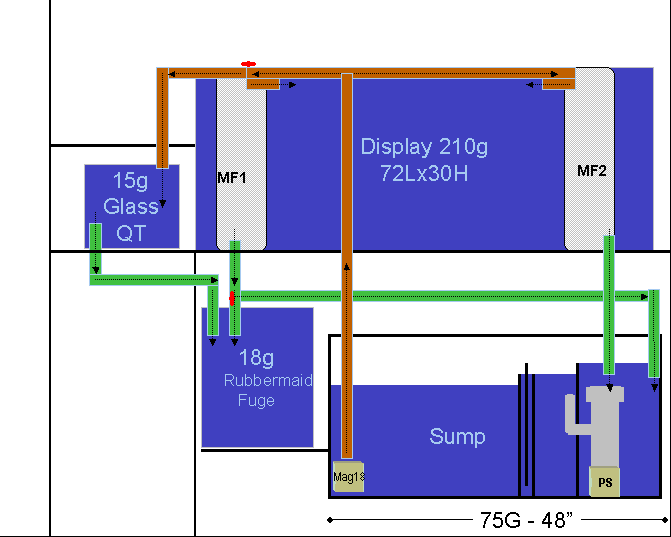 In this alternate design I have one, main return from the mag 18 all the way up to the top of the tank, and then split it off there to the two returns -- rather than split it beneath the tank and having two 30" heads. The benefit is that I save 30" of head. The drawback is that the returns dont run through the drilled holes, but rather up the outside of the display, and then along the top of the tank, like a spraybar. If saving 30" of head is worth it, I have no problem running the line outside the tank and then poping the sprays up top. Thoughts??
__________________
Bryan |
|
#296
09/08/2005, 11:13 AM
|
|||
|
|||
|
I didn't return my lines through the overflow.. I would save the holes for you could later on increase the flow to the sump if needed. Like your last picture. This will also let you move the return pipe where ever you want it.
If you do it like you last picture, you might want to "T" the return pipe under the tank, and run two lines up the corners of the tank, so you do not have a pipe running across the back of the tank. It might be in your way there, trying to work from the back of the tank.
__________________
Lonnie WWLD ------------------------------------------------ Friends don't let friends buy PC lighting. |
|
#297
09/08/2005, 12:28 PM
|
|||
|
|||
|
Bryan - If I understand your layout correctly, your 15g QT (Quarantine?) tank wouldn't be a true quarantine because it is open to the main tank effluent and return.
-Doug |
|
#298
09/08/2005, 12:53 PM
|
|||
|
|||
|
Quote:
Also keeping live rock in the QT tank will allow Pods and such to grow so when adding new fish they will have a live food source to help feed them.
__________________
Lonnie WWLD ------------------------------------------------ Friends don't let friends buy PC lighting. |
|
#299
09/08/2005, 05:16 PM
|
|||
|
|||
|
Lonnie - thats great to hear that you do that already. I didnt think about the extra option for more outflow by leaving that open. I just may do that.
Also, the reason I wanted to do it in the first place was so preserve pressure by reducing "head". If I combine the two returns into one while it goes up the back of the tank, and then split it at the top, I think I'll save 30" of head. Right? But, to your point, maybe I'll run it up the corner so its not sticking out right in the middle of the back of the tank. Doug - yep, youre exactly right on that. I should be clear - this is really just a Holding-QT. And, also, Lonnie is right too. I will have a seperate, true, QT on the other side of the room - a 20 gallon tank. But, I want to use this 15 gallon for exactly what Lonnie suggested. I'm hoping to use it as a "secondary" or "interim" QT. Once I properly QT a fish in the standalone 20gallon for 6 weeks (mainly for ICH) I will then transfer it to the 15 gallon. There I'll be able to monitor it better than just dropping it into the 210 to hide and be harassed by other fish. I can also spend plenty of time "fattening" it up so that its as healthy as possible when it gets released into the rest of the community. Also, like Lonnie said, I'll keep LR in there for Pods as well as some Chaeto. And, if need be, I will be able to shut it off from circulation from the rest of the tank. I'll have my backup heater in there just in case power goes out. Thanks so much for the feedback! Any others?
__________________
Bryan |
|
#300
09/08/2005, 05:21 PM
|
|||
|
|||
|
I don't know if I would want to QT the fish in two different tanks. Because that means you have to move the fish twice causing more stress on the fish. I'm not saying I'm Right on this, It just my thought.
__________________
Lonnie WWLD ------------------------------------------------ Friends don't let friends buy PC lighting. |
|
|


 Linear Mode

