|
|
|
|||||||
|
|
Thread Tools | Search this Thread | Display Modes |
|
#1
 11/14/2005, 05:24 PM
|
|||
|
|||
|
Step-by-step account of my first reef (with lots of pics)
 This is where I am at the start of this thread, so if this interests you at all, please read along and contribute. I've had water in my first reef tank for just over 3 months now, so I thought I'd share what I've done to date. I took a lot of pictures along the way, and thought that this could be helpful to others who may be beginner reefers like myself. I also hope that some of the more experienced folks climb aboard as well and help me with future acquisitions, modifications, upgrades, etc. This has been extremely exciting for me. My goal was to start out with a large (200-300 gallon) tank and skip the more common scheme of beginning with a smaller tank and working one's way up in size. In that light, I began reading feverishly about 2 years ago and the only money I spent was on a Premium Membership here at RC and in purchasing a library worth of books. My books include: The Conscientious Marine Aquarist (Fenner) - this book I read twice, an excellent read and a must for new aquarists, IMO. The New Marine Aquarium (Paletta) - another excellent read and contains a good cookbook style account of how to get started. Ultimate Marine Aquariums (Paletta) - great book with jaw-dropping photos and detailed information regarding the inner workings of some beautiful and diverse set-ups; very similar to browsing the Tanks of the Month here on RC. Reef Invertebrates - An Essential Guide to Selection, Care and Compatibility (Calfo & Fenner) - great reference as I considered my clean-up crew purchases. Invertebrates, A Quick Reference Guide (Sprung) - same comments as for the previous book. The Reef Aquarium, Volume I (Delbeek & Sprung) - decent reference, a little outdated but I like history so it was interesting to read. The Modern Coral Reef Aquarium (Fossa & Nilsen) - another good reference, again outdated but with with good information. Corals, A Quick Reference Guide (Sprung) - I tried to read this page by page before I ever knew anthing about corals and before I could recognize anything other than an open brain coral; I don't recommend this. Now that I know more, however, this has been a nice reference, particularly when figuring out where to place corals in the tank. Aquarium Corals - Selection, Husbandry, and Natural History (Borneman) - awesome book, only got this recently and wish I had it a year ago; packed with outstanding information and has really helped me to decide what I want for my tank. Corals of the World (Veron) - this 3 volume tome is incredible, ask for it for your birthday! Marine Fishes (Michael) - one page or less per fish, what else could you want to get started? Clownfishes (Wilkerson) - if you want clownfish, you should at least check this book out. Giant Clams (Knop) - haven't read this yet but I have a love affair with clams and once I feel my tank is ready for one, I'll break this book out. My plans for a large tank were stalled due to the fact that, well, let's just say It'll be a couple more years before I go huge. Until then, this is what I was able to talk my wife into getting. Oh, by the way, I have to say that I wouldn't have gotten anywhere in this hobby without you good people here on Reef Central. I don't know how many threads I started "way back when" getting info on how to start a reef tank. I actually went back and looked at my early threads and it's quite humbling to see how little I knew. I also need to acknowledge my good friend and reefing mentor John "thedude15810" here on RC, who has helped me nearly every step of the way.
__________________
The Dude abides |
|
#2
11/14/2005, 05:27 PM
|
|||
|
|||
|
Hey Duderino ... Nice House! ... oh and tank too, love the tank!

|
|
#3
11/14/2005, 06:14 PM
|
|||
|
|||
|
philosophy and equipment
Being a scuba diver, I wanted to have a tank that was as natural-appearing as possible. First of all, that meant a sand substrate. I appreciate the benefits of a bare-bottom tank but just can't stand the look of them. No offense to all you BB folks out there, it's strictly a personal opinion. I also didn't want powerheads in the tank. My goal is to have a mixed reef with softies, LPS, SPS, clams, and an anenome. Of course I'm going to go quite slowly and I have no intention of keeping SPS, clams or anenomes for quite some time. If it means having a powerhead of some sort in the tank for increased circulation, then I guess I'll fold - it'll be worth it to have SPS. I also wanted to ensure that there would be plenty of swimming room for my fish. I understand the constraints of my small tank and intend to provide the most hospitable environment possible for the creatures I've chosen to care for.
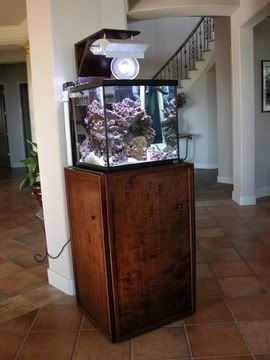
Tank 30 gallon Oceanic cube, used Stand custom-built, DIY 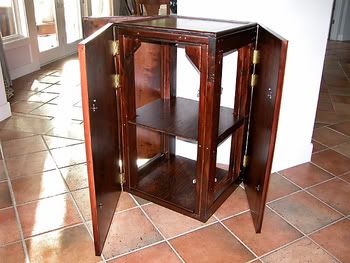 I'll make a separate post detailing the construction. Filtration 30 pounds cured Tonga branch and plate live rock Remora HOB protein skimmer (used) Chaetomorpha and grape Caulerpa macroalgae in refugium Carbon runs 24/7 in sump 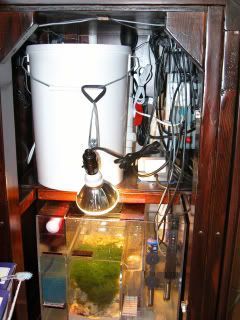 Substrate 20 pounds CaribSea Aragamax Select sand and 20 pounds CaribSea AragAlive sand Circulation Closed loop plumbed into SCWD, plumbing increased to 1" diameter, powered by Mag12 pump at 3 and 1/2 feet head height, approximately 1100 gallons/hour. Mag5 sump return pump at 5 feet head height, plumbing increased to 1" diameter, returning to tank via OceansMotion 1" OmniFlex nozzle, approximately 250 gallons/hour. In actuality, the SCWD reduces flow significantly, so I would guess that my tank circulation totals approximately 1000 gallons/hour. At 30 gallons, this is more than 30x/hour turnover. Lighting AquaMedic 250W DE MH pendant with 15K XM bulb Photoperiod = 10 hours (on at 12:30, off at 10:30) so that I can enjoy the tank in the evenings before going to bed. Refugium light is illuminated 24/7. It's the 2700K version of the bulb featured in Melev's thread http://archive.reefcentral.com/forum...hreadid=599175 Temperature Control Living in Texas, it's pretty hot! Nevertheless, I have 2 50W Jager heaters in my sump, since we like to keep the house cool. Heat is still a problem, and I have a 7" fan on a timer. The fan turns on and off along with my MH light, and during the light it turns on and at about 1 and 1/2 hour intervals. This took some fiddling but now keeps my tank between 79.6 - 81 degrees. 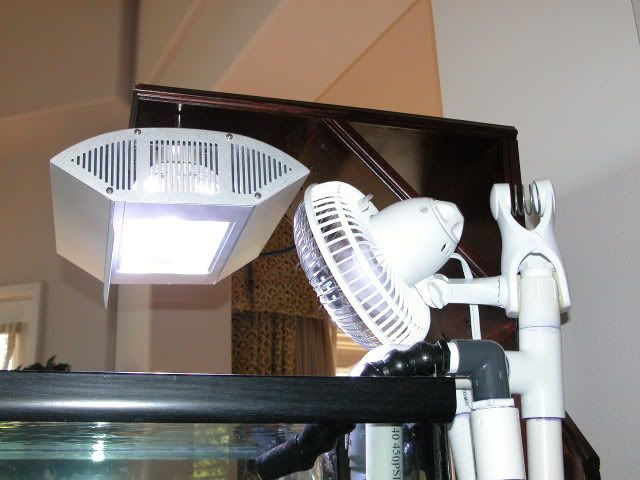 Top-off I'm using the Tunze Osmolator with Kalk reactor for top-off. My water is RO/DI (more details on this to follow). Sump/Refugium Acrylic and custom-made by Trigger Systems (www.triggersys.com). What an awesome job, and a pleasure to work with. I highly recommend them. The sump/fuge holds about 13 gallons of water, making my total system volume at around 43 gallons. Water drains out of my tank via a CPR-90 HOB overflow, and as mentioned, returns to the tank via a Mag5 pump. This return is directed behind the rock work to eliminate this potential low flow region. 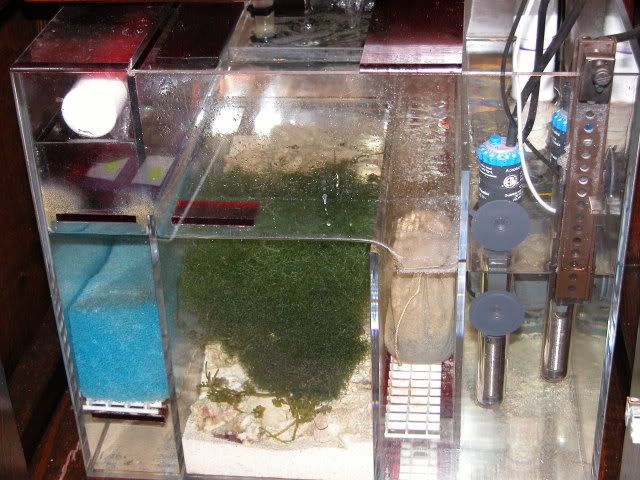 Additives Currently I done ESV B-Ionic. My calcium is still not where I want it, and I'm titrating up the volume of the B-ionic. Current tank parameters I'm using a refractometer for salinity, and all test kits are Salifert. My salt is Instant Ocean Temp 79.6-81.0 S.G. 1.026 pH ~8.4 Ca 380 kH/alk 8.3/2.97 NO3 0 NH3 <0.25 Quarantine tank 20 gallon long with AquaClear 50 HOB filter, MaxiJet 900 for circulation, and 50W Hydor heater. I'm also using a SeaChem ammonia badge.
__________________
The Dude abides |
|
#4
11/14/2005, 06:20 PM
|
|||
|
|||
|
That ought to get things started. I intend to document all of the steps for my system, so I'll fill in the gaps as I go. Of course, if there are questions or comments, please chime in.
Glad you like the house, I mean tank, chocolateblnt. Can I change my name to Duderino?
__________________
The Dude abides |
|
#6
11/14/2005, 07:26 PM
|
|||
|
|||
|
Sorry, I was too busy admiring your flooring. Nice tile work!! I'm sure I'll get around to looking at your tank some day!!.
__________________
The irony of 2007 is a disgustingly fat multi-millionaire trying to tell me I need to cut back on my consumption. |
|
#10
11/14/2005, 10:52 PM
|
|||
|
|||
|
stand construction
old salty, focus my friend, focus ... we're here to discuss tanks. I guess I need to crop my photos more.
KRP and Ugly-one , thanks for the compliments and hope you continue to tag along. smp, why do you assume I'm not a golfer? Before I got my tank, and of course before my daughter was born, golf was my passion. You must be quite intuitive, as it has slid by the wayside. datman422 - ask and you shall receive ... OK, on to my stand. Considering the fact that I wanted a sump, refugium, and auto-topoff system, and everything had to be concealed, I quickly realized that the Oceanic stand that accompanies the tank would not be sufficient. I also wanted the stand to be able to shield much of the noise created by the pumps and water flow. My wife demanded that the setup be attractive, and while I would have been quite happy with a giant rubbermaid tub sitting beside my tank, that would have been a disaster for my relationship. I must say that she's been extremely supportive of my new hobby, but littering the living room with a bunch of equipment was not to be included in the plans. The height of the stand was determined by 2 main factors. First, I wanted it to be comfortable to view while sitting and standing. Second, on the inside I wanted two levels, one to hold the sump/fuge and the other to hold my auto-topoff reservoir and closed loop pump. Initially I wanted to model my stand after sonofgaladriel http://archive.reefcentral.com/forum...hreadid=565476 In his thread, I believe he mentioned that he was a beginning carpenter, and that his entire stand took him about 18 hours to build. If that's the case, then my hat's off to you, because it took me more than 2 weeks to make mine, and it's not half as nice as his! I quickly realized that I had neither the skill nor the tools to duplicate his stand, particularly the finish work, so I kind of improvised the whole thing. This was my first real carpentry project, and I actually had to purchase a lot of tools in order to construct it. I bought a mitre saw, a circular saw, two drills (I highly recommend this, since changing bits really slows momentum), an electric sander, and a host of other smaller tools. My father was visiting me from out of town, and I wouldn't have been able to do it without his help. The frame is made of 2x4's. These were fastened together with sheet metal screws (3", if I remember correctly). In this image it's upside down, with the inside top on the floor. The corners were braced with additional wedges of 2x4, drilled both horizontally and vertically for support. 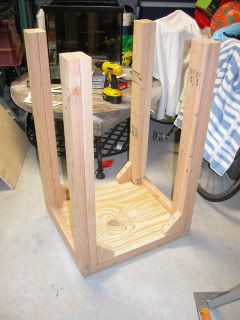 Here's a close-up of what I mean. 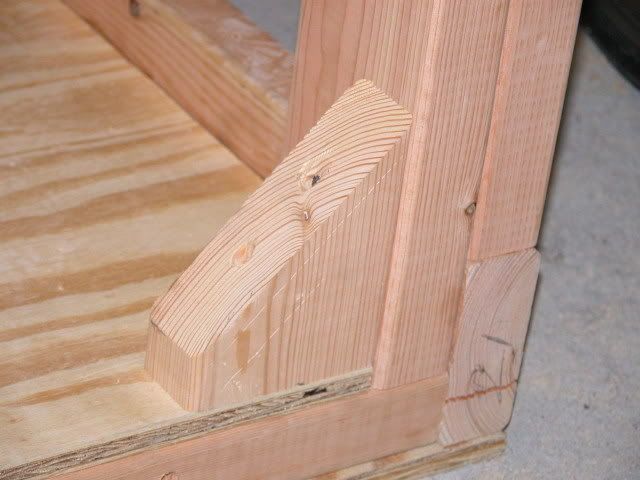 The top of the stand is 3/4" plywood, nothing special. You'll also notice that I doubled-up the 2x4's along the four vertical legs for increased strength. 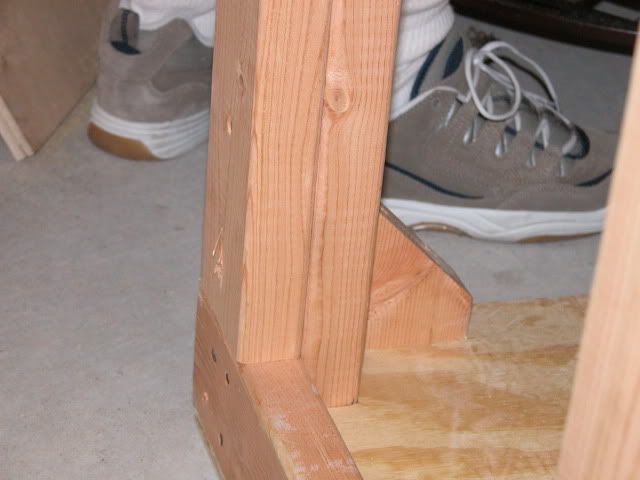 Here's the nearly completed frame. 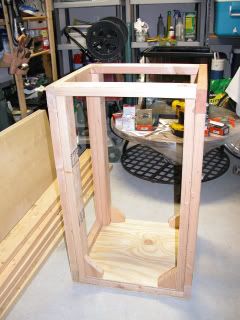 And here you can see how many screws were used to hold this thing together. Overkill ... maybe ... better safe than sorry. 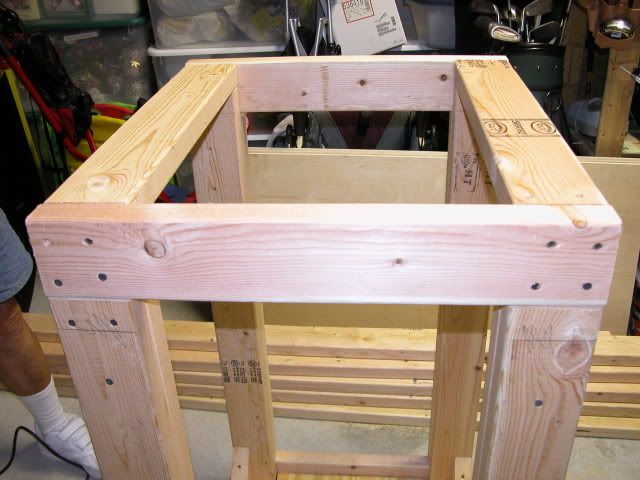
__________________
The Dude abides |
|
#11
11/14/2005, 11:15 PM
|
|||
|
|||
|
Here's where my attention to photography waned a bit. I went from what you see above to the finished product without any more pics (I know, I'm dodging the rocks and garbage), but I think I can describe it with some accuracy. The top shelf needed to accomodate my auto-topoff reservoir, which in my case is the container that comes with the Tunze Osmolator. I measured it's height and lined the frame with 2x4's around the perimeter. The shelf is a piece of 3/4" plywood that I cut to fit so that it overlapped the 2x4's on all four sides. In this way it is removable if ever necessary. Good thing I did that, since I modified this shelf later on (I'll get to that eventually). The bottom of this shelf was supported with an additional 2x4 drilled into it right down the middle to prevent bowing. I cut a similar piece of plywood for the bottom, which is where the sump/fuge would rest.
This picture shows the shelves best (sorry, I know this is a repeat). As you can see, I also wanted 3 door access. Each door was secured with three hinges. Again, overkill I know, but they're rock solid and they won't fall off, even if my daughter hangs on them. I now regret not having more room to work on the tank/stand in the back, but that has to be my sacrifice in order to keep it in our living room. The back of the stand was left completely open for access, but it's against a column (well, about 18" away from the column) and it's a cramped space in which to work. Here's another view of the stand with the doors open 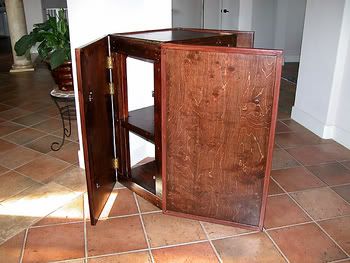 and here it is with all doors closed. 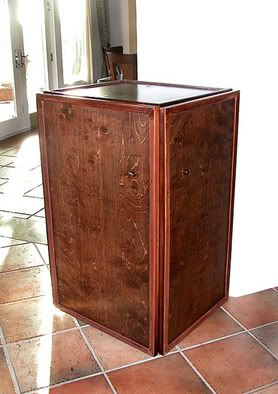 The doors are 3/4" birch plywood. I love the grain of this wood. The entire top and door edges were lined with trim that was secured to the wood with brads. These were countersunk and the small holes were filled with plastic wood. Handles and closing latches were then installed. The entire stand was then stained, then sealed with 3 coats of polyurethane. I loved the color of the birch wood after it was stained, and the grain really came out. I wanted the stand to be nice enough to be in our living room, but clearly I did not want it to be the focal point.
__________________
The Dude abides |
|
#12
11/14/2005, 11:38 PM
|
|||
|
|||
|
Looks nice! I'm also a newbie to salt water. I'm just one month into my first SW tank, a 20 gal long. So far, so good. I have four small fish, three shrimp, two hermit crabs, and an anemone that so far are doing OK.
I'm just up north of you a bit, near Fort Hood. Nearest SW LFS for me are in Austin. I've been going to AquaTek on Burnett and Austin Aquariums over near Northcross mall. Any other good places in Austin I should check out? Keep the pics and details coming. I'm here to learn. Last edited by bcoons; 11/15/2005 at 12:04 AM. |
|
#13
11/15/2005, 12:41 AM
|
|||
|
|||
|
Checked my email and found an interesting thread
 . .First off I'd like to say that Mike (Dudester) did a TON of research before getting his feet wet (literally). This helped immensely in the planning stage and in the operational stages in general. After thinking about it for awhile, we decided that this would be the best course of action to prepare him for a truly monster system and I would recommend the same to anyone. If you're diligent enough to keep a nano going, chances are, you're going to have a much easier time taking care of a big tank. Hmmm what else to add... Mike has a pair of clowns right now acclimating and for those of you local following, perculas have not been coming in well recently so please stop ordering them for awhile. I've learned as I've taught and the tank looks fantastic Mike! PS Bcoons: Anytime you're in Austin Tues-Fri come by Austin Aquariums, I'll be there. |
|
#14
11/15/2005, 11:42 AM
|
|||
|
|||
|
bcoons - Glad to have you along. In my opinion, you've visited the best LFS's here in Austin already. I'm sure you've noticed that they both have their advantages over the other, it depends on what you're looking for. Lately I've been going to AA more than AquaTek, since "thedude" works there. Incidentally, he was not a LFS employee when we first started working on my system, so his help is totally motivated by creating a healthy and stable tank, not making a sale. I'm amazed to read that you have an anemone and all of that livestock in a 1-month old tank. Good luck with that! I don't plan on having an anemone for at least another 6-8 months or so. If they die, they can contaminate your small system in a heartbeat (I've seen it happen to other peoples' tanks). Keep a very close eye on that guy, and keep us posted on how it's doing. It seems like your clean-up crew is a little sparse, you may need to buff that up a bit once the algae blooms erupt.
John (thedude15810) - thanks for the compliment, means a lot coming from you. Make sure you keep up with this thread and help me to fill in the gaps if I've gotten lazy.
__________________
The Dude abides |
|
#15
11/15/2005, 12:27 PM
|
|||
|
|||
|
closed loop and leak test
I mentioned that my tank was used. It came completely covered in coralline algae, and although it was beautiful, I wanted to start out brand new and grow my own coralline. I therefore cleaned out the tank thoroughly with a razor blade and a vinegar solution until it was spotless. The tank then sat dormant for about a month before ever putting anything into it.
The next step (while my stand was drying) was to plumb the closed loop to my SCWD. I basically followed the procedure outlined by melev since I have an undrilled tank. http://www.melevsreef.com/closedloop.html I created this with only a few modifications. First, I added a union and ball valve to the pump intake, and I T'd this off to a separate horizontal segment with a ball valve to facilitate draining the closed loop. Actually, I think Marc mentions this on his website as well. 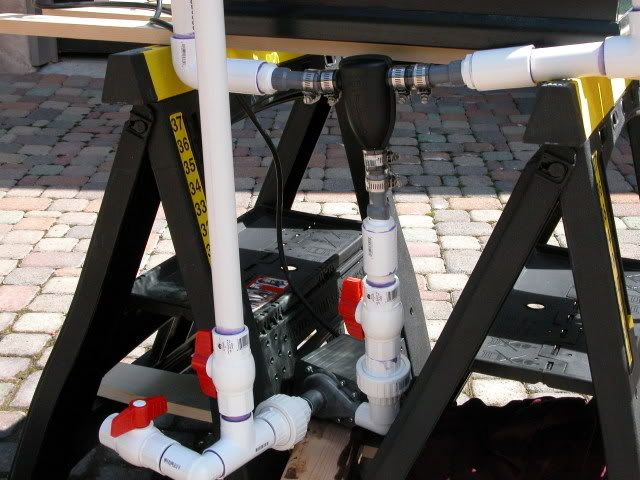 I'm so glad I did this, because I had problems with leaks from my first SCWD and I had to assemble and disassemble it too numerous times to count. Having that side port for drainage directly into a bucket meant that my floor stayed dry and my wife stayed happy. In retrospect, I wish I had angled the drainage port downward instead of horizontally so that the water would drain better (duh). If you look in the photo, you'll notice that the ball valve at the end of the horizontal drainage port is the only thing keeping the water in the system. I was worried that my daughter or some curious guest would crank that ball valve some day and flood my house. I therefore capped this off with a threaded cap (similar to the one at the top of the closed loop that's used for priming) for extra security. Incidentally, I had never connected 2 pieces of PVC prior to this project, and John was immensely helpful. Only cost me a few beers, if I recall correctly  . .The next modification was that I drilled about 5 times the number of holes in my return PVC pipe (the one that sits in the tank) as melev recommended. I did this because I wanted to distribute the amount of suction per hole more broadly, in the hopes that no critters would get sucked up against pipe. In this picture, you can see just how many holes I drilled into the PVC. The photo was focusing on the peppermint shrimp, but you get the idea - the entire pipe was drilled with this distribution of holes. 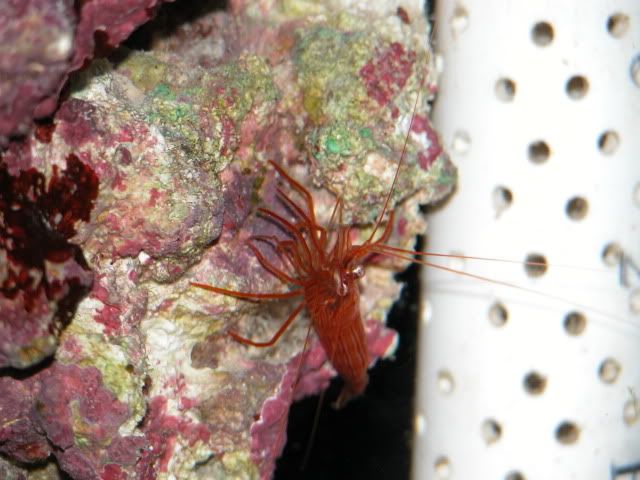 The pump I chose for my closed loop is a Mag12. I selected this for several reasons. First, I was told that it's relatively quiet. Second, I like the fact that there are only a few moving parts, and to me, less moving parts means less potential problems. Third, that's what melev used, so I knew it was good enough for me. The Mag12 is kind of big (powerful), but I also knew that the SCWD would rob my system of a lot of flow, so I figured bigger is better in this case. Here you can see a broader view of the closed loop plumbing as it ascends over the top of the tank. I used 1" PVC for the majority of the plumbing, but had to decrease the diameter for my 3/4" Locline fittings that return the water to the tank. My plan is to eventually replace these with 1" Oceans Motion OmniFlex nozzles, when I need more flow for SPS.  I screwed a couple of "eye" hooks onto the back of my stand, and used wire between these hooks and around the SCWD to suspend it's weight - works like a charm. The next thing was to do a leak test. I placed the tank and CL on some saw horses and filled'er up with water. 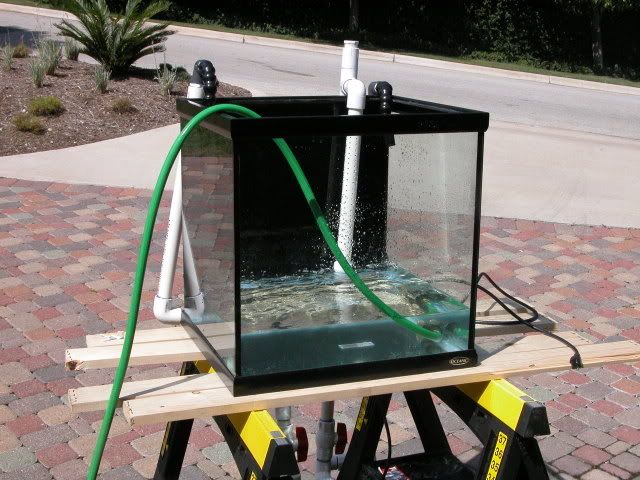 Once it was full I fired up the pump. I was thrilled that none of my PVC connections had any leaks whatsoever. In this image you can see the Locline passing over the tank, and the left side of the SCWD returning the water with the right side dormant. I intentionally suspended the Locline above the water for this photo so that you could see bubbles indicating the flow. 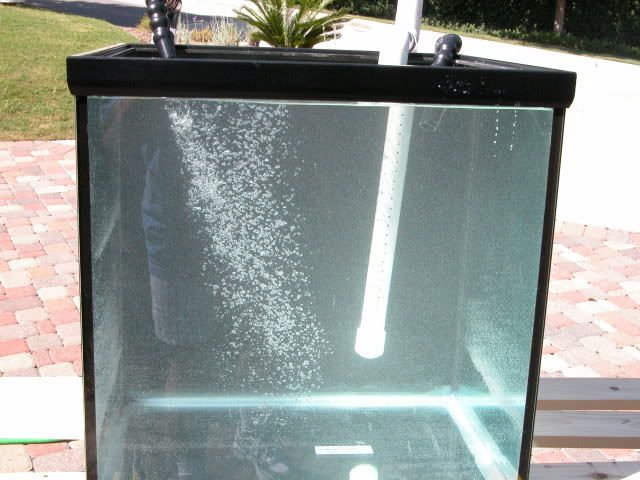 Also notice that in this photo there aren't as many holes drilled into the return PVC as I ultimately have - this was done later. Fortunately, this return segment is not hard plumbed to the system so it was easy to remove, drill, and replace. I mentioned above that there was a leak from my SCWD. During my leak test, I noticed this but thought it was very small and inconsequential. BAD IDEA. For any newbies out there, any leak is unacceptable! If I would have fixed it before moving the tank into my house, the repair would have been much less difficult and certainly much less stressful. I ultimately had to have the unit replaced, and the manufacturers were extremely helpful in that regard.
__________________
The Dude abides |
|
#16
11/15/2005, 01:03 PM
|
|||
|
|||
|
Quote:
The tank I've had up for a month is a 20 gal long. I've got 20lb of pre-cured live rock from AquaTek. Also 20 lb of Arag-alive sand. It went through a very small ammonia cycle. Filtration is an AquaClear 110 HOB that I had lying around (much too big, but gives a lot of flow), a CPR BakPak 2R (that doesn't seem to be doing much) and two small powerheads for circulation. Lighting is an AGA Versatop with the dual light strip, one 10000K light and one actinic. I added the fish over several weekends. 1 Ocellaris clown 1 Green Chromis 1 Purple Chromis (that's what the LFS called it, I think it may be a basslet) 1 Royal Gramma Plus: 2 camel shrimp 1 peppermint shrimp 2 tiny red hermit crabs 1 Anemone (RBTA, I think) All seem to be doing well. They're all eating. I am checking water params every day. Temp 79-81F Salinity (s.g.) 1.023 pH 8.2 dKH 10 ammonia & nitrites 0.0 Nitrates 10 ppm. (which concerns me) Haven't had an algae outbreak yet. I'm tagging along here and look forward to seeing your continued posts. Let me see if I can figure out how to post a pic. 
|
|
#18
11/15/2005, 03:51 PM
|
|||
|
|||
|
fill'er up time
bcoons - that's a beautiful anemone, sure looks healthy in that pic and hope it stays that way. With the lighting you described, I think it's only a matter of time before your algae blooms come along. I actually waited until my predictable blooms came then were controlled by my clean-up crew before adding my first fish, but your system looks good from what I can tell.
We had some electrical work done at the house and, in preparation for the electrician's arrival, I totalled all of the predicted wattage for my system. The biggest power user is, of course, my light at 250W. Anyway, the electrician determined that one outlet could easily handle the power requirements of my system, so I had him install a GFCI outlet into the column where my powerstrip would connect. I had already purchased a plug-in GFCI but wasn't comfortable with this, since it can't handle all that much power and I was afraid it would inadvertently fall out of the wall socket. I currently don't have any power back-up plan, but fortunately there aren't a lot of hurricaines, snow storms or tornados here in central Texas. Our longest power outage that I can remember was about 2 hours, so I do plan to get a battery-powered air pump that will turn on whenever power is interrupted. That way I can at least oxygenate the tank. Once I had the completed stand in my house and in its final resting place, I put the tank on that sucker and filled it with RO/DI water. The water is made via an AquaFX 5-stage Mako system. http://www.aquariumwaterfilters.com/...product_id,39/ It contains a 1-micron sediment filter, a carbon block, a DOW membrane (50 gallons/day), and 2 color indicating DI cartridges. The unit came with an aluminum mounting bracket, and I mounted this on the wall over my utility sink. I'll have to get a picture of this to post). I also got a 40 gallon water storage tank to have RO/DI water available at all times. Since I keep this in my garage, it's pretty warm and I don't heat it (at least until winter comes along). It's not perfectly convenient in that I have to carry 5-gallon buckets of water around, but I can deal with that. I collect the waste water that's made and we use it to keep the pool full, or to water the plants (I hate to waste water). In the tank was a MaxiJet powerhead for extra circulation, a 50W heater, digital thermometer, and the closed loop was installed with the pump resting on the top shelf of my cabinet. All of the plumbing exits the rear of the cabinet and is, for the most part, hidden from sight (at least when looking from the front). I aged and aerated the saltwater in the tank since it was not going to be populated with living creatures for a while. This was my next mistake. It's almost too embarrasing to mention, but I'll do it anyway. Afterall, this is a full-disclosure thread. The instructions on the IO container clearly mention using 1/2 cup of salt per gallon of water. Well, in my excitement of actually having water in my tank, I began adding salt at a rate of 2 cups salt per gallon of water. I had a 160 gallon bucket of IO and after emptying half of the bucket into my tank, I finally realized that this bucket would not make 160 gallons of saltwater ... unless ... OH NO! What did I just do? Well, fortunately I had an empty 20 gallon trash can in the garage for saltwater storage, so I siphoned most of the hypersaline water out of my tank and stored it in the garage. Of course this was at midnight and I had to get up in 5 hours, but hey, there have been several more nights since then when I got less sleep. I added more RO/DI water to the tank until the salinity was 1.026. When I subsequently needed more saltwater, I just used some of my hypersaline water, diluted it with RO/DI and was good to go. I let it run like this for 9 days, allowing the saltwater to aerate and warm up to 80 degres, before doing anything else. Still no lights, substrate, rocks, critters or anything.
__________________
The Dude abides |
|
#19
11/15/2005, 04:15 PM
|
|||
|
|||
|
aquascaping
After 10 days, here were my tank parameters:
temp 79.9 S.G 1.027 pH ~8.2 Ca 410 kH/alk 7/2.52 NO3 0 I know, the salinity was a little high, but I hadn't yet installed my auto-topoff unit. I added small pieces of cured LR from John's tank to seed my tank with some beneficial bacteria. I also added some RO/DI to get my salinity down to 1.025. The next day, I added 20 lb, of CaribSea Aragamax Select sand and 20 lb. of CaribSea AragAlive sand. I also installed my Remora protein skimmer, which I hung on the side of the tank (as a temporary measure until my sump arrived). Four days after adding the sand and allowing the sandstorm to die down, I added the cured live rock. This was 30 pounds of beautiful, coralline-encrusted Tonga branch and plate LR. The aquascaping and rock selection was done with the help of John. I'm glad he was there because, with his experience, we were able to put together a look that was open for the fish, provided tons of tunnels and caves, and yet had plenty of space for mounting corals. Additionally, there is space on the sandbed for putting clams, large softies, and species that I don't want to spread all over my aquascape (like 'shrooms and zoos). The powerhead was mounted on the rear of the left side and blew behind the aquascape to eliminate this as a dead area. Here's how it looked from the front. 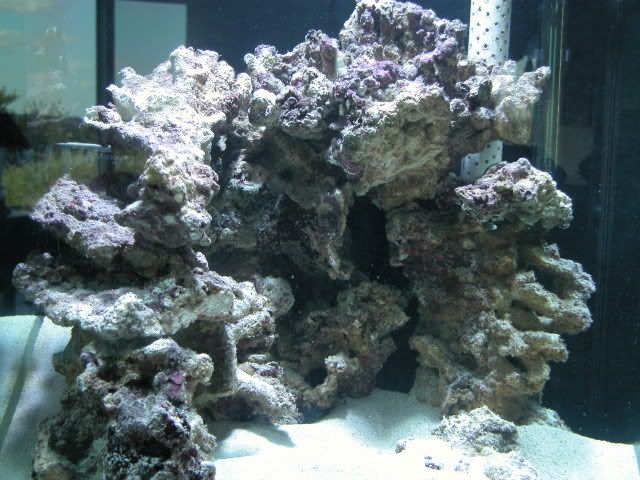 And here it is from the right side. In this image you can see all of the extra holes I drilled into the CL return pipe. 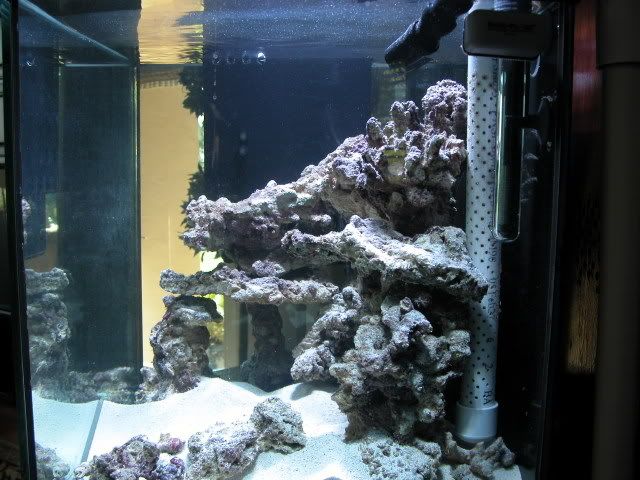 I have not changed my aquascape from day 1, and I'm very happy with it. That's not to say that it didn't change itself, however. On the front left you can see a piece of plate rock sitting on top of 2 towers. That structure crumbled a few times, but I've redone it in such a way that it feels pretty solid. I toyed with the idea of using zip ties or epoxy, but ultimately I've decided to leave it alone and see what happens. I might live to regret this decision. On this day I also installed my Tunze Osmolator topoff device and began dripping kalkwasser using the Tunze kalk reactor. I simply taped the infrared sensor onto the back/inside of my tank with duct tape until my sump arrived.
__________________
The Dude abides |
|
#20
11/15/2005, 09:26 PM
|
|||
|
|||
|
Nice looking little thread you've got going here
.BCoons - Not to hijack Mike's thread but that is a condylactus anemone, not a RBTA. I only have one confirmed case of a clown actually hosting in one but hey, it's still a chance right? Also if you plan on keeping corals yank those Camel shrimp pronto. They are most definitely coral eaters and not safe for any size reef tank let alone a 20 gallon one. And now I remember how good our aquascaping looked! |
|
#21
11/15/2005, 11:07 PM
|
|||
|
|||
|
Quote:
 ) )I'll remember about those shrimp. They'll have to go if/when I get some corals. I usually get down to Austin on Saturdays, but I may be coming down the Wed before Thanksgiving. If so I'll look you up at the store. Dudester, - I really like your writing style and pics. Very enjoyable reading. I love all these setup and tank diary threads. I learn so much by going through them and seeing the design process play out. Gives me tons of ideas. If you're interested in back up power for the tank I may be able to give you some ideas. I do solar power for my ham radio station, and I have a battery backup system for my tank's life support in case of power outages. Also have two generators to back that up. I guess the best way not to have long power outages is to have the gear to be ready for them. Murphy will then go elsewhere!  Regards, Bruce |
|
#22
11/16/2005, 03:39 PM
|
|||
|
|||
|
Bruce, glad you don't consider this boring or tedious reading. By the lack of input/questions/comments from others, I'd guess you may be the only one who doesn't mind reading it
 . Oh well, I'm documenting all of this to potentially help others like yourself, and hopefully to get help from some experienced reefers out there. Once I finish documenting how I got where I am today, I'll start hammering the board, so to speak, with questions of my own. That's when I'll really need others' help. Thanks for your input regarding battery backup - I'd love to get some specific information from you. The only absolutely necessary factor is that in order to work with my system, it has to be small, since it will have to fit either on the top shelf of my cabinet or behind the cabinet on the floor. I should measure those dimensions and let you know ... . Oh well, I'm documenting all of this to potentially help others like yourself, and hopefully to get help from some experienced reefers out there. Once I finish documenting how I got where I am today, I'll start hammering the board, so to speak, with questions of my own. That's when I'll really need others' help. Thanks for your input regarding battery backup - I'd love to get some specific information from you. The only absolutely necessary factor is that in order to work with my system, it has to be small, since it will have to fit either on the top shelf of my cabinet or behind the cabinet on the floor. I should measure those dimensions and let you know ...OK, I just measured, and there's absolutely no room inside my cabinet or on the floor behind the stand. If I want a battery backup unit of any kind, I'll have to build a shelf onto the back of my light rack. There's enough space behind it to accomodate something that's no longer than 12" and no deeper than 6". Anything come to mind in that size? If so, I'd be happy to build the addition. My wife swore that I'd never use the tools that I bought to make the cabinet again - this way I can prove her wrong! Speaking of my light rack ...
__________________
The Dude abides |
|
#23
11/16/2005, 04:59 PM
|
|||
|
|||
|
light rack construction
The next step for this project was to provide some light. It wasn't essential up to this point to have any additional light other than ambient room light, so there was no hurry except that this would determine when I could begin stocking the joint. I had purchased my AquaMedic 250W MH pendant long before I ever put any water in the tank and before I knew where it would be situated in my home (FYI - BAD IDEA). This was one of the only choices I made without sufficient planning. I chose this since this is the light John uses and I really like his setup. Additionally, it was on sale at www.helolights.com. Also, I liked the idea of a single bulb for my small system. Being a diver and favoring a slightly bluish tint, I selected a 15K XM bulb. There were several challenges to using this MH pendant. First and foremost this pendant is supposed to be hung from the ceiling. I didn't realize that my system would be sitting in front of a column with a ceiling that is probably 30 feet high, so therefore I could not suspend it as recommended in the instructions. I considered building a shelf off of the column behind my tank from which to hang the pendant, but the column is angled (not a flat surface). The angle and the fact that the shelf would have to protrude several feet off of the column meant an extremely difficult construction project as well as a visually unappealing product. I then had a revelation and decided to build the light rack so that it would be attached to the back of the cabinet, then ascend above and project toward the front of the tank. The added bonus is that there's no shelf built into the column behind the tank, meaning less holes to fill if/when the system is taken down. When will that occur? -- when I'm ready to build my monster system. Anyway, back to the light rack - here's how I did it.
I got some more of the 3/4" birch plywood at Home Depot. Again, I wanted the rack to be only minimally visible, and it needed to be secured onto the cabinet. I therefore cut the main vertical piece in the shape of a trapezoid so that it would be tapered behind the tank and therefore, less conspicuous. The lower half of the rack was fashioned as wide as the cabinet so that it could be secured to the cabinet. The height was determined by the fact that I wanted the pendant about 8" off of the water surface. 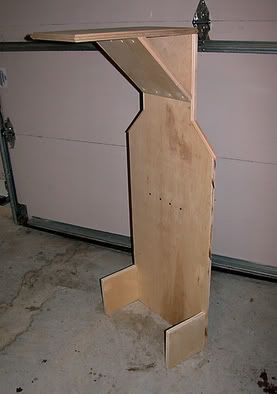 The horizontal piece at the top projects from back to front over the center of the tank, and that is where I mounted my light. A separate piece of plywood was cut with 45 degree angles and this served as a brace to support the light pendant. Remember this picture from before? Sorry, I know the rack is finished here, but this shows how I mounted the pendant to the rack. The pendant came with some hardware to hang it from the ceiling. I simply drilled 2 holes into the top of the rack (where it would be centered over the tank), disassembled the hardware, then threaded some wire between the two mounting screws and over the top of my rack, and voala, there I had it! Quite simple, actually. The wire is not visible in the above image, nor is it visible when viewing my tank. In the photo you can see one of the mounting screws over the pendant. The wire passes through this screw, through a hole in the wood, over the top (horozontally) and down the hole on the other side and into the other mounting screw. The next step was to build a shelf for my light ballast. I didn't want the ballast inside the cabinet due to concerns for heat accumulation, so I placed it behind the light rack. This is just a simple shelf that I extended onto the back of the light rack. I cut it so that it would fit my ballast exactly, and nothing further. I wish I had made it a little bigger, in order to store things on, but I can always add that modification at a later date. 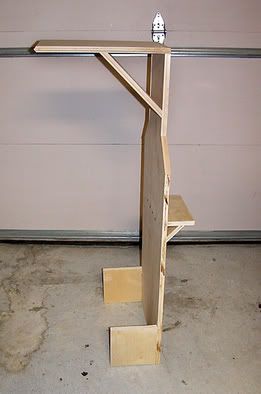 And here it is, completed. Ignore the plumbing, I'll get to that later. The devices on top of the ballast are an Aqualifter air pump and prefilter for my HOB overflow. I should also mention that I drilled numerous holes in the vertical piece of the rack where the ballast sits, in order to provide ventilation. Sorry, don't have a picture of this, but see if you can imagine multiple round holes in the wood behind the ballast ... there you go. 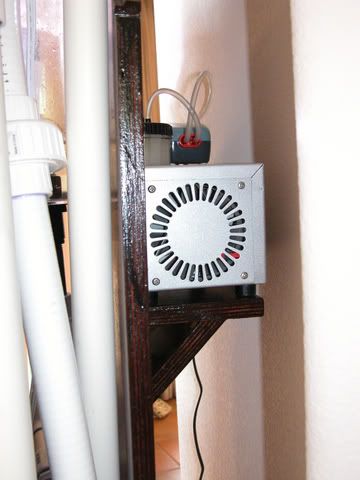 Now I had to provide a way to secure the rack to my cabinet. I used two more pieces of 3/4" plywood that were tall and wide enough to provide several sites to drill into the side 2x4's of my cabinet frame (in the back). These are illustrated here. 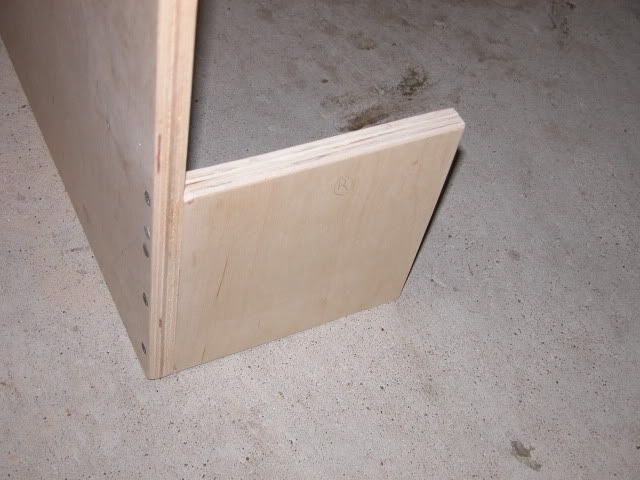 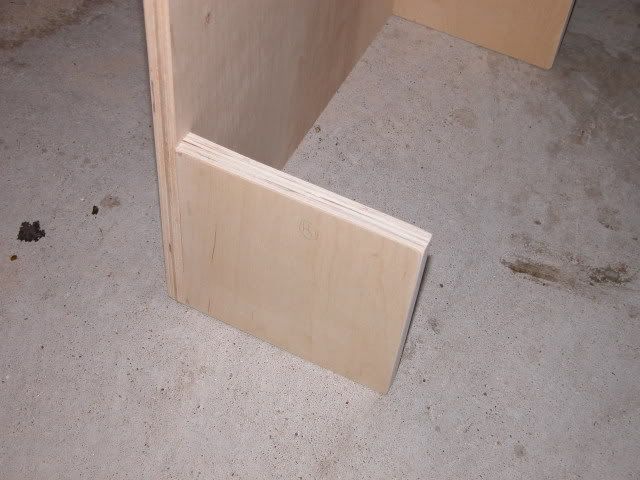 What I'm not showing is that I was nervous that these wouldn't be able to handle the weight of my ballast and pendant. I therefore added additional pieces of wood to the right angle joints and screwed these into both the back of the rack and the side "legs," know what I mean? Here's a view of the bottom of the finished product looking from the left and behind the cabinet (ignore the sump and skimmer, I'll get to those later). The legs are drilled into the inside of the back sides of the cabinet with 3" screws and no wood glue, since I wanted to be able to remove this. This will be essential when I need to do maintenance on my SCWD (recommended every 6 months for cleaning), since I can't get to it with the light rack mounted.  The added benefit of this light rack is that it conceals a lot of the plumbing from the rear of the tank. This is less convenient for me when I need to work behind the tank, but those will be rare occasions (hopefully) and, as I mentioned, aesthetics were of primary importance. The last few steps were to add some trim to the visible portions of the light rack to conceal the end grain of the plywood. This was added to the entire top surface as well as the upper half of the rack. Once applied, the rack was stained, sealed with polyurethane (3 coats, of course), then mounted onto the cabinet. Oh yeah, almost forgot, I also had to make some holes in the upper brace and at the rear of the rack for my pendant electrical cord. This was a bit of a cluster @#%&. I used a drill and made multiple holes in the wood, then chopped out the intervening segments of wood until I had a hole. I then used a file to smooth out the holes. This doesn't look good but fortunately it's pretty well hidden by the light pendant. You can see the electrical cord passing through the rack in the photo below. I later learned that there's a thing called a hole saw that attaches to a drill and makes a perfect hole ... brilliant! Wish I knew about this before. Oh well, overall I am very happy with how this turned out. 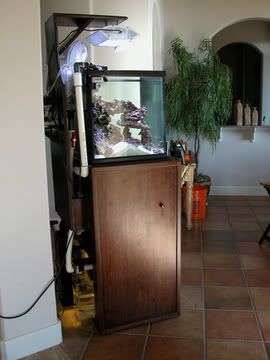
__________________
The Dude abides |
|
#24
11/16/2005, 05:01 PM
|
|||
|
|||
|
Whoops, sorry, I meant to say "www.hellolights.com"
(there are two of the letter "l") Now if someone could be so kind as to tell me how to use a highlighted descriptive word or phrase instead of using the entire web address or link address, I could tidy up this thread a little more.
__________________
The Dude abides |
|
#25
11/16/2005, 05:53 PM
|
|||
|
|||
|
Tank looks great!
I think you did a real nice job on the stand. I like the fact the doors hide the 2x4 construction. The light stand is very creative and looks very nice. I think the whole tank looks good where you placed it in the house. Can tou tell us about the auto-topoff system? I t looks like what I want to do on my 90 ga tank.
__________________
Some of its magic, some of its tragic but I had a good life all the way |
|
|


 Linear Mode

