|
|
|
|||||||
|
|
Thread Tools | Search this Thread | Display Modes |
|
#51
 08/24/2006, 06:09 PM
|
|||
|
|||
|
Great thread Travis...
I've done alot of siliconing in my day and I've found that it is worth the effort to tape both sides of the silicone,smooth out w/a wet finger then remove the tape. Makes for very clean lines.
__________________
its all about time,space,and money |
|
#52
08/25/2006, 08:14 AM
|
|||
|
|||
|
Yes, I should have suggested that and thank you for bringing it up. I've just had past horrible experiences trying to do it that way. Boy what a mess!
__________________
Travis Stevens |
|
#54
08/26/2006, 11:25 AM
|
|||
|
|||
|
Travis,
How does one determine the height of the return hole you drilled inside the overflow? T |
|
#55
08/26/2006, 12:59 PM
|
|||
|
|||
|
Paul,
The first tanks I remember where steel framed and held together with Litharge-glycerol cement. I wonder how SW fish and inverts would do with a tank loaded with lead oxide?  Six-line, I was born after Archimedes so we already knew how to screw water up. 
__________________
"Leading the information hungry reefer down the road to starvation" Tom |
|
#56
08/26/2006, 04:29 PM
|
|||
|
|||
|
great thread, love the pvc for the overflow, have been thinking of a nano to go with my 180 and this is the inspiration that I need
|
|
#59
08/27/2006, 08:41 AM
|
|||
|
|||
|
Hey UrbanSage. I know that I got my Fusion paint from Wally World (WalMart) but I'm almost positive that any and all home improvement stores carry it as well.
Adam
__________________
"I spent 90% of my money on women and drink. The rest I wasted" - George Best |
|
#60
08/27/2006, 09:05 AM
|
|||
|
|||
|
instead of paying 32 bucks for that 6" PVC here is an alternative for only a few bucks
http://archive.reefcentral.com/forum...hreadid=894704 good thread |
|
#61
08/28/2006, 08:37 AM
|
|||
|
|||
|
I'm back from my non-work weekend so I can post. I'll have a couple pictures posted up soon of what I did during the weekend
Quote:
Quote:
 FWIW, I was able to pick it up at my local WalMart FWIW, I was able to pick it up at my local WalMartQuote:
__________________
Travis Stevens |
|
#62
08/28/2006, 08:50 AM
|
|||
|
|||
|
Non-work related weekend ehh? Sounds like a weekend full of messing around with the tank, doing meaningless chores, and drinking a couple cold ones if that's your thing
 We are awaiting updates and pics with baited breath.... Adam |
|
#63
08/28/2006, 09:06 AM
|
|||
|
|||
|
Step 3: Building a Stand and Canopy
Now here comes the fun part. This is something that I'm not very good at yet. So, most of the hands and body parts that you see in the next few pictures are that of nIx_tank. He knows wood; I know water. First, we took a trip to Lowe's and made some decisions on what wood to buy for our stand and canopy. We decided to go with 2x2's for the legs and 1x4's for the frames. It seems like it would be weak, but for a 10g tank, there wouldn't be more than 150lbs on the stand in the first place. Heck, that's about 1.5+ of me I didn't get pictures, nor did I get prices. I'll do that later. But I do know that I spent $29 and some cents and I got the following:A - (2) 2"x2"x8' Pine (~$3.00) B - (2) 1"x4"x8' Pine (~$3.50) C - (1) 1"x8"x4' Pine (~$4.00) D - (1) Box of 2" Coarse Drywall Screws (~$4.00) E - (1) 1.75"x1.75"x10' 90º Trim (~$11.00) I'm sure that either I'm missing something, or I have the prices wrong. I know tht the 90º Trim was $10.??. It was the most expensive piece. I still didn't buy any sort of plywood or anything to skin the frame. Here is what I used each piece for: A - Vertical part of the frame B - Horizontal part of the frame C - Sides and Front of the canopy D - Screwing. Duh!  E - Trimming. Double Duh! Now, for the fun part. Most of us know that just because wood is called 2"x2" doesn't mean that the wood is actually 2" x 2". What a pain in the rear, huh? Well, the wood that I got, the 2x2's were actually 1.5"x1.5". So, using that, and measuring the width of the tank including the frame, we were able to come up that we needed the following cut out of the 1x4's (4) 17 1/8" pieces from the 1x4's for the front and back of the top and bottom (4) 7 3/8" pieces from the 1x4's for the sides of the top and bottom. We then needed to determine how tall we wanted the stand. This was a little bit of a problem with using such a small tank. I wanted it tall enough that I didn't have to stoop over to look into the tank, but short enough that it wouldn't be top heavy and wobbly. So, we decided to make it 36" tall. Now we need the pieces for the legs. (4) 36" pieces from the 2x2's for the vertical pieces. Now, it's time to take the screws we got and get to work. Since we were working with rather large screws and thin wood, we drilled pilot holes. Then, as a safe measure, we counter-sinked the screws a little so we could get it to go into the 1x4's better. First, we took two of the 2x2 pieces and put one of the long 1x4's inbetween to make a pair of legs. 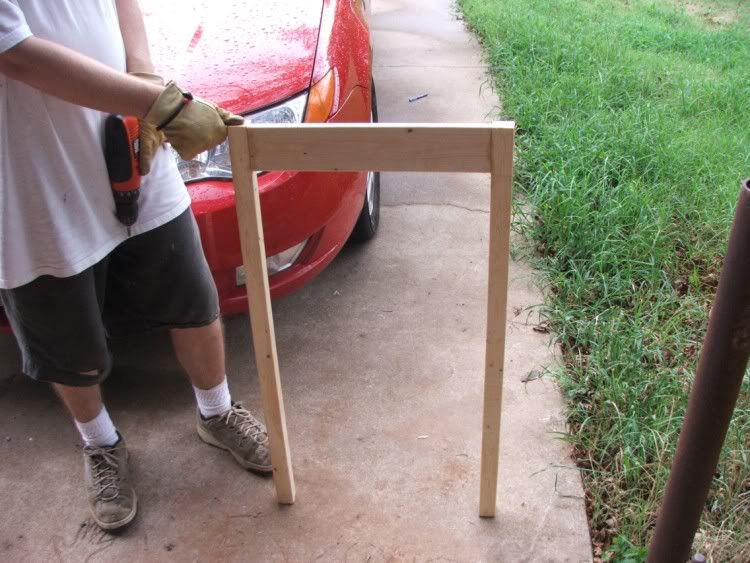 We then repeated that step for a second pair. Now, we screwed in both of them together with the shorter 1x4's for the sides. 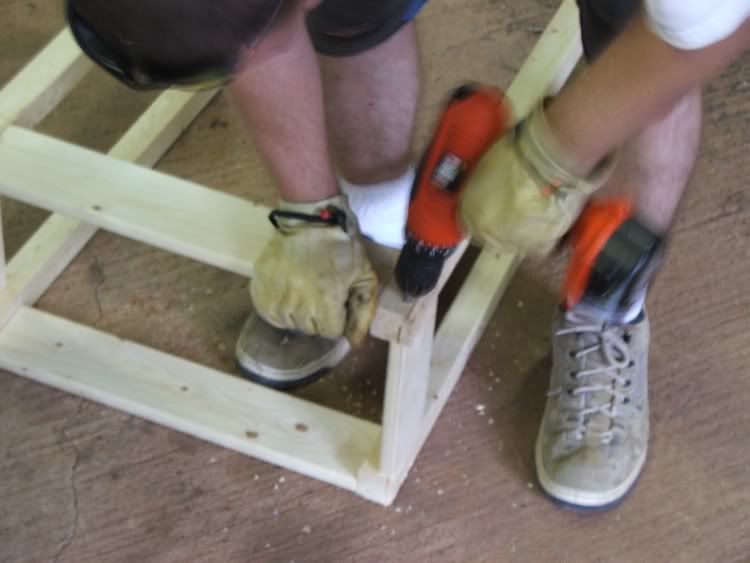 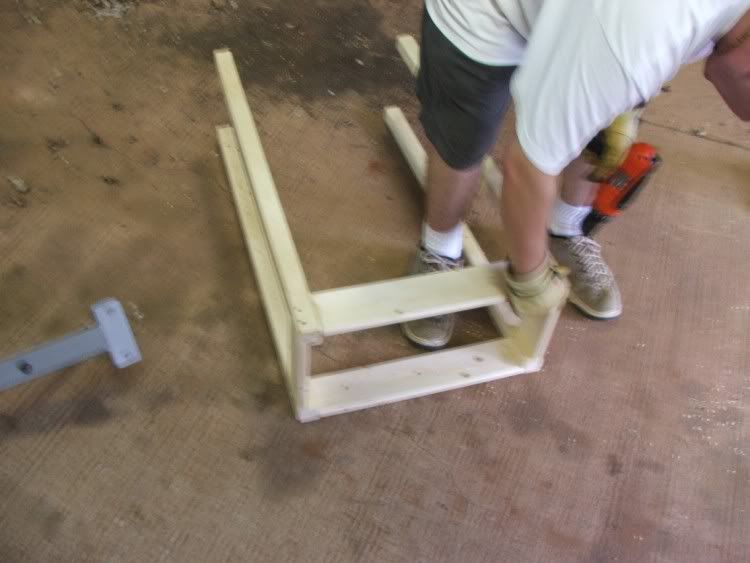 Lastly, we filled in the bottom with more of the 1x4's for a complete box. 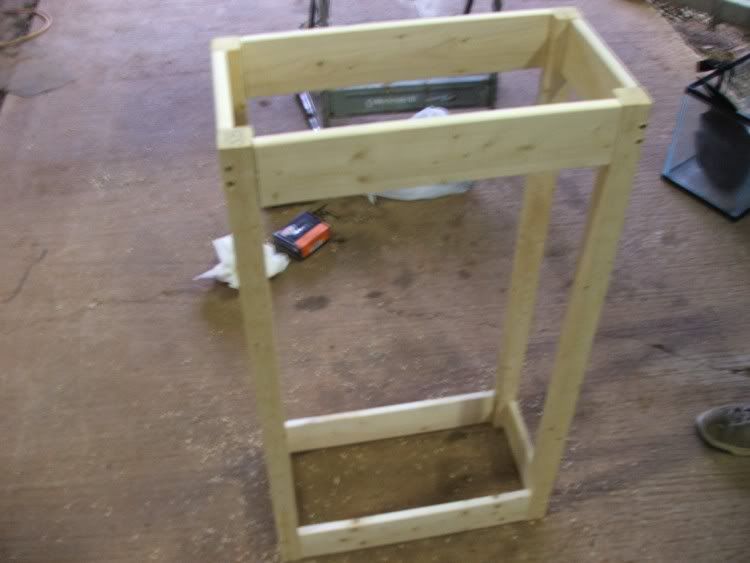 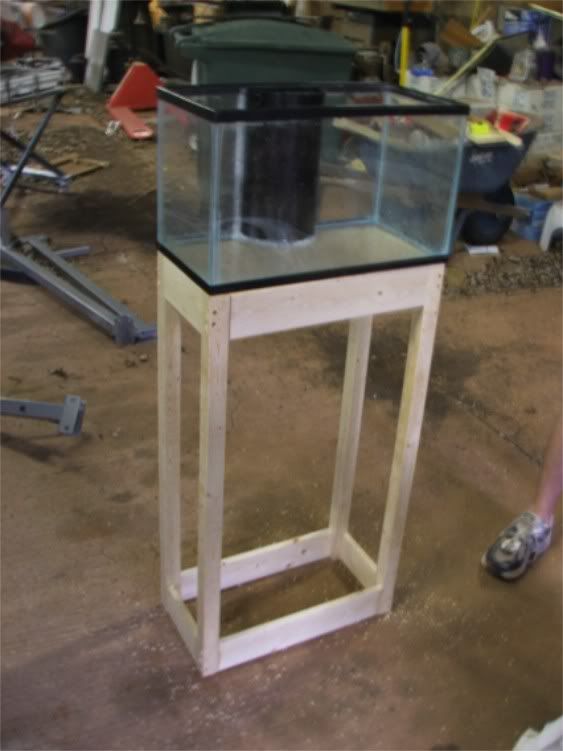 Future updates will include building the canopy, skinning the stand, and building a door. To be continued....
__________________
Travis Stevens |
|
#64
08/28/2006, 09:07 AM
|
|||
|
|||
|
Quote:
But FWIW, yes, that is what my weekend was composed of 
__________________
Travis Stevens |
|
#65
08/28/2006, 09:17 AM
|
|||
|
|||
|
Stand looks great Travis. When I was building my stand, I quickly found out as well what a PITA it is that 2X2 and 2X4 really aren't the exact dimensions. Hopefully that statement will save a lot of people heartache when they're trying to construct a "true" box frame.
Glad you had a good weekend then
__________________
"I spent 90% of my money on women and drink. The rest I wasted" - George Best |
|
#66
08/28/2006, 09:18 AM
|
|||
|
|||
|
Looking at your current tank "projects" do you have any pics of those tanks? I'm curious what the 2- 2 gallon tanks look like. Sound cool to me.
__________________
"I spent 90% of my money on women and drink. The rest I wasted" - George Best |
|
#67
08/28/2006, 09:19 AM
|
|||
|
|||
|
I lied. I do have some pictures of wood for you dendrophylliacs
2"x4"x8' from Lowe's. It's not the stuffed that I used. But if you are doing a tank larger than a 10g, then I would use this instead.  1.75"x1.75" 90º Trim - Lowe's - The 8' piece is about $9 and the 10' piece is almost $11. It's EXPENSIVE! 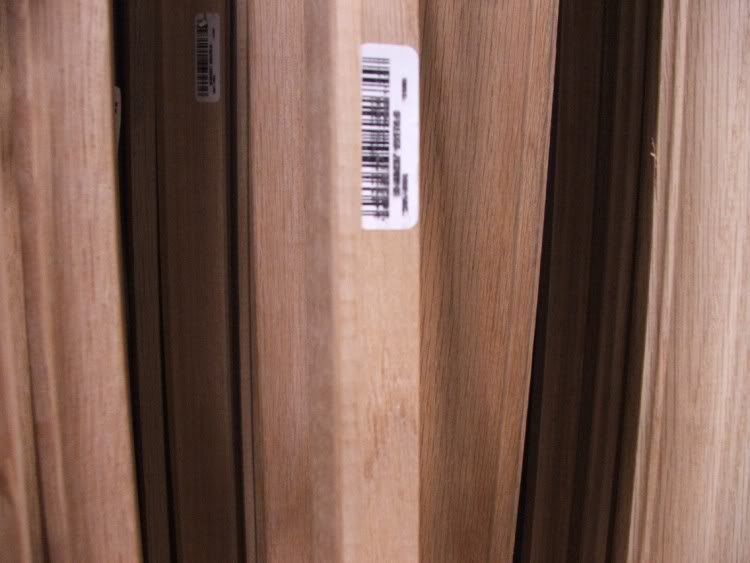
__________________
Travis Stevens |
|
#68
08/28/2006, 09:33 AM
|
|||
|
|||
|
Quote:
44g Corner Pentagon (Black and White Tank) - http://archive.reefcentral.com/forum...hreadid=600226 42g Hexagon (The Great Seahorse Tank) - http://archive.reefcentral.com/forum...hreadid=682002 75g Tank (Montipora Only Tank) - http://archive.reefcentral.com/forum...hreadid=875880 29g Tank (Currently: Holding Tank Future: Soft Coral Only) - http://archive.reefcentral.com/forum...hreadid=789454 2g Cube (Mine: Harlequin Shrimp Wife's: Sexy Shrimp) - http://archive.reefcentral.com/forum...hreadid=902677 Any missing pictures can be found at my photobucket account still. I just had to rearrange it. Just click here  for a link to it. Look in TravisStevens/Aquariums/Saltwater/ and then the size tank that you would like to see. for a link to it. Look in TravisStevens/Aquariums/Saltwater/ and then the size tank that you would like to see.
__________________
Travis Stevens |
|
#70
08/28/2006, 09:55 AM
|
|||
|
|||
|
FWIW, I think that the 42g, 44g, and 29g pictures can be found in my photobucket account. Sorry for the hassle. I can't find a mod with enough time or patience to edit all those posts to just fix pictures
__________________
Travis Stevens |
|
#72
08/28/2006, 11:29 AM
|
|||
|
|||
|
Whoops. It looks like I forgot a few pictures of some objects that I've used or will be using. Here they are. Sorry, I don't have my price list with me today. I remember a ballpark estimate on how much it costs though.
Krylon Fusion Spray Paint - WalMart - $3.97 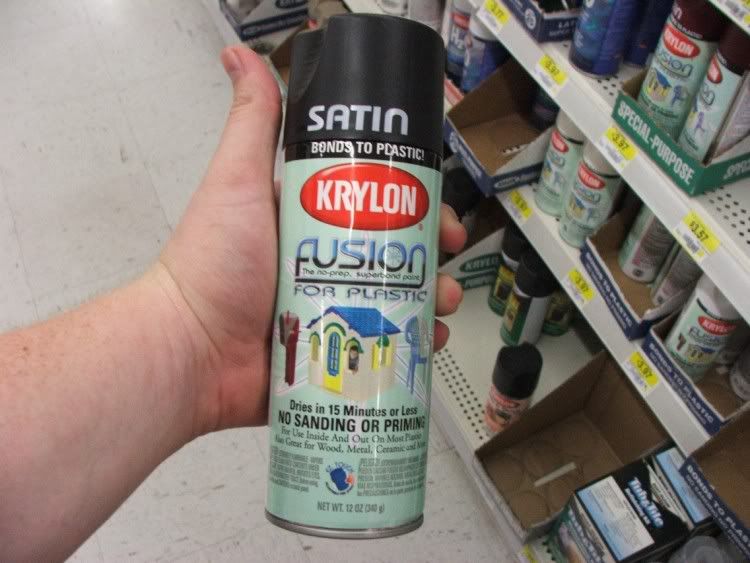 12" Long Hinge - Lowe's - $4.87  Olympic Stain - Lowe's - ~$6 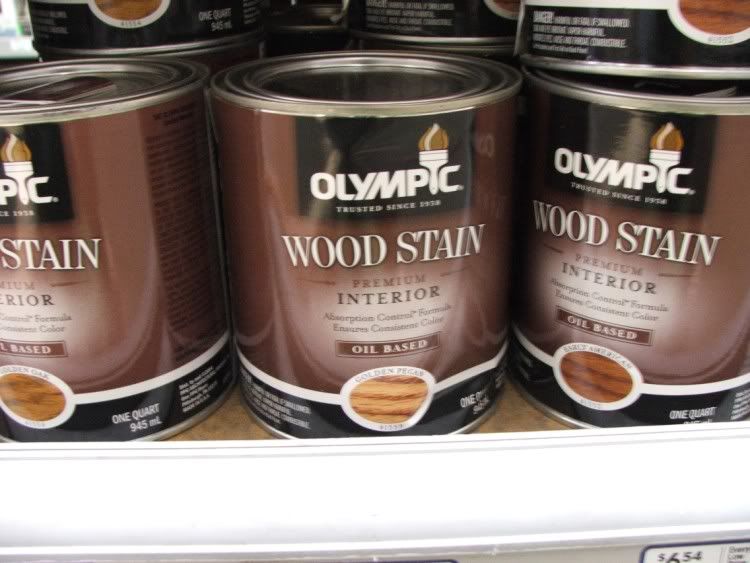 Polyurethane Sealant - Lowe's - ~$8 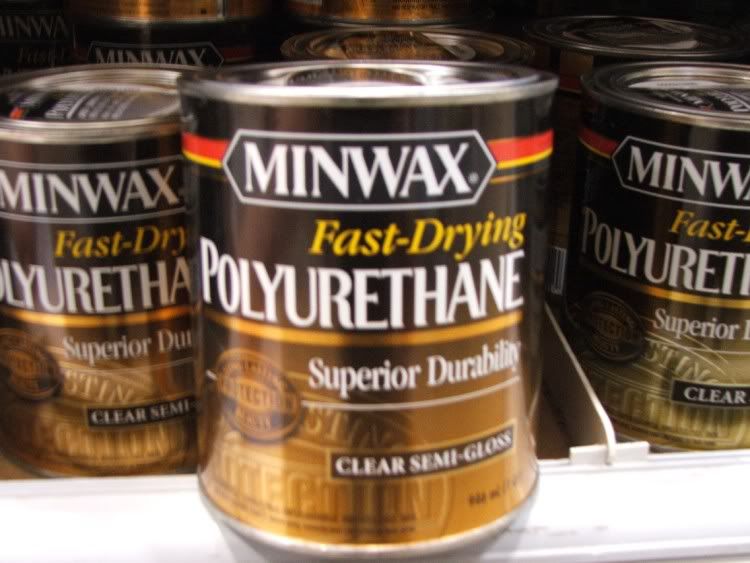 1" ID Vinyl Tubing - Lowe's - ??? 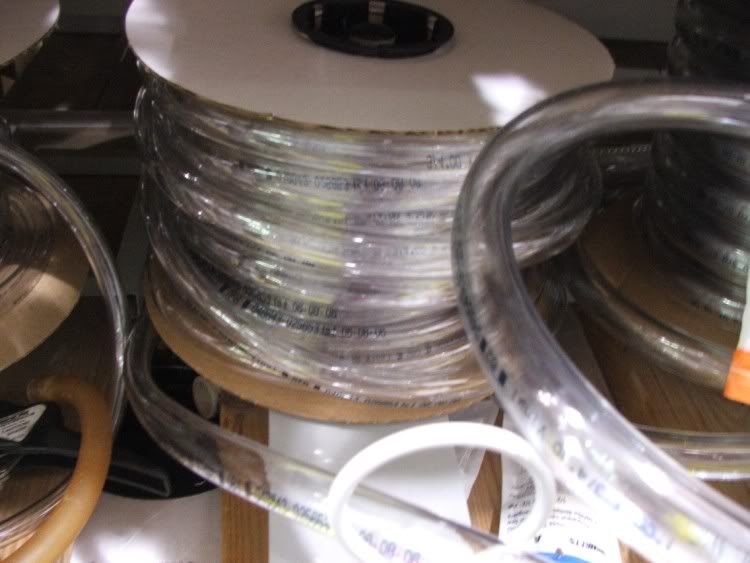
__________________
Travis Stevens |
|
#73
08/28/2006, 01:18 PM
|
|||
|
|||
|
I really like this thread, I just got into the hobby starting in april with a 6-gallon nano from JBJ. I just bought a night stand from wally-world for a stand. Works well, I wish I have seen this thread before getting that tank. An extra few gallons would be nice.
I know this is late but to the person that stated starting out with a nano doesn't work well....I think it does IF the person puts the time into the tank and the research. And thats a big IF. I research this hobby for 2+ months before getting into it and now I have a really cool 6G nano tank. I have been working on it very slowly. I only have 2 corals, zoo's that are growing like a weed and some GSP which...of course is growing like a weed. With this 6G nano I just use distill water from walmart to help make the water so the expense is a little less at the start for someone starting. Just thought I would throwing my 2 cents into that part of the discussion. I am thinking about going to a 20 or 30 gallon soon. (Once I get settled somewhere!) This thread will really help with that. Can't wait for updates!
__________________
"If your going through hell, Keep going" -Winston ChurchHill- |
|
#74
08/28/2006, 01:41 PM
|
|||
|
|||
|
I think that's a really great point RodGod. Just like anything, and especially with this hobby, the R&R (Research and Reading) phase is really important. With diligence, patience, and taking things as they come slowly, it is very accomplishable to have a nano tank.
Have you seen Travis' pics of his two 2 gallon tanks? Pretty cool Adam
__________________
"I spent 90% of my money on women and drink. The rest I wasted" - George Best |
|
#75
08/28/2006, 01:44 PM
|
|||
|
|||
|
Quote:
Oh, and thanks on the 2g Cube compliments.
__________________
Travis Stevens |
|
|


 Linear Mode

