|
|
|
#101
 08/14/2007, 11:12 PM
|
|||
|
|||
|
Newreef, I'll have to try that. When I was messin with it I did pull a thin layer off the color side but it pulled the color up with it I guess all I need to do different is soap it.
Latazyo, thanx bro!
__________________
Fish swim in water. ><> ><> |
|
#102
08/21/2007, 01:48 AM
|
|||
|
|||
|
Nothing big to update, I have just been doing finishing touches on the setup. I made some trays out of acrylic for the sump to hold media, made the standpipes (one is taller so it will be used as a backup, if one can't handle the flow I will lower the taller one..), painted the back of the fuge and assembled some basic plumbing parts. I dont want to start plumbing until I get the pump in so I can layout the equipment and space everything out right. The first pump I ordered was backordered so I ordered a different one from salty critter friday.
I also picked up some 100% polyester fabrick from Handcox to make some filter socks as well as black krylon fusion to paint the white pvc on the plumbing work.
__________________
Fish swim in water. ><> ><> |
|
#103
08/22/2007, 01:54 PM
|
|||
|
|||
|
progression
My pump finally came in so i am going to begin plumbing soon. Heres a pic of most of the most of the fittings the pump and the standpipes. I couldn't get a very good pic for some reason but watever here it is.
 Heres a better pic of the standpipes. Any tips on making them better are welcome. I was thinking of putting some screen on the intake but am not sure if I want to bother with it. What do yall think. 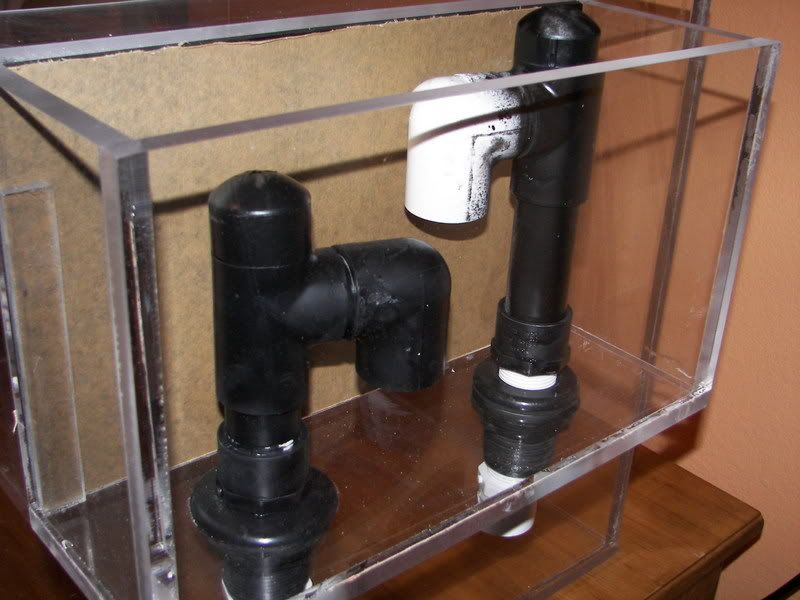 I also painted the back and right side of the tank black with krylon fusion. Once I finish putting shelves on the cabinet for the equipment I will be able to start glueing the plumbing. Im hoping to finish this today or tommarow. pics to come..
__________________
Fish swim in water. ><> ><> |
|
#104
08/22/2007, 02:25 PM
|
|||
|
|||
 This is my ATO design so far. I am going to try and just use gravity to feed the reactor which will then go to the sump via gravity as well. If this doesnt work I guess I will need to get some kind of dosing pump. I have never set up an auto top off so I may need some help but it doesnt seem too complicated. I have a Spectra Pure 90 gpd RO/DI unit but I have no way to connect it to my reservour. My bathroom is across the hall but I dont think there would be enough pressure to have the RO line go across the hall, my room and up to the reservour. So, I will most likely have to manually fill the reservour when ever it gets low. Wait. I just realized I could put the RO unit in my room and have the input line go across the hall, this would give me enough pressure from the sink, maybe. Then the RO would top off the reservour when ever it gets low. This will probably require an elaborate layout of a soleniod and float swithches though right. Then I will need somwhere to bleed the waste water..... I am a tad confused if you can't tell so any tips would be helpful. What I really need is someone to come look at my setup in person. If any one local would be interested in helping me out shoot me a pm.
__________________
Fish swim in water. ><> ><> |
|
#106
08/22/2007, 04:06 PM
|
|||
|
|||
|
ya i guess your right. But it wont hurt anything having it there will it? If I decide I need more flow I can just shorten it and have two drains. But I doubt I will need more flow.
__________________
Fish swim in water. ><> ><> |
|
#110
08/22/2007, 05:20 PM
|
|||
|
|||
|
i wouldn't worry about running the output of the RO far. i have a friend that has his go up into his attic, 30' across, then down to his sump. some people recommend bumping up to 3/8" for long runs like that, but since the flow rate is so slow i'm not sure if it really matters.
running kalk through a float valve is usually a bad idea. it'll get crusty over time and might have trouble sealing. so i'd get a float switch or two, relay and a cheap peristaltic off ebay. or get an adjustable peristaltic and use it with a timer to work like a litermeter. nice thing about the peristaltic over other pumps (powerhead/aqualifter) is you can suck water through the kalk reactor rather than push. this way when the tip clogs it'll just blow out the clog rather than leaking out the reactor body. then get a solenoid for the input on the RO so you can have it come on once a day automatically just long enough to fill a small topoff reservoir up to a float valve. |
|
#111
08/22/2007, 06:07 PM
|
|||
|
|||
|
Quote:
Quote:
Manderx, thanx for the info that cleared some of the fog. This is exciting news. NO MORE BUCKETS!! Do you know were I might be able to find a fitting to connect the RO line to my bathroom sink? Also does any one have any ideas about what to do with the waste water? I wish I hadn't drilled my sump for the float valve now.... would it still work if I just poured warm RO water over it every week or two? I will probably just put a piece of acrylic over the hole.... How do you wire the relay to the perstaltic pump? [IMG] 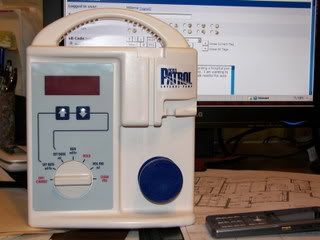 [/IMG] [/IMG] I have this hospital pump ^^^. I couldn't ever figure out how to work the thing  . But I got the feeling that it only doses and relies on gravity so I figured it wouldn't work for this application. Is it the same thing as a perstaltic pump? . But I got the feeling that it only doses and relies on gravity so I figured it wouldn't work for this application. Is it the same thing as a perstaltic pump?For the solenoid do you have to have a relay for the float valve to signal the soleniod. My knowledge of solenoids is very limited, any links or info on how they work would be much appreciated. Sorry about all the questions 
__________________
Fish swim in water. ><> ><> |
|
#112
08/22/2007, 07:38 PM
|
||||||
|
||||||
|
Quote:
INLINE UNDERSINK SHUTOFF ADAPTER http://thefilterguys.biz/fittings.htm anyone selling ro parts probably has something similar. for the wastewater, sending it outside for a garden is about the best, especially if it's automated. but you probably won't be using so much water that it'll be that big a deal. cut your shower a minute or two short most days and you'll probably save more water than you waste. Quote:
Quote:
if you do want to float switch it, and if it does turn on and off when you toggle the power, and not lock up in an error mode, then go to radio shack and get a 120v relay. relays are incredibly simple, the basic ones have 4 pins on them. 2 of them power an electromagnet and take the low voltage (9 or 12v usually) to activate it. this throws a switch inside that opens or closes the 120v circuit. so, use an appropriate power supply through a float switch to the relay. then wire the 120v pins to an outlet or chopped extension cord. you won't have any trouble with it. Quote:
Quote:
Quote:
|
|
#113
08/22/2007, 10:27 PM
|
|||
|
|||
|
i think both your stand pipes should be the same height...and one of them should have an upturned elbow..that way it will gurgle and flush..letting you know there is a problem..
and second thing i would do is go to your one of your local gas fitting outlets and buy yourself a can of Crown Rust Control...and spray the snot out of you sliders...i know the hinges inside my cabinet have completely rusted apart and my door fell off...as far as i know water never got directly on them either... other then that....all i can say is wow your tank and craftsmanship are awesome...i am also in the midst of planning a cube...
__________________
Marine Aquarist Society of Barrie (MASB) Member, which is proudly supported by Aquariums Obsessed. |
|
#114
08/22/2007, 11:15 PM
|
|||
|
|||
|
Milleme I know this was earlier in the post.
But here is the description of the weldon #16 from http://www.rplastics.com/ Weld-On #16 Plexiglas Glue in Tubes, Pints and Gallons Fast-setting, medium bodied (SYRUPY), high strength Acrylic cement. Also bonds rigid PVC, ABS, styrene, butyrate, polycarbonate to themselves and each other, as well as other plastics and porous surfaces. Great all-around Plexiglas and Lexan Glue. May leave bubbles however the bonding strength is superior to #3 or #4 for water-tight applications. If parts do not fit tightly, #16 helps fill the gap. Also #40 is the one to use that melts the acrylic together. Ive used this before, it bonded nicely but was a pain to use. The glue in applicator was only good for 20mins or so, when after that the applicator bottle became so hot I couldnt hold it anymore. So you have to be fast. The #16 is kinda messy and real syrupy...but it works very well to seal and fill in any gaps...if you dont care about bubbles in your seams... thought I would share.. |
|
#115
08/22/2007, 11:17 PM
|
|||
|
|||
|
Manderx, thanx for all the info man your helpin me out a bunch! The only problem I have now is my parents..... they don't like the idea of having a line going across the hall. So I told them I would run it through the atic (they didnt fall for that one). My last idea was to run a hose from outside to my window and plumb it from there but it would probably freeze up in the winter. The only other thing I can think of would be to get a sink built into my room. But I don't even want to know how much that would cost.... Any ideas for me guys?? I havent tried bribing, or cherry on top yet.
Nanoreefwanabe, good Idea on the standpipe. That should be an easy fix. Thanx for the tip on the sliders to! Ill go check some places tomarow.  You have to post a link once you start a thread for your build. You have to post a link once you start a thread for your build. O ya, any ideas on were to locate one of those hospital pump dripsets? My neighbor is a nurse so I may ask her. But I don't think Ill be using it for the auto top off I wouldn't have the patience to change out the tubing every 2-3 weeks. I may incorpurate it with a rotifer breeding station or something later on.
__________________
Fish swim in water. ><> ><> |
|
#116
08/22/2007, 11:23 PM
|
|||
|
|||
|
nynex, thanx for the info on the weldon. Now if any one asks ill know what to tell them. I saw the #16 at the plastics store but im not sure if I want to mess with applying it although it probably would help (I have a couple bubbles, the pics just dont show it...)
__________________
Fish swim in water. ><> ><> |
|
#117
08/23/2007, 12:07 AM
|
|||
|
|||
|
i'm following this thread especially closely because a friend and i are about to get started on a pair of 28x24x20 tanks very similar to yours. 28" wide just so it'll be easier to cram 24" fluorescent supplements over it if we want. that and make the bottom, back and top bracing out of black. but otherwise pretty much the same thing.
i hate #16. too many bubbles in it as it dries. i love 40 though. i mix it and apply with a syringe or paintbrush depending. i was originally thinking of doing the joints with 40 because it seems easier for me to get bubblefree joints, plus it's stronger than 4. but since *everyone* seems to use 4 i'll play it safe and use 4 myself. but i might go over all the inside joints with a fillet of 40 just because. |
|
#118
08/23/2007, 12:33 AM
|
|||
|
|||
|
Sounds like a fun build, I would now..... Why make the top brace out of black? Wouldn't that shade the tank. Or is it to make the side panes hidden so that the eye is focused on the middle?
Ya you better stick with #4, dont want to upset the acrylic gods.
__________________
Fish swim in water. ><> ><> |
|
#119
08/23/2007, 12:42 AM
|
|||
|
|||
|
Quote:
and i just thought of the greatest reason of all. so that you're not looking at bubbles in the seams 
|
|
#120
08/23/2007, 01:43 AM
|
|||
|
|||
|
I think it will look pretty cool. Looking straight on will give it a frame. No bubbles, no problems.
It would be interesting to see a tank with all the sides but the front, top and bottom black.What do you use to clean the outsides. I remember reading windex is bad.
__________________
Fish swim in water. ><> ><> |
|
#123
08/26/2007, 11:33 PM
|
|||
|
|||
|
Well I met my goal of getting the tank wet before school started, tonight. I finished all the plumbing (finally) and began a fresh water test. At first I was trippin' because i had like 3 leaks going and I didn't know what to do but after the initial filling once i calmed down I figured it all out. The genx is a bit louder than I was thinking but Ill live with it.
I was planning on draining the tap water and filling with ro but it has gotten too late now. and I gotta go to first day a school tomarow 
__________________
Fish swim in water. ><> ><> |
|
#124
08/26/2007, 11:34 PM
|
|||
|
|||
|
Well I met my goal of getting the tank wet before school started, tonight. I finished all the plumbing (finally) and began a fresh water test. At first I was trippin' because i had like 3 leaks going and I didn't know what to do but after the initial filling once i calmed down I figured it all out. The genx is a bit louder than I was thinking but Ill live with it.
I was planning on draining the tap water and filling with ro but it has gotten too late now. and I gotta go to first day a school tomarow I will post pictures tomarow!! CHECK BACK
__________________
Fish swim in water. ><> ><> |
|
#125
08/27/2007, 11:43 PM
|
|||
|
|||
|
PICS like I promised of the tank in position and plumbed.
A couple full views 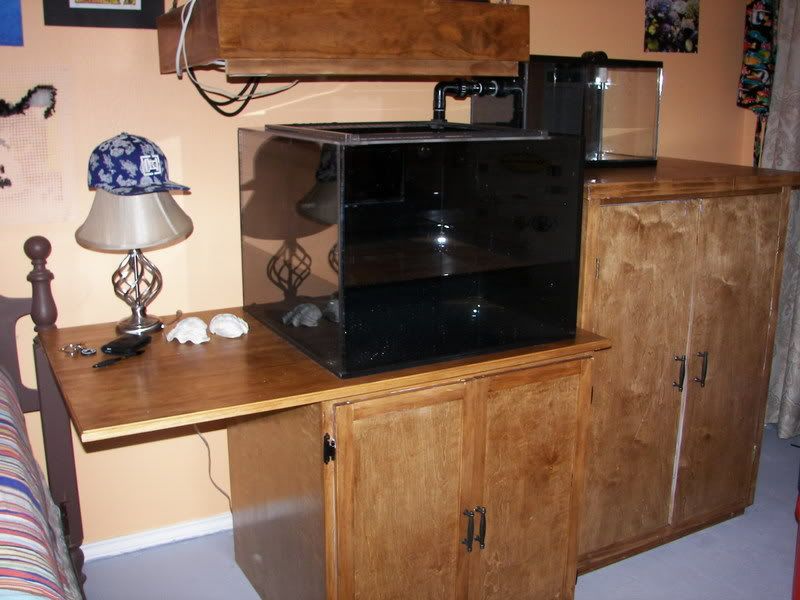 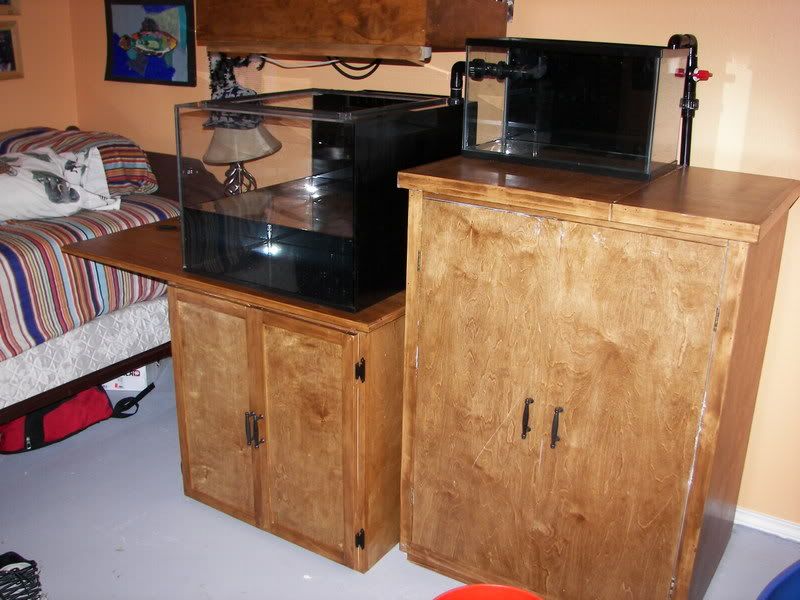 Sump 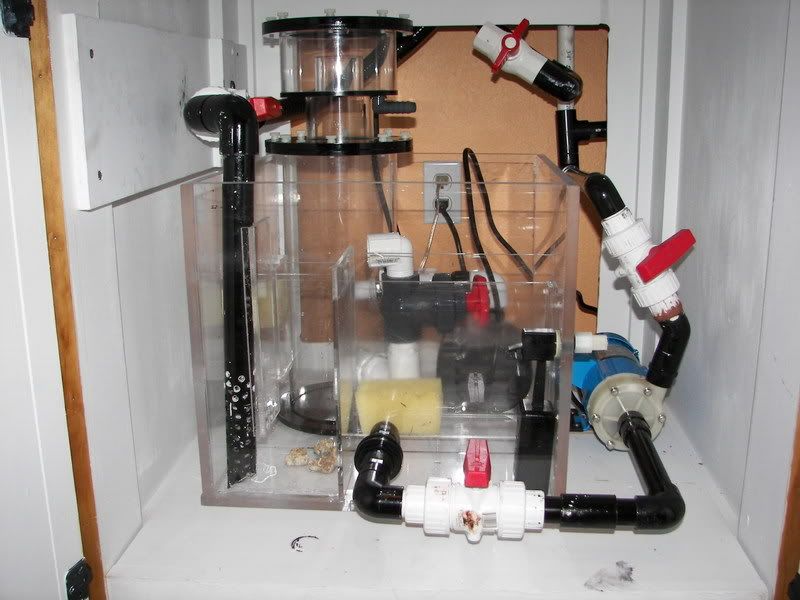 Top I made 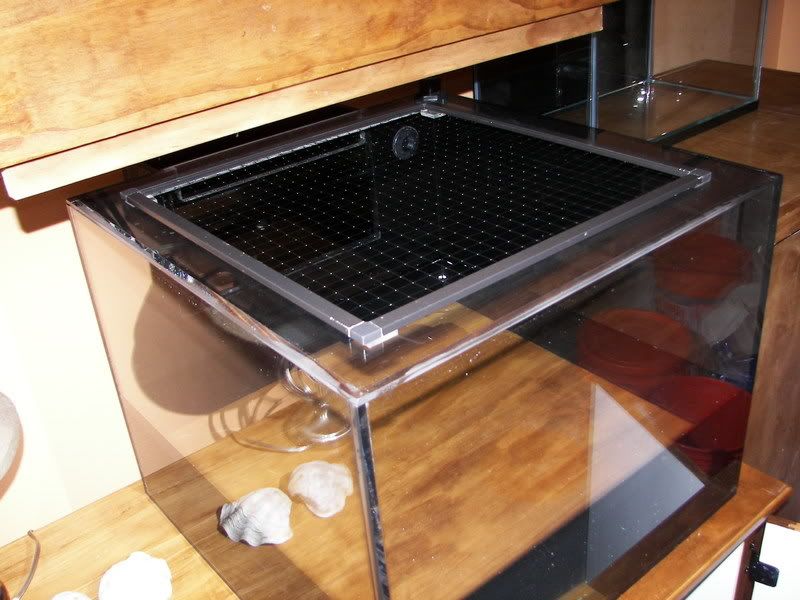 I forgot to calculate the corner pieces that hold the sides together so it doesn't exactly sit in the eurobrace like I planned but I will probably redo it later once it starts to bug me.
__________________
Fish swim in water. ><> ><> |
|
|


 hehe. I am having the same size tank built for the kids. Keep up the great work!
 Linear Mode

