|
|
|
#251
 06/19/2007, 10:23 PM
|
|||
|
|||
|
Finally! A post that doesn't mention tissue necrosis!
 Only kidding. Looks promising so far. I'll have to drop by soon to see it for myself.
__________________
Steve - DFWMAS Member Click on the red house to view my build thread |
|
#252
06/19/2007, 10:24 PM
|
|||
|
|||
|
I would love to chime in, but I know not much of this subject. I tried to install a GFI in my oulet that my power strips were plugged into....there were three different wires coming in and no matter how many combinations I tried, it wouldn't work. The GFI sits (idle) on a table next to my tank (rats).
__________________
A quote from my daughter Logan (after discussing "salt in wounds") "Yeah, and that's why you don't go swimming after you get bit by a shark" |
|
#253
06/20/2007, 12:15 AM
|
|||
|
|||
|
Steve, are you going on the Tank Tour this weekend? My tank is one of the homes we'll be visiting.
kwaters, it isn't hard. The GFCI outlet should be clearly marked how to hook it up. It is key that the white wire be affixed to the screw that states WHITE. The black goes on the opposing side, and the ground on the green screw. Do be sure the power is off when you install it to avoid shocking yourself. Worst case, hire an electrician. The visit might be somewhat expensive, but way less than a trip to the hospital.
__________________
Marc Levenson - member of DFWMAS |
|
#254
06/20/2007, 01:30 AM
|
|||
|
|||
|
As always, Marc - I learn something new every day reading this thread. While wiring my own outlet boxes just scares the jeebeezus out of me for now, maybe one of these days I'll get the cojones to try it ...
Spleen |
|
#255
06/20/2007, 01:37 AM
|
|||
|
|||
|
If you were closer to my area, you could come over now as I'm redoing the old power panel area. The hardest part is knowing where I want everything, but I'm about to get the sawdust flying.
__________________
Marc Levenson - member of DFWMAS |
|
#256
06/20/2007, 11:10 AM
|
|||
|
|||
|
Quote:
If you feel inclined to try it again, as Marc said it should be relatively well marked. On the GFCI you will have 2 screws (or sometimes wires) on either side of the outlet, one each on the left and the right. If they are wires then they will be white and black, if they are screws then one will be silver in color and the other brass in color (typically speaking). There will also be a green, hexagonal screw on the frame of the outlet, that is your ground. From your wall you should have 3 wires... 1 each white, green and black (or sometimes red) The white wire will connect to the white wire on the GFCI outlet (or the silver screw). The Black (or red) wire will connect to the black wire (or brass colored screw) on the outlet. And lastly the green wire will connect to the green screw on the outlet frame. You should hook up the green one first, then the white then the black. As Marc recommended, definitely have the power off when making these connections. If connecting wires together use approved wire nuts (available for cheap from Home Depot) HTH
__________________
- Tom |
|
#257
06/20/2007, 04:28 PM
|
|||
|
|||
|
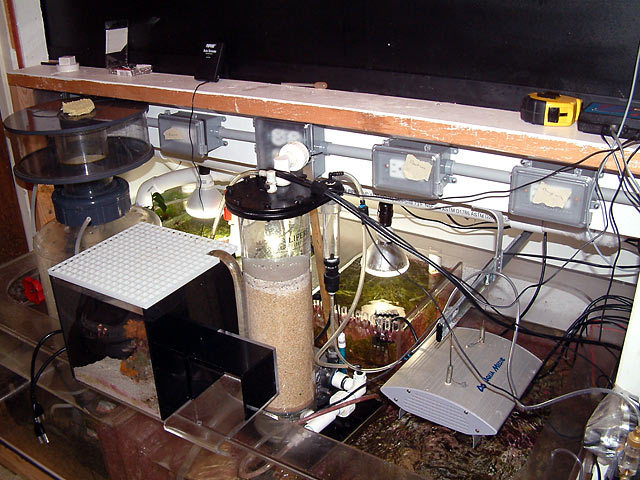
So the wiring project continues. My reef is running on minimal equipment overnight (Return pump, 2 VorTechs, a heater), and I just now to got the lights to fire up. What a pain! Everything was wired correctly, but I kept tripping the GFCI circuit for some reason. It took me about 30 minutes to track down that one of the ground wires had looped back up and touched a screw on the side of an unused outlet.
 At least that has been resolved so I can move forward. At least that has been resolved so I can move forward. I put 6 outlets above the tank for lighting and cooling fans. The new outlets I assembled two nights ago are affixed to the back of the stand above the sump, but not tied in yet. I still need to build the new set of outlets that are going in the corner above the return pump.
__________________
Marc Levenson - member of DFWMAS |
|
#258
06/20/2007, 07:38 PM
|
|||
|
|||
|
It's a pain, but you will look back later and be glad that you did it
It really is a great idea! One maybe I should have looked deeper into after seeing yours, but I think the way mine is, or will be split between 5 circuits and 3 rooms with three legs from the neptune and all on/off functions in the wetroom, it will be OK. Not as impressive as yours and a few others, but OK
__________________
Hop |
|
#261
06/20/2007, 09:37 PM
|
|||
|
|||
|
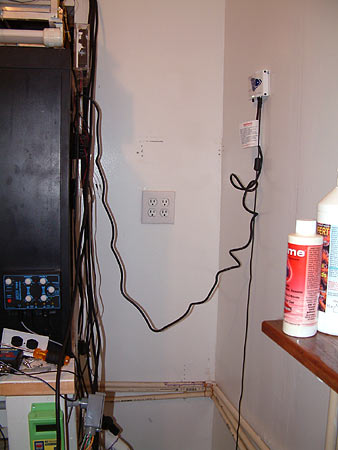
I removed the old power center. Now you see it, now you don't.
  And because I get so many questions about how it was wired, here are two more pictures. From the front and from the back. 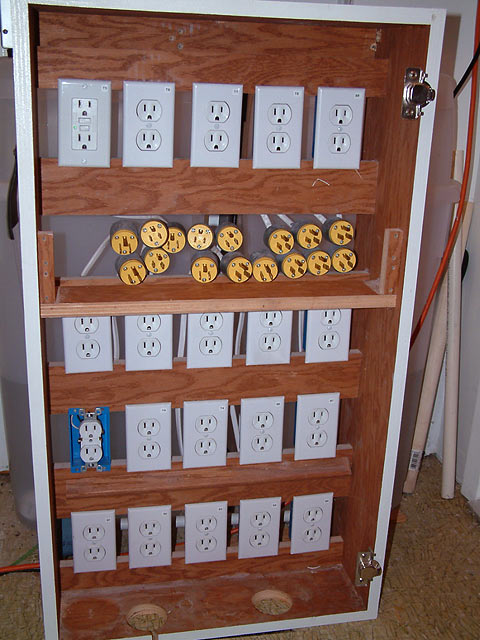 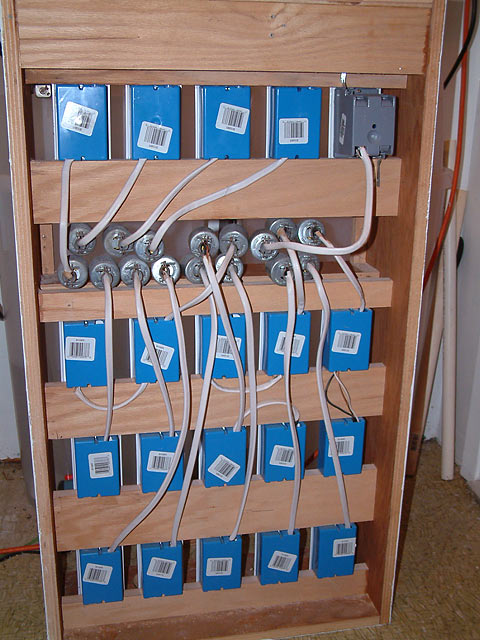 The electrical boxes were wired either individually or in pairs to a 3-prong grounded plug. This was then plugged into one of 8 outlets in each American DJ Power station. The powerstations have been relocated. 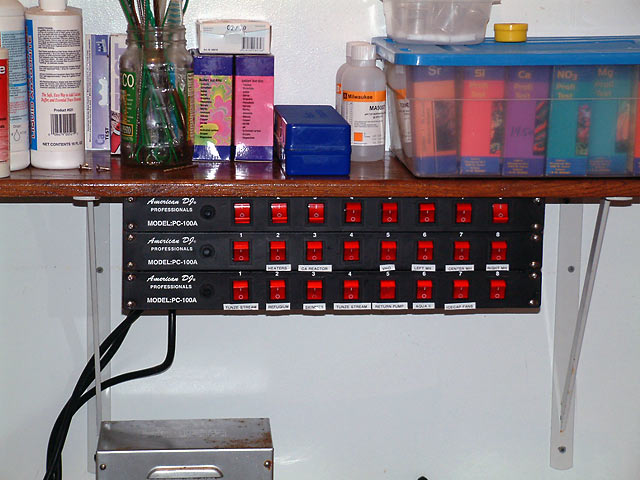
__________________
Marc Levenson - member of DFWMAS |
|
#262
06/20/2007, 09:40 PM
|
|||
|
|||
|
Looks so much better. Now you won't see that electical panel from the kitchen side of the tank. Nice work.
I wonder why this project was so diligent? It wouldn't have to do with your tank being on the DFWMAS tank tour Saturday would it Marc?
__________________
Steve - DFWMAS Member Click on the red house to view my build thread |
|
#263
06/20/2007, 09:41 PM
|
|||
|
|||
|
The wiring fiasco continues.
 And I built the new box to hold the outlets up high. The box was made of birch, stained and sealed. 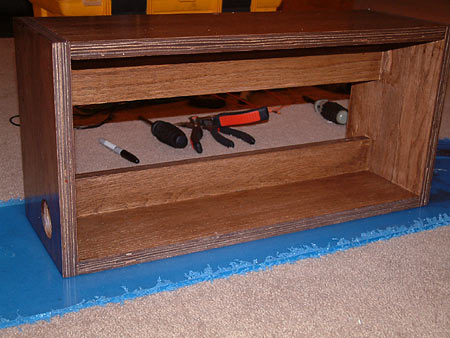 The outlets were screwed into place, with each box getting its own romex (14/2) wire that leads to the DJ Power stations. Each wire has a 3-prong plug that fits into the back of the power station. 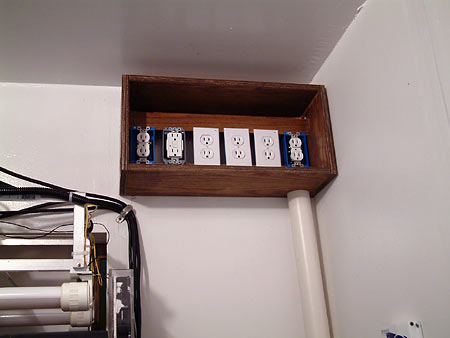 The wires were hidden inside PVC, an idea I liked that Hop used recently. Still more to come, but probably not posted until tomorrow. 
__________________
Marc Levenson - member of DFWMAS |
|
#264
06/20/2007, 09:44 PM
|
|||
|
|||
|
Quote:
Maybe.  But more seriously, I have to get all the wiring stuff done as quickly as possible because quite a bit of equipment is offline at the moment.
__________________
Marc Levenson - member of DFWMAS |
|
#267
06/21/2007, 01:29 AM
|
|||
|
|||
|
I was just thinking about that a few minutes ago as I stripped it down. The wooden cabinet itself could be used again by a local hobbyist if they wished. I'm reusing the electrical boxes & outlets.
__________________
Marc Levenson - member of DFWMAS |
|
#268
06/21/2007, 11:52 AM
|
|||
|
|||
|
Yeah those outlets look a lot like how I did mine. I used flexible liquid-tight conduit just to make the job easier. Looking good Marc.
Not fun doing all that right over a running system though!
__________________
Jonathan--DIBS Breeder and Card carrying member of the Square Skimmer Brigade (Click on the Red House to see my pics garage) |
|
#269
06/21/2007, 01:43 PM
|
|||
|
|||
|
Quote:
I took some pictures, just trying to get the time to show them to my electrical guy. Good luck on your endeavor.
__________________
A quote from my daughter Logan (after discussing "salt in wounds") "Yeah, and that's why you don't go swimming after you get bit by a shark" |
|
#270
06/21/2007, 01:49 PM
|
|||
|
|||
|
Quote:
__________________
A quote from my daughter Logan (after discussing "salt in wounds") "Yeah, and that's why you don't go swimming after you get bit by a shark" |
|
#271
06/21/2007, 01:57 PM
|
|||
|
|||
|
It could have just been a bad GFCI. Sometimes they have too sensitive a trip point due to a malfunction. Not incredibly common, but not unheard of either. But it also could have been one of the "piggy backs" back feeding the GFCI, it really all depends on how you had it wired up
. Sorry I couldn't be of more help to you with it
__________________
- Tom |
|
#272
06/21/2007, 04:01 PM
|
|||
|
|||
|
Your tank looks great. Do you use a tripod when you take FTS. Mine never seem to turn out right
 . Do you have any more info posted or a new forum about your angled tank for the clowns? I have seen the one of reefvideos.com and want to see how yours turned out. Good work as usual, im sure . Do you have any more info posted or a new forum about your angled tank for the clowns? I have seen the one of reefvideos.com and want to see how yours turned out. Good work as usual, im sure 
__________________
~John Trying to learn everything about something and something about everything... |
|
#273
06/21/2007, 04:08 PM
|
|||
|
|||
|
Great idea with the conduit. I have been trying to get up the urge to run two or three dedicated circuits to my sump room, and my hold up was figuring out where I wanted my outlets in the wall. I was thinking I was going to have to go up and down feeding wire up into the attic and back down to where the circuit enters the room.
Now I see your setup. I am going to use conduit and not worry about putting more holes in the wall. I can always change it that way and only have to patch a few screw holes. Again, it looks great. Can't wait to see the canopy setup.
__________________
Blake -DIBS breeder |
|
#274
06/21/2007, 06:18 PM
|
|||
|
|||
|
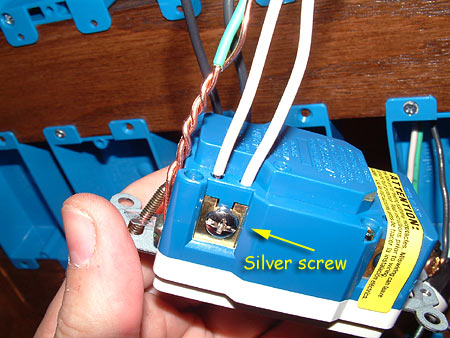
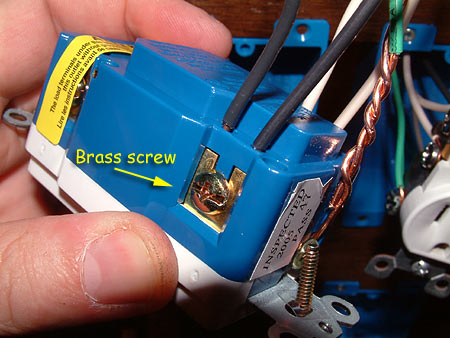
It is very important that outlets are wired correctly to avoid tripping a breaker or crossing power lines. When I had help with the original power center almost 3 years ago, I didn't realize some were wired backwards. It took me a while to find the three that were wrong out of 20.
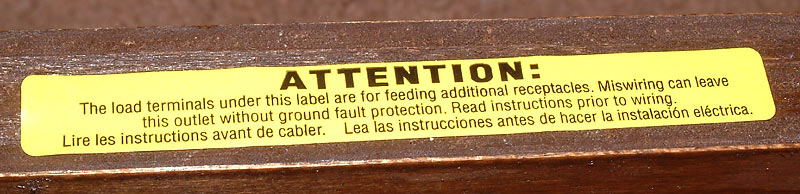
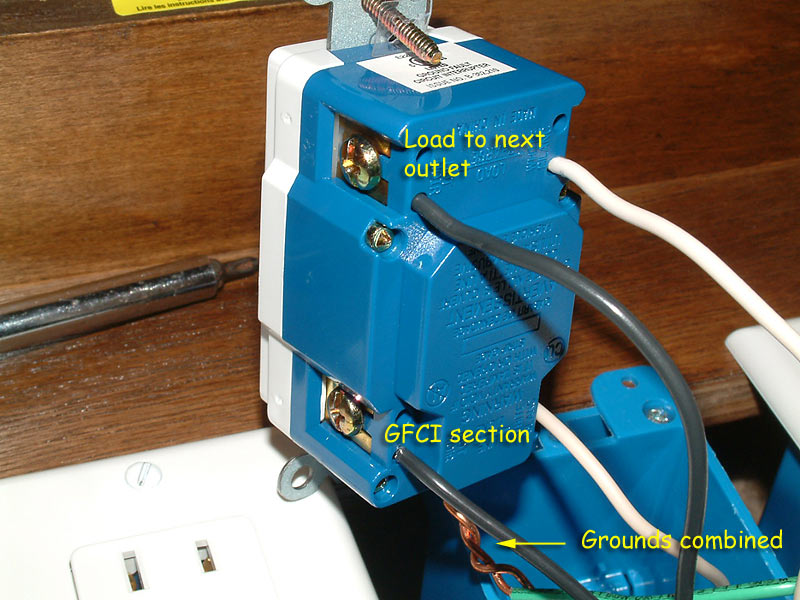
While I was disassembling the powerstation last night, I was surprised to find 4 screws that were not tightended down properly. The wires were on the screws and carried power all this time, but they were not secured.  Amazing. Another great reason for building this new system. Amazing. Another great reason for building this new system.Here are a few pictures how a GFCI outlet should be wired. These may not be exactly the same as what you can buy locally, but the premise should be the same. The reason you see two sets of each wire is because one set goes to the outlet, and the other set continues to the next outlet in series. That way if the GCFI trips, the outlet(s) after it will also be powerless. Remember - silver screw for the white wire, brass screw for the black wire, and green screw goes to the ground wire. Quote:
   The same priciple applies to regular outlets. These are specifically designed for Copper (Cu) wiring. If your home happens to have aluminum (Al) wiring, you'll need to find the more expensive made-for-aluminum outlets that use special screws to prevent arcing and overheating. My old home had aluminum wiring, and instead of $.58 outlets I had to buy $3.24 ones. These would be marked CO-ALR on the back. So here's a regular outlet wired. 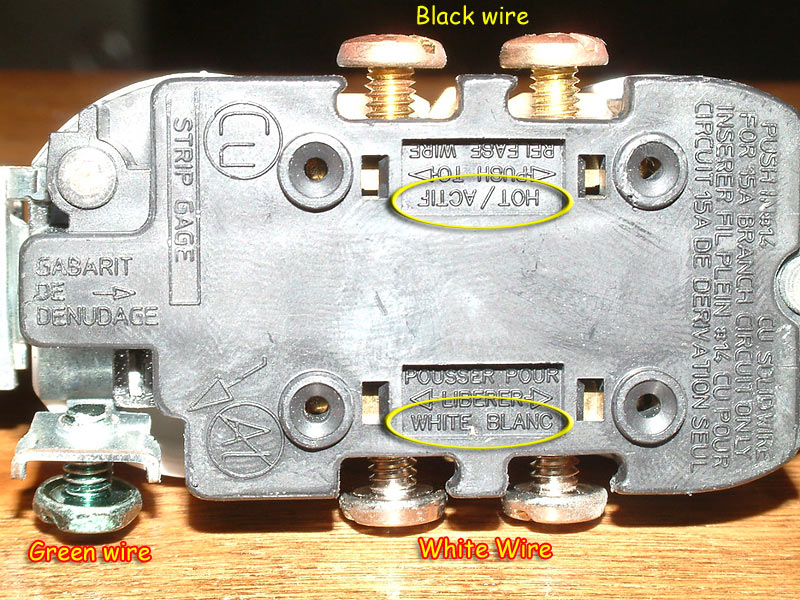 White and green screwed in (left picture). Black screwed in (right picture). 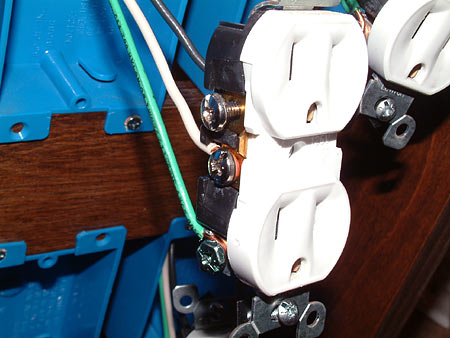 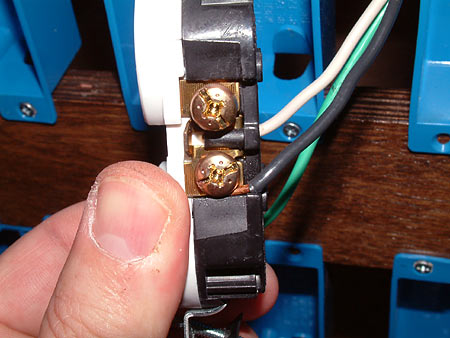 Please note I used the screws to clamp down on each wire instead of the press-in system readily available. I've been told those work but aren't as secure and in my opinion not as safe. Plus due to the fact I'm using shallow boxes, there wouldn't have been any room to press the wires into the holes on the back of each outlet and still fit in the boxes. 
__________________
Marc Levenson - member of DFWMAS Last edited by melev; 06/21/2007 at 07:02 PM. |
|
#275
06/21/2007, 06:28 PM
|
|||
|
|||
|
Here's the stuff I reused. Outlets, gang boxes, and grounded plugs.
   Last night I built the new power center cabinet, stained and sealed it. Today when it was dry, I was able to wire it. It is ready to install.  A total of 12 wires exit this center, feeding power to 15 outlets. The 12 wires will run through PVC to the DJ power stations, and each wire will have a ground plug installed. Those will plug into the back of the DJ station outlets so I can turn them on and off as needed. And how the outlets are wired. Only 7 of the 15 are GFCI protected. The rest are simply powered outlets.  Here's the back side. I accidentally goofed how the notches were aligned during assembly and had to cut away more wood to fix the mistake. The water heater plumbing will run behind the panel in that notch.  More later. I still have to figure out how I'll run the waterproof wiring.
__________________
Marc Levenson - member of DFWMAS |
|
|


 Linear Mode

