|
|
|
|
|
#1
 01/05/2007, 12:32 PM
|
|||
|
|||
|
My 40 breeder "blog" - PIC INTENSE
11/6/06
Ordered a 45mm and a 40mm hole saw from ebay. Total cost $17 shipped  Ordered three 1" bulkheads and three 3/4" bulkheads from ebay. Total cost: $22.44 shipped  Ordered a drill guide from Sears.com. Total cost: #34.94 shipped 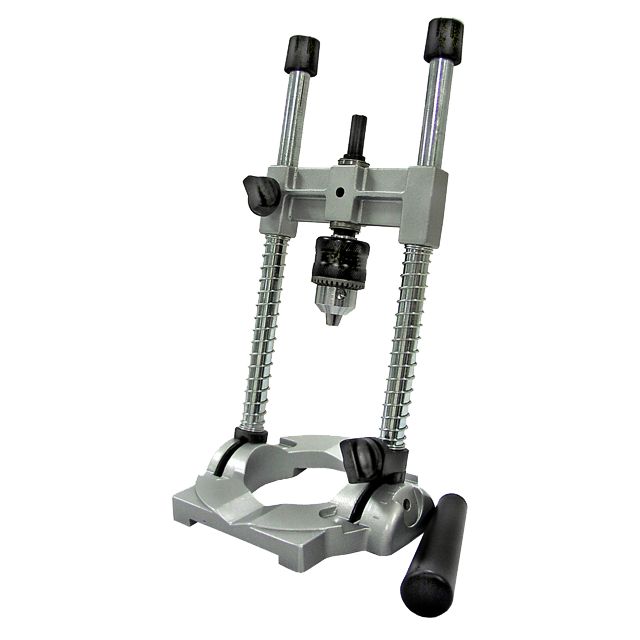 Running total: $74.38 Last edited by perpetual98; 01/05/2007 at 12:43 PM. |
|
#2
01/05/2007, 12:32 PM
|
|||
|
|||
|
11/07/06
Tomorrow I go to pick up my 40B from a guy in Madison. He's selling it for $40. I have a guy who is interested in my 26G bowfront, and I told him that I want $40 for that. If all goes right, I should have a fair swap and three happy barterers. The stand is coming along nicely. The stand itself may be completed in a week or two. The doors and canopy might take a while longer. I haven't taken any pictures of the stand build as of yet, but I'll run through and take some before I get much farther. Here's the mockup that I made using Sketchup. 
|
|
#3
01/05/2007, 12:33 PM
|
|||
|
|||
|
11/08/06
Ok, it looks like the server is back up, at least for the time being. If there's continued problems, I'll find a different place to host the pictures. Here we go... Here's some of the wood that I had laying around in the garage. This all came from a soft-sided waterbed that we took down. I busted it all apart and was going to cut up the wood and burn it in the fire pit, then I had the idea of actually using it for something.  You'll notice all of the nails in the wood. Those things are WAY sharp too! Here's one of the many piles of nails that I ended up pulling out...  Here's a couple pictures of the framing for the sides. They're all glued/bisquitted (is that a word?) together and have a 45 degree bevel on the edges. I also filled all of the nail holes the best I could and sanded it. I'm going to paint the stand anyway, so I don't need it to be perfect.   Here's the top and bottom support frames. The bottom will have a 3/4" shelf on it and the top is a 1" or 1.25" piece of countertop that I have laying around at home and haven't cut up yet.  Here's another picture of some of the scrap wood that is left. I'll burn this stuff.  
|
|
#4
01/05/2007, 12:34 PM
|
|||
|
|||
|
11/08/06 continued...
The tank is in hand! Great dimensions. I can't believe that I didn't get one sooner! I've also got the other side for the stand glued up and clamped. Tomorrow after work I should be able to get it somewhat assembled and looking like a piece of furniture as opposed to a pile of lumber. Tank cost: $40. I'm also high bidder on a Ranco Dual Stage Temperature Controller on ebay. We'll see if I win. If I do, great! If I dont, no big deal. Running total: $114.38 11/08/06 continued... God bless ebay. I won my auction for the temperature controller and it wasn't even at my highest bid. Not the cheapest thing in the world, but oh well, what in reefkeeping is.  Total cost: $81.44 Running total: $195.82 |
|
#5
01/05/2007, 12:35 PM
|
|||
|
|||
|
11/09/06
I had some time after dinner tonight to do a little more assembly. Everything was glued, and about as straight as it was going to be. Time to bust out the screw gun and the air nailer and air stapler. God bless Home Depot... Here is one of the two sides all assembled and ready to go on the top and bottom framing...  Here's a closeup of some of my "it looked better in my head" construction...  This is one of the sides attached to the base frame... [img width=480 height=640]http://www.ericfeige.com/gallery/albums/userpics/10001/stand10.jpg[/img] And here are both sides screwed to the top and bottom frame...  And here's some scrap wood that I had from an entertainment center. This will provide the bulk of the vertical support as it's wedged in between the top and bottom frames and then stapled in with about 50 1" narrow-crown staples. Did I mention I love air tools?  Total cost for the stand so far: $0.00 (priceless)  Running total: $195.82 |
|
#6
01/05/2007, 12:36 PM
|
|||
|
|||
|
11/10/06
Well, for all of my trying, and convincing myself that I can do this "on the cheap" the costs involved are slowly creeping up. Well, not so much creeping as they are rocketing up! I ordered a RO/DI unit from someone on RC. $115 shipped for a nearly new (according to him) 6-stage Water General setup. We'll see what model number it is when it arrives. I have a feeling that it might be this one, but he didn't verify the part number with me.  Total cost: $115 Running total: $310.82 I wonder if I'll be able to keep it under $1000? I hope so, lighting will make or break me. I've got a 150W halide and a 70W halide setup that I can use, and I've also got a 4x65W PC setup that I could use if I wanted, as well as a 4x24W T5 setup with IceCap SLR reflectors. I'm leaning towards selling some items so I can fund a 36" T5 setup and maybe I can still use the 150W halide... |
|
#7
01/05/2007, 12:36 PM
|
|||
|
|||
|
11/11/06
Well, I was working on the top for the stand last night and had a brain fart and made it 2" too narrow from front to back. D'oh!!! Shouldn't be that big of an issue though. I've already formulated some contingency plans in my head to rectify. I'm going to attach some more wood to the back, and depending on prices, I night put some laminate countertop material over it. It'll make it look better and should add a lot of strength considering I have multiple pieces of wood glued together. Strength for the tank shouldn't be an issue though. I also sold some chaeto which will help offset some costs. Total price of chaeto sold: $20 Running total: $290.82 |
|
#8
01/05/2007, 12:37 PM
|
|||
|
|||
|
11/12/06
Stopped at Menards today to pick up some more stuff for the stand. Grabbed some Formica countertop material for the stand, as well as some handles for the doors and some pine 1x6's for the doors too. Ok, on to some pictures and whatnot... I cut three pieces of the 1" thick MDF 15" long by 2" wide. I attached these to the back of my "boo-boo" top to get it to the correct depth of 26". After that, I busted out a cheap paint brush to apply some contact cement. Talk about a buzz after working with that stuff in the garage for a while. Yeesh. You have to slather contact cement onto both pieces that are going to be attached to each other, then let it dry for about 20 minutes before attaching the pieces. Easy enough, even with a buzz.... Here's the top getting ready for the cement... (you can see the error of my ways where I had to attach the 2" strip to the back)  Here's some glue getting slathered onto the top of the stand...  Here's some glue getting applied to the backside of the Formica...  This is the top with the Formica glued on. I left about a 1" overhang on all sides that I trimmed off with either a flush-bit in my router, or the bevel bit, as seen in a bit...  Here's an end-view of the top with the Formica glued on...  I flipped the top over and glued the Formica onto the sides...  Here's another shot of it...  I trimmed the top with the flush bit (didn't take pictures of that) and then busted out the 45 degree bevel bit for the router...  Here's a picture from my first pass of beveling the edges. I'm going to paint the MDF that is showing to match the rest of the stand...  After I did that, time to start cutting wood for the doors. Measure once, cut three times, right? Mmmmm, biscuits.....  Total cost: $25.00 Running cost: $315.82 |
|
#9
01/05/2007, 12:38 PM
|
|||
|
|||
|
11/13/06
There's just some days that the postman is good to me. The hole saws arrived today, as well as my Ranco dual stage temperature controller. Woohoo! I spent some time in the garage working on the doors to the cabinet. I only messed up a little bit when doing some routing that I've never tried before. I'll probably try to hide that corner under the top lip of the countertop so it won't be as noticable. It took me a little bit to figure out that the router wanted to "wander" away from the guide when you went a certain direction. Here's a picture of one of the doors after it was all sanded up...  Not sure why, but here's a closeup picture of the door...  I did a couple of the vertical details with the router and now I'm doing one of the horizontal details. I clamped a guide board onto the door so the router could follow it...  And here's a pic of the finished horizontal line...  To do the 45 degree details, I just clamped your trusty square onto the door in the right position...  And viola! Detail complete!  Then I threw the first coat of paint on the door. I'll probably do 3 coats, or less if I'm antsy.  No new costs today! Woohoo! Running total: $315.82 |
|
#10
01/05/2007, 12:39 PM
|
|||
|
|||
|
11/14/06
Well, I got some time to get some paint put on the rest of the doors and I started with the first coat on the stand... Here's a picture of one of the doors before I put the gray paint on it...  And after the first coat went on. I'll probably do at least 2 coats of gray, and then I might put a poly over everything, depends on how I feel.  Here's the cruddy looking stand before paint...  And here it is after some paint was slapped onto it...  Running total: $315.82 |
|
#11
01/05/2007, 12:39 PM
|
|||
|
|||
|
11/15/06
Ok, I brought the tank home from work and busted out my layout tools, markers, drill, safety glasses, etc... I first laid out where I thought that I wanted the bulkheads to be. I'm sure I'll wish I didn't put them in the spots that I did, but oh well, too late now... I just used a sharpie marker and drew some crosshairs where I wanted the holes...  Another closeup of the layout lines...  Here's a picture of the "rig" that I used to drill the holes. It worked really slick. I'm guessing that the holes for the 1" bulkheads took about 5 minutes each, and the holes for the 3/4" bulkheads took around 3 minutes each. I put about 6" of cold water in the bathtub and ran a MaxiJet 1200 (it was the first pump I found) and pumped the cold water onto the hole saw to keep things cool. Not sure if I needed to, but I did, so you'll have to live with that.  Here's a shot after all 6 holes were drilled. I did a dry fitting with a couple bulkheads and things were dandy! 8)  Here's a couple more pictures of the holes for your hole-viewing pleasure! (Not THOSE holes, you sicko)   I also ran to Home Depot at lunch and picked up some items that I needed for plumbing. I'm sure I'll need to pick up some more stuff, but I got a jump start on it. I also grabbed some stuff for the electrical. I can't find a cover for one of my project boxes though. :'( I'm sure it's in my post-tornado looking garage somewhere. When I get elbow-deep into that project, you know that I'll be posting pictures. Home Depot: ~$50.00 Running total: $365.82 |
|
#12
01/05/2007, 12:40 PM
|
|||
|
|||
|
11/16/06
Not much to report today. I got a second coat of paint on the doors and stand. Didn't figure it was worth posting pictures. I also came up with a brilliant idea for my electrical system. It'll probably be a couple days before I get to start on that though. I plan on getting some beer imbibed this weekend. Might cut into my productivity! Running total: $365.82 |
|
#13
01/05/2007, 12:41 PM
|
|||
|
|||
|
11/19/06
I got the doors installed yesterday after watching OSU beat Michigan in a great football game. I haven't taken any pics yet though because the stand it up on it's side while I painted one of the side panels. I think I'm going to run to the store and pick up some poly today before the Packer game. I'd like to get a coat or two of poly on everything to protect the latex paint from getting dinged easily, and it should add another layer of waterproofing to the stand. I'm still trying to figure out what I'm doing for lighting. I THINK I'm going to go with a 4x39W T5 setup with a 150W halide, but it all depends on how much room I have over the tank. I'm not sure what I'm going as far as a canopy goes. I'm leaning towards a cabinet that is mounted on the wall about 12" above the tank, but if I go that route, I have to make sure it's not super heavy. I suppose drywall anchors would work. Another option would be to build a canopy that sits on the tank itself, but I don't know if I want to go that route. The third option is go get a fixture that sits on the tank, but then you're talking serious $$$ (~$400-$500) and since I have 75% of the lighting components to do the T5/halide lighting, that may make the most sense. 4x39W may be overkill though, maybe a 2x39W and the 150W halide would work. Hopefully pictures later today! |
|
#14
01/05/2007, 12:42 PM
|
|||
|
|||
|
11/22/06
No new pictures yet. Nothing terribly exciting has happened with the stand so far. The back of the tank is painted black with about 6 coats of black spray paint. The stand is painted and there's 2 coats of poly on it so far. I have to do some touchup work on the stand where paint has snuck around some tape. I should have more pictures soon. I've also incurred some more costs, go figure, with more costs coming! I bought a bunch of miscellaneous plumbing supplies and PVC stuff for $21. I should have enough stuff to plumb the drain to the tank and the returns mostly plumbed up. I'll probably need to get knee deep into that phase before I know what else I'll need. I bought a Digi-Lab Temp/Salinity/SG tester from someone on Nano-Reef.com for $60 I was going to get a refractometer for at work, but I thought that this would work in its place. I also ordered some stuff from Petsolutions.com that should arrive probably Monday the 27th. I grabbed the following... A SCWD for my closed loop...  Red Sea Labs Master Test Kit "Scientifically accurate tests for your marine aquarium. Kit includes 45 ammonia tests, 80 nitrite tests, 60 nitrate, 100 pH tests, and 60 alkalinity tests. Complete with test vials, reagents, color charts, and full instructions."  And an AquaLifter pump for my copepod breeding area (more details on that in the coming weeks)  Total cost on the Petsolutions.com order: $75.95 Running total: $532.77 |
|
#15
01/05/2007, 12:43 PM
|
|||
|
|||
|
11/22/06 Continued...
Ok, I got around to doing some plumbing work and taking some pictures. Here's some plumbing that I didn't end up using, but I think would have worked well. What I did was take a flap-sander on my Dremel and sand out the inside of a 90 degree PVC elbow. I sanded the sharp corners and opened up the hole a bit. Not sure how much more flow I would have gotten, but I'm betting that it wouldn't have hurt things...  There's a hole in my tank!!! Wait, there's like 6 holes... Here's a pic of the tank before I took the tape off of the inside...  The back of the tank...  Here's the bulkheads dry fit in the back...  Here's some more plumbing dry fit onto the tank. I'm trying to minimize the space taken up behind the tank by plumbing. I cut a couple of the bulkheads shorter and also cut a couple of the PVC fittings a bit shorter...  Here's another picture of some of the plumbing. The tank is going to be pretty close to the wall, so I think that turning the ball-valves towards the inside will make them easier to get to and also take up less space...  Here's a fairly modified 90 degree elbow. I cut around 5/8" off of it to take up less space. I don't think that it will affect things...  And here's some fittings that will be in the tank. They're white now, but I will spray paint them black so that they don't stick out like sore thumbs...  Running total: $532.77 |
|
#16
01/05/2007, 12:45 PM
|
|||
|
|||
|
11/23/06
Happy Thanksgiving! I cleaned some of the garage so that I can actually walk through there and move some things around. I threw the tank onto the stand so I could see what it looked like. Here you go!!!  Gobble, gobble... |
|
#17
01/05/2007, 12:46 PM
|
|||
|
|||
|
11/24/06
Even though I had the day off of work, not much happened with the tank. Went out with some friends from high school last night and had a beer-induced lack of motivation day.  Did manage to drill some holes in the top to run some plumbing into the stand...  I also went to the LFS to look for another 40 breeder for the sump. They wanted $62 for one. A decent price, but I'm going to look around for a used one. |
|
#18
01/05/2007, 12:47 PM
|
|||
|
|||
|
11/25/06
Got some time this morning to work on some of the electrical. I have a bunch of 3 rocker switches sitting in the garage that I'm using. I also had a couple "project" boxes for some previous electrical stuff that I did. I got the boxes from mouser.com and used our CNC machine at work to drill the holes where I needed them and to cut out the lids to accept the receptacles. Here's a picture of the box after I ran the 3 wire power cord into it...  Here's some of the stuff that is going into each box (there are 2 boxes)  Here's a picture of one of the completed boxes. The top switch will control the outlets to the right of it, the middle switch controls the middle outlets, etc...  Mounted one of the boxes in the stand...  And here's a picture of both boxes connected up and tested. The lighting will be on a separate system that I haven't quite figured out yet.  I think I have to make a trip to the hardware store today so I can wire up the Ranco dual-stage temperature controller to some outlets. I just need a couple bucks worth of parts and that should be done. Oh yeah, I'm also going to start using some lower-resolution photos in this thread to take some of the strain off of my server. Maybe that will help with the outtages I've been having. They shouldn't be too bad to look at either. |
|
#19
01/05/2007, 12:48 PM
|
|||
|
|||
|
11/28/06
I've been lax on my posting and photos lately. Work has been insanely busy this week and my motivation fell off the chart. I did manage to get the dual-stage temp controller wired up. Here's a picture of the raw parts...  After I attached the two boxes together, I ran some wire into them...  Wiring them isn't terribly complicated, but it takes some planning, and some wire nuts. Here's a picture of the completed assembly...  The controller (at this point) is set up to turn a heater on when the temp falls below 79 degrees, and turn fans or a chiller on when the temp goes over 80. The outlets on the left are for heating, and the ones on the right are for cooling at this point. I also sold a few items that I had floating around in the garage, so that helps costs! SOLD: 4x24W T5 setup: $150 SOLD: 2x36W PC ballast: $25 Running total: $362.77 |
|
#20
01/05/2007, 12:49 PM
|
|||
|
|||
|
11/30/06
I ordered some black acrylic off of ebay to make the overflow, but some delivery mishap occurred and it got sent back to the seller. I asked for a refund, but we'll see what he wants to do. He said he'd send it back to me, but I said that I'd just use clear acrylic for my project. I took at 12" x approx 5" piece of clear 1/4" acrylic and had grand designs on bending into a half circle. Here's the piece of acrylic and the pot that I used...  I taped the acrylic to the pot in the center and put it into the oven at about 325 degrees. I kept an eye on it pretty closely...  Here's the acrylic starting to "bend" when it got soft...  And here's the acrylic after I took it out of the oven and taped it to the pot and let it cool...  It turned out what I'll call "OK" Not the most perfect half-circle. I had to do some "tweaking" of it in the garage with the torch because it was twisted, and that introduced some bubbles into it because of uneven heating. No big deal in my book, it just has to work, not be a work of art. I painted the inside of it black, then used Weld-On 16 (all I had) to join it to a flat piece of clear acrylic for the bottom. I then used a router bit with the bearing (can't think of what it's officially called right now) and cut the bottom acrylic flush with the overflow wall. Wait! It's called a flush trim bit! (You'd think my brain would be awake right now) It's still all taped and painted and drying in the garage, so no pictures of that yet, but I promise I'll snap some.
|
|
#21
01/05/2007, 12:50 PM
|
|||
|
|||
|
12/05/06
Not much new to report lately. I'm kind of at a standstill until I get the tank for the sump. Until then I can't really progress much further. Also, the budget has dried up for the time being. Christmas and property taxes looming on the horizon have made the "fun funds" dry up. The overflow is siliconed onto the tank. I'll take some pictures one of these days. I did sell an Iwaki pump that I had in the garage that I was going to use for this project, but realized that I'll have to go submersible. SOLD: Iwaki pump: $67 Running total: $295.77 |
|
#22
01/05/2007, 12:53 PM
|
|||
|
|||
|
Sweet! I was trying to figure out how to run the pump to my copepod culture tank. I wanted something that would turn my Aqualifter pump on for about a minute once per hour. Figured a digital timer would work, then I found the answer! Bought this from a guy on Nano-Reef for $35. They normally go for over $100:
 Here's a description: Green Air Products CycleStat II Repeat Timer The Cyclestat II repeat cycle timer is capable of accurately functioning equipment repeatedly at very short increments from 5 seconds to 30 minutes of ON time and 7 minutes to 8 hours between cycles. Precise and easy to use, it is ideally suited for irrigation, misting, drip systems, ebb and flow, CO2 enrichment or ventilation controls to name a few. Automatic reset feature allows function synchronizing with other system controls. This feature provides an interesting variety of timing combinations. Push button reset for manual cycle operation. Power "on" and "cycle on" LED indicator lights. The Cyclestat timer plugs directly into wall or equipment outlet with rear mount 3 prong plug. Timed equipment plugs into flush mount grounded front outlet. Operates on 110 VAC with 15 Amp switching capacity. I also sold a HOB refugium that was in the garage. Cyclestat timer: $35 SOLD: HOB Refugium: $25 Running total: $305.77 |
|
#23
01/05/2007, 12:54 PM
|
|||
|
|||
|
12/09/06
Ok, time for some long-awaited pictures. I spent some time in the garage today cleaning it so that the wife would get off of my back. It was long overdue anyway. Now I can walk into it without jumping over buckets, and trash, and wood, and tank parts. I basically treat my garage as a walk-in dumpster. I haven't been able to park a car in there in years. lol  I also changed the theme on the board, I think it looks a lot better now, what do you guys think? So here's some pictures of my overflow and some dry-fit plumbing... This is a picture of one of the return lines and one of the closed loop lines. The return line has the 90 degree elbow in it. I did this to raise them above the water line to help with power-outage flooding.  This is what the back of the tank looks like now...  Here's a close-up shot of the overflow and the return line for the drain. I still have to get a screen for it...  And this is a top-down shot of the overflow itself. I put a clear bottom on it, because I figured that why block any light if I don't have to?  I also used Google Sketchup to mock up my sump/refuge plan. I had some time to kill...  I was investigating how much my skimmer would take up and I realized that I need a new impeller/shaft assembly for it because the one that I have (it's about 3 years old) has a lot of wear to it and doesn't spin well. I might upgrade needle-wheel pumps to get better performance from it. I probably won't need a skimmer for a month or two anyway. Running total: $305.77 |
|
#24
01/05/2007, 12:55 PM
|
|||
|
|||
|
12/11/06
I was trying to figure out another way of draining water to the closed loop without one of those big ol' ugly strainers when I had an idea... I took a 4" PVC cap that i had laying around and cut about 1.5" off of it...  Then I took a pencil and a ruler and made a bazillion lines and marks on it.... (ok, 155 to be exact)  Then I took it to the drill press to unleash the fury...  And since I was feeling giddy, I put a stencil on it before I painted it. Yeah, I know it'll be behind rocks and it will get all crudded over time, but oh well...  And here is is siliconed onto the tank, but it's hard to tell in the picture...  I also sold some more stuff that I had laying around, and I don't even remember what it all is off the top of my head, but here's what I do remember... SOLD: Old gutted T5 fixture that someone wanted for some reason: $10 SOLD: Some non-reef-related electronic stuff that I had: $500 Running total: -$204.23 |
|
#25
01/05/2007, 12:56 PM
|
|||
|
|||
|
12/13/06
Ok, I got MOST of the parts to make my ASM-G3 skimmer a recirculating skimmer with my extra OceanRunner 2700 needlewheel pump. I had to order a couple uniseals for the skimmer, which were about $3 each. I'll lump that in with some misc. costs for the build. I also am waiting on delivery of some carbon fiber shaft material because the ceramic shaft for the OR2700 is missing. That pump hasn't seen much action in a long time, so I must have misplaced the shaft at some point. The carbon fiber shafts are cheap though, only a couple bucks a piece. I just need to cut it to length. On to the pictures! Here's a shot of the dirty ASM-G3 skimmer before I decided to hack some holes in it...  You can see some hazing marks on it where a 250W heater was contacting the skimmer body at some point. It's fairly cosmetic, so I'm not worried about it. Here's the bottom 1" uniseal installed. A couple of 90 degree elbows constitute the input into the pump...  Here's a picture of the top 3/4" uniseal...  This is a shot of the dry fitting to see if things worked out. So far, so good...  Threw the whole bad boy into about 8 gallons of water in a Rubbermaid tub to see how it worked...  And here's a shot of some bubbles!  Various plumbing stuff/odds and ends/shaft and uniseals: ~$20 Running total: -$184.23 |
|
|


 Hybrid Mode
