Mini Rock Sauna - First Tested January 9th, 2008 By Insane Reefer at Reef Central
The purpose of the Mini Rock Sauna (MRS) is to allow the hobbyist to create MLR (Manufactured (DIY) Live Rock) in a very short time-frame by using what I've dubbed as the Jiffy Rock Method (JRM). Previous efforts with the JRM produced traditional type rock, using traditional materials, that could be used in the aquarium in as little as 9 days. However the previous method is deemed flawed, and by using the original JRM, the potential for later rock failure is increased. By following the cement block industries methods for steam curing cement blocks that are equivalent to mature block of 28 days of age, the new and improved JRM has less potential for possible future rock failure.
I am not a scientist, nor am I a cementitious expert. I am a very curious monkey though, and thought there might be a faster way for people to make their own live rock at home. So I started a 6 month journey of discovery, learning as much as I could about cement - from online sources and experts I contacted, and then later on to the research articles and books from the local universities online resources. After a little trial and error (and a lot of brain freeze), and further supporting testing by volunteer Reef Central members (my Lab Monkeys), I thought I was ready to release my method. But in continuing my cement education, I had started to touch on cement failure, and learned the risk that all cement based MLR faces in the Saltwater Aquarium, and realized that the method I had formulated might have future problems. I found this to be unacceptable, so I returned to the drawing board, and with some modification and the "invention" of a new rock making device, recreated the JRM. Only time will tell if the rock created with the JRM is as stable as it's traditional counterpart, but I hope that by creating this method and making it readily available to the general public, that more people will be able or willing to make their own live rock, thereby reducing some of the stress on our diminishing reefs.
As this is a DIY project, the author (that's me), can take no responsibility for anything that goes wrong by someone implementing this method, nor is she responsible for damages or injuries that might happen to a careless or unlucky person.
You need the following "equipment":
* Pressure Cooker - the larger, the better as temperature is more easily controlled with a larger volume of water. It might be possible to use a pot with a tight fitting lid (would have to bore a hole if it doesn't have one for the knob), but I'm not sure of that. I used a $40 Mirro 8qt PC from Wal-mart, which happened to fit the parts I had, so the PC was unaltered and was used the next night to make Cassoulet (only water is in the PC, so it can still be used for food, if you don't end up drilling it).
* Cooler - Igloo chest type. Should also work with larger igloo drink dispensers and
might work with styrofoam coolers. I used a medium sized chest that my dad was going to throw out because it was "old".
* Thermometer - You almost have to go digital probe or remote for this. You can't open the lid of the MRS while in use (except in a 3 second emergency vent), but you
must monitor the temperature during the process. I used a Coralife/ESU digi probe from Petco - I think it was $12.00.
* Stovetop or hotplate/burner - I used the front small burner on my stovetop - figured it would be easier to control the temperature, and it is. A small single burner that kids use in the dorm should also work.
And you will need the following "parts":
* Approximately 4ft of hose. I used vinyl hose and it worked just fine, but use something better if you want.
* 1 Connector barb - I used nylon and it worked just fine. I used a reducing barb I happened to have in the plumbing box, but if I were to buy one for the project, I think I would get a straight connector - for joining two hoses of the same diameter.
* 1 Elbow connector - Again, I used nylon.
* 1ft of soft copper tubing that fits
into the elbow and barb - I suppose it could go the other way, the tube to the outside.
OK. You have everything. Depending on what equipment you use, you might have to be a bit creative (or destructive) to make it all fit together, but this is a DIY thread, so DIY

These were my parts.
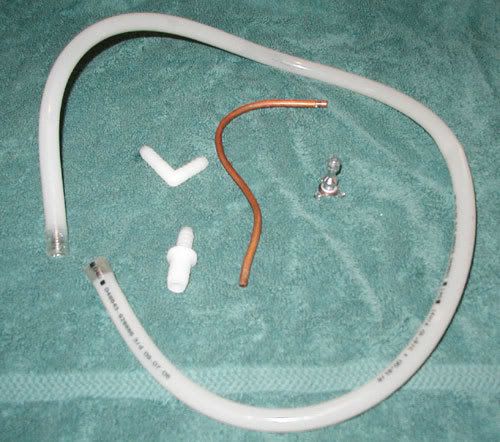
Stick the copper tube into the end of the elbow and the other end into the end of the hose barb. Bend the tube into a question mark and attach the hose to the elbow. Why a question mark? I dunno - it seemed like a good idea at the time, and since it worked, I guess it was as good as any other shape. Now, if your barb slips over the vent tube, do so, pushing it gently down all the way, and then hook the hose to the drain spout of the cooler (I had to heat the hose end a bit to get it to fit).
If your parts just don't work, you might be better off using a compression fitting and lock nut, and bore the appropriate sized hole in the lid (if needed) and proceed to fit it to the copper tubing of appropriate diameter - something like a 3/8ths fitting should work. Keep in mind that if you bore your lid, the PC will never function as it was meant to again.
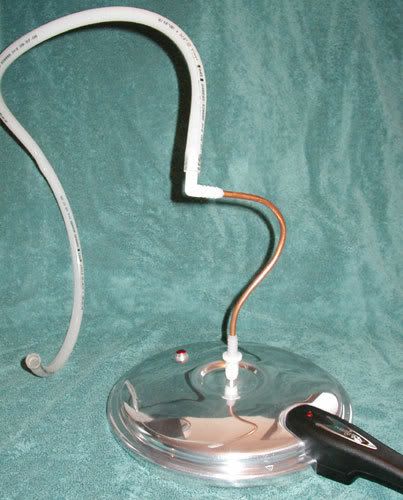
When you are done putting it together, you should have something that looks like this:
Place the temperature probe in the cooler (the wire is thin, it should still seal), and place the read-out part where you can see it clearly. Now do a trial run. This will let you get a feel for how the MRS works before committing rock to it. As we've discussed, excessive heat is bad, as is heating (or cooling) the rock too quickly, so by doing a trial run, you run less chance of mis-steaming your rock.
How to Steam Cure Your Rocks the Jiffy Rock Way
First off, let's avoid terms like "cooking" or "baking" - if you want a technical term, we are "Steam Curing at Atmosphere". Tell a cement guy that you are cooking your cement rocks and he will be looking for the dudes in white duds that
should be following just behind you
Tell the same guy that you are steam curing your rock and if he knows about steam curing, he will be interested in what you are doing - and if he doesn't know, he'll might want you to explain it to him. Humor me and call it steaming, 'k?
The digital probe I used has a Max temperature of 158°F, which, ironically, is the
exact temperature that several sources say that heat associated damages can start to occur, if pressure isn't used. I decided to keep the temp at 155°, and with a bit of fiddling, managed to stay within 1 or 2 degree's of that - except once, where I had to do an emergency vent after refilling the PC with boiling water halfway through the process.
So let's get started.
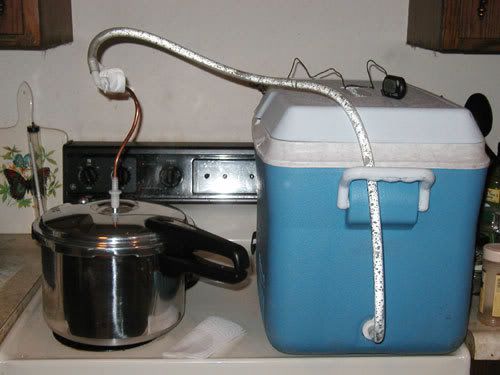
Cast your rocks 12-16 hours before the start of steam process. Be careful with this young rock as it will be soft and apt to break. If you must stack the rock in the cooler, place heavy pieces on the bottom and lighter pieces on top. Try to leave a small space around the drain spout so that blasting hot steam isn't hitting the rock directly (a few inches should be good). Once the rock is in place, close the lid, making sure the temperature probe is well placed. Use something to shim the igloo up on the drain spout side so that water that will accumulate in the cooler will not rise above the drain spout, thereby throttling the flow of steam. If you notice a steady fall in temperature, check to make sure that water isn't collecting at the spout.
Fill your PC with hot water - 2" from the top should be good - the more water, the easier temperature is to control. Bring the water to a boil, and place the lid on the PC. Arrange the hose so that the elbow is pointing slightly upwards, and the hose has a level grade from the top of the PC to the drain spout. Basically, you should see condensation run freely from the elbow to the spout, without pooling in any spot. Be careful handling the hose - it will be hot.
Adjust the stove knob to the point that the temperature in the igloo raises a little less than 1°F per minute (this should take about 2 hours). Remember, raising the temperature of rock too quickly can cause micro-fractures to the crystalline structure of the cement, and cause the potential for later rock failure.
Once you have reached the target temperature, refill the PC, if needed, with boiling water - just remove the lid, which is safe to do since the device is not under pressure - just be careful, the lid will be HOT. Check the temperature for the next 10 minutes, adjusting until the temperature is holding steady (ish) at 155°F. If you need to, you can do an "emergency vent". Wearing a protective glove or oven mitt, crack the lid of the cooler for not more than 3 seconds.
Do not lean over the lid while venting - the released steam could scald your exposed skin! Check the heat to see if it has lowered and do it again after 2 or 3 minutes, if the temperature is still to high. If you find that you have to do this often, you will want to play with the stove knob a bit more; you haven't found the "sweet spot" yet. Emergency venting should be a last resort, not the means of maintaining temperature.
Set an alarm for 5 hours. You will need to monitor the temperature during the whole steam cycle. As water evaporates, the amount of energy required to heat it becomes less, so you will need to nudge the stove knob down a bit now and again. I think I was adjusting the knob about every 20-30 minutes. Only a very slight nudge should be used - there is a very fine line between holding steady and rising or lowering the temperature. Figure on refilling the PC once more too, about halfway into the steam cycle. Be quick during refills so that loss of heat is minimized.
When the steam cycle is completed, you now need to ramp the temperature down, slowly, just like you raised it, but in reverse. I found that at about 100°F that the temp wouldn't drop anymore with the PC connected, so I pulled the hose from the coolers drain spout.
Be careful! - the cooler will have accumulated a bit of water and it will be
hot. Have a bucket handy and allow the very hot water to drain out, then just leave it alone until it reaches within 10° of room temperature.
When cooled. take your rock out and allow it to dry out overnight.
The next day, you may start to kure your rock.
Traditional water bath methods will work, and generally take 2-4 weeks to complete; the more porous the rock, the faster it will leech out to a safe pH. Using a tank heater in the kure bin will speed the kure time. This is the safest and recommended way of performing the kure, but will not produce rock within the JRM time-frame. Place the rock in a bin, bucket or barrel. Add a aquarium heater and set it to max. Change water after 12 hours, then check pH daily, changing water when it reaches 11. After it it drops lower than 11, test every couple of days and change water as needed until a pH of 7-9 is reached. You may now use your rock.
Since this steamed rock is considered "cured", and if speed is more important to you than stability (i.e. you need a bunch of sump rock
now), you may choose to use the full JRM (Steam+Acid Kure=JRM). To speed kure your rock, a very weak acid bath can be used to speed the dissolution of the calcium hydroxide and drop the pH much faster. One should be aware that the use of acid of any type to kure your rock is considered bad from a cement chemistry standpoint, and can greatly increase the chances of future rock failure. In essence, what you gain in speed, you can loose in stability. If you still want to use the full JRM, this speed kure can be accomplished but adding 1/4 cup of regular vinegar to each gallon of water used. The kure solution should be no less than 5pH. Place a tank heater (turned all the way up) in the kure bin and put your rock in to soak for 3 days. After this, rinse the rock really well, refill the bin and leave over night. Drain, refill and test the pH after 3 days. Most of the lab monkeys that helped test the JRM had pH test results in the 8-9pH range, which is safe to use. Never use rock over 9pH as the system may not be able to buffer that high of a pH. If the rock tests in the correct range, you can go ahead and start using it.
So that is it. You now have rock ready for your aquarium, and it took less effort, water and time then traditional methods usually take. I had a lot of fun working on this project, and learning about cement. I'd like to thank everyone on the thread for their comments, suggestions, help and general coolness. My cement/LR studies are going to continue, as I more fully delve into cement failure and ways that we can ensure success. My first project will be to try to improve the "kure" of MLR. As calcium hydroxide is leeched from cement, the cement is placed at greater risk of failure; basically, as I understand it at this point, the calcium hydrates in some way protect the rock from chemical attack. Carbonation is a way to convert the calcium hydroxide to calcium carbonate, which forms on the outer surfaces of the cement and works its way in. This carbonate barrier works both ways - it is supposed to "bind" the calcium hydrates into the rock, and calcium carbonate is not affected by saltwater the way cement can be. If a way can be found to reliably convert the calcium hydroxide, then traditional water kures would be rendered obsolete and indeed more harmful to the cement. So keep tuned as I explore this new avenue of MLR kuring - I will of course post my results for all to share and welcome ideas and suggestions.
If you use the JRM, please send me a message or email at
rockresults@gmail.com, Subject: "JRM", I'd be especially interested in future reports, including reports several years from now on how the JRM rock is holding up. Pictures of your creations are also welcome

Questions about the JRM are of course, welcome, but should be directed here, to the thread so that everyone else can get the answer too.
Take Care and Rock On!
